How to create EKS Cluster using Terraform MODULES?
- You can find the source code for this video in my GitHub Repo.
Intro
In this video, we're going to create an EKS cluster using open-source terraform modules. First, we will create VPC from scratch and then provision Kubernetes.
-
I'll show you how to add additional users to EKS by modifying the
aws-authconfigmap. We will create an IAM role with full access to Kubernetes API and let users to assume that role if they need access to EKS. -
To automatically scale the EKS cluster, we will deploy cluster-autoscaler using plain YAML, and kubectl terraform provider.
-
Finally, we will deploy AWS Load Balancer Controller using the helm provider and create a test ingress resource.
I also have another tutorial where I use terraform resources instead of modules to create an EKS cluster.
Create AWS VPC using Terraform
First of all, we need to define aws terraform provider. You have multiple ways to authenticate with AWS.
It will depend on how and where you run terraform. For example, if you use your laptop to create an EKS cluster, you can simply create a local AWS profile with the aws configure command.
If you run terraform from an EC2 instance, you should create an instance profile with the required IAM policies.
It's a best practice to define version constraints for each provider, but since in this video we will be using terraform aws modules, they already come with version constraints. We only need to require terraform vesion itself along with kubectl and helm providers. We will discuss later why I chose to use kubectl instead of kubernetes provider to deploy cluster autoscaler.
| terraform/0-aws-provider.tf | |
|---|---|
To create AWS VPC, we use terraform-aws-module and the latest version at this moment.
Let's call it main and provide a CIDR range. For EKS, you need at least two availability zones. Let's use us-east-1a and 1b.
Almost in all cases, you want to deploy your Kubernetes workers in the private subnets with a default route to NAT Gateway.
However, if you're going to expose your application to the internet, you would need public subnets with a default route to the Internet Gateway.
We would need to update subnet tags later in the tutorial for the AWS Load balancer controller to discover them.
Now you have multiple options for how you want to deploy the NAT gateway. You can deploy one single NAT Gateway in one availability zone or choose to create a highly available setup and deploy one NAT Gateway per zone. It depends on your budget and requirements. I always prefer to create a single NAT gateway and allocate multiple Elastic IP addresses.
Next is DNS support. It's common for many AWS services to require DNS, for example, if you want to use the EFS file system in your EKS cluster.
It's handy in some cases because it allows ReadWriteMany mode and mount a single volume to multiple Kubernetes pods.
Create EKS using Terraform
Now we have all the components that we need to create an EKS cluster. Let's call it my-eks and specify the latest supported version by AWS. Right now, it's 1.23.
If you have a bastion host or a VPN, you can enable a private endpoint and use it to access your cluster. Since we just created VPC, I don't have either one.
I would need to enable a public endpoint as well to access it from my laptop.
Next is a VPC ID that you can dynamically pull from the VPC module. You must also provide subnets to your cluster where EKS will deploy workers. Let's use only private subnets.
To grant access to your applications running in the EKS cluster, you can either attach the IAM role with required IAM policies to the nodes or use a more secure option which is to enable IAM Roles for Service Accounts.
In that way, you can limit the IAM role to a single pod. Then the node's configuration. For example, you can specify the disk size for each worker.
To run the workload on your Kubernetes cluster, you need to provision instance groups. You have three options.
- You can use EKS-managed nodes; that is recommended approach. In that way, EKS can perform rolling upgrades for you almost without downtime if you properly define PodDisruptionBudget policies.
- Then you can use self-managed groups. Basically, terraform will create a launch template with an auto-scaling group as your node pool and join the cluster. Using this approach, you would need to maintain your nodes yourself.
- Finally, you can use the Fargate profile. This option allows you to only work on your workload, and EKS will manage nodes for you. It will create a dedicated node for each of your pods. It can potentially save you money if Kubernetes is badly mismanaged.
Let's create managed node groups for this example. First is a standard node group. You can assign custom labels such as role equal to general.
It's helpful to use custom labels in Kubernetes deployment specifications in case you need to create a new node group and migrate your workload there. If you use built-in labels, they are tight to your node group.
The next group is similar, but we use spot nodes. Those nodes are cheaper, but AWS can take them at any time. Also, you can set taints on your node group.
That's all for now; let's go to the terminal and run terraform. Initialize first and then apply. Usually, it takes up to 10 minutes to create an EKS cluster.
Before you can connect to the cluster, you need to update the Kubernetes context with the following command:
Then a quick check to verify that we can access EKS.
Add IAM User & Role to EKS
Next, I want to show you how to grant access to Kubernetes workloads to other IAM users and IAM roles.
Access to the EKS is managed by using the aws-auth config map in the kube-system namespace.
Initially, only the user that created a cluster can access Kubernetes and modify that configmap.
Unless you provisioned EKS for your personal project, you most likely need to grant access to Kubernetes to your team members.
Terraform module that we used to create an EKS can manage permissions on your behalf. You have two options.
-
You can add IAM users
directlyto the eks configmap. In that case, whenever you need to add someone to the cluster, you need to update the aws-auth configmap, which is not very convenient. -
The second, much better approach is to grant access to the IAM role just once using the aws-auth configmap, and then you can simply allow users outside of EKS to assume that role. Since IAM groups are not supported in EKS, this is the preferred option.
In this example, we create an IAM role with the necessary permissions and allow the IAM user to assume that role.
First, let's create an allow-eks-access IAM policy with eks:DescribeCluster action.
This action is needed to initially update the Kubernetes context and get access to the cluster.
Next is the IAM role that we will use to access the cluster.
Let's call it eks-admin since we're going to bind it with the Kubernetes system:masters RBAC group with full access to the Kubernetes API.
Optionally this module allows you to enable two-factor authentication, but it's out of the scope of this tutorial.
Then attach the IAM policy that we just created and, most importantly, define trusted role arns.
By specifying the root potentially, every IAM user in your account could use this role.
To allow the user to assume this role, we still need to attach an additional policy to the user.
The IAM role is ready, now let's create a test IAM user that gets access to that role.
Let's call it user1 and disable creating access keys and login profiles. We will generate those from the UI.
| terraform/3-iam.tf | |
|---|---|
Then IAM policy to allow assume eks-admin IAM role.
Finally, we need to create an IAM group with the previous policy and put our user1 in this group.
Let's go ahead and apply terraform to create all those IAM entities.
Now let's generate new credentials for user1 and create a local AWS profile.
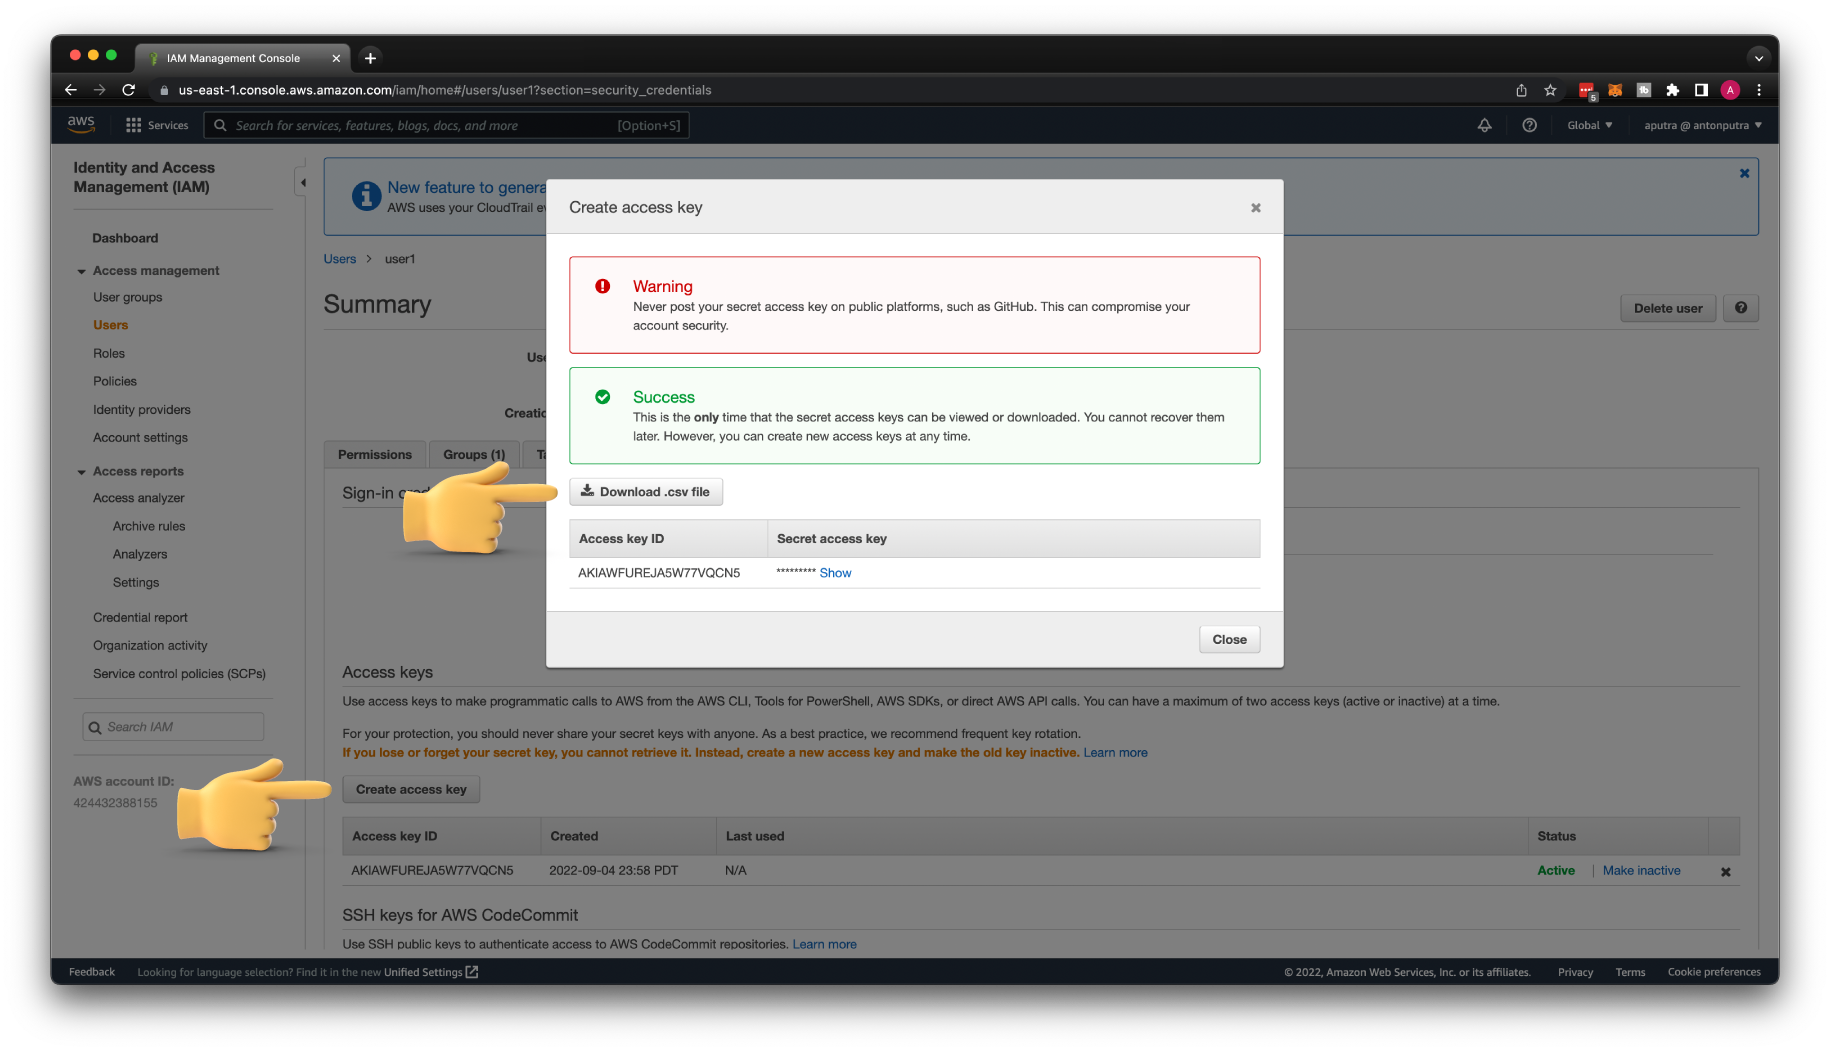
To create an AWS profile, you need to run aws configure and provide the profile name, in our case, user1.
Then verify that you can access AWS services with that profile.
To let user1 to assume the eks-admin IAM role, we need to create another AWS profile with the role name.
You need to replace role_arn with yours.
| ~/.aws/config | |
|---|---|
Let's test if we can assume the eks-admin IAM role.
Now we can update Kubernetes config to use the eks-admin IAM role.
If you try to access EKS right now, you'll get an error saying You must be logged in to the server (Unauthorized).
To add the eks-admin IAM role to the EKS cluster, we need to update the aws-auth configmap.
| terraform/2-eks.tf | |
|---|---|
Also, you need to authorize terraform to access Kubernetes API and modify aws-auth configmap. To do that, you need to define terraform kubernetes provider.
To authenticate with the cluster, you can use either use token which has an expiration time or an exec block to retrieve this token on each terraform run.
Now you can run terraform.
Let's check if we can access the cluster using the eks-admin role.
Since we mapped the eks-admin role with the Kubernetes system:masters RBAC group, we have full access to the Kubernetes API.
Suppose you want to grant read-only access to the cluster, for example, for your developers. You can create a custom Kubernetes RBAC group and map it to the IAM role.
Deploy Cluster Autoscaler
One of the many reasons we chose to use Kubernetes is that it can automatically scale based on the load. To autoscale the Kubernetes cluster, you need to deploy an additional component. You also have at least two options.
-
You can deploy Karpenter, which creates Kubernetes nodes using EC2 instances. Based on your workload, it can select the appropriate EC2 instance type. I have a video dedicated to Karpenter if you want to learn more.
-
The second option is to use cluster-autoscaler. It uses auto-scaling groups to adjust the
desired sizebased on your load.
In my opinion, Karpenter would be a more efficient way to scale Kubernetes because it's not tight to the auto-scaling group.
It is something between cluster-autoscaler and Fargate profile.
Since I already have a dedicated tutorial for Karpenter, let's deploy cluster-autoscaler in this video.
We have already created OpenID connect provider to enable IAM roles for service accounts.
Now we can use another terraform module, iam-role-for-service-accounts-eks, to create an IAM role for the cluster-autoscaler.
It needs AWS permissions to access and modify AWS auto-scaling groups. Let's call this role cluster-autoscaler.
Then we need to specify the Kubernetes namespace and a service account name where we're going to deploy cluster-autoscaler.
Now let's deploy autoscaler to Kubernetes. We're going to use Helm next to deploy the AWS load balancer controller.
To give you other options, I'll use plain YAML to deploy cluster-autoscaler. For YAML, you can use the kubernetes provider that we have already defined, or you can use the kubectl provider.
-
With the
kubernetesprovider, there is no option, for now, to wait till EKS is provisioned before applying YAML. In that case, you would need to split your workflow of creating EKS into two parts. First, create a cluster, then apply terraform again and deploy autoscaler. -
On the other hand, the
kubectlprovider can wait till EKS is ready and then apply YAML in a single workflow.
When deploying autoscaller, preferably, you need to match the EKS version with the autoscaler version.
| terraform/5-autoscaler-manifest.tf | |
|---|---|
1 2 3 4 5 6 7 8 9 10 11 12 13 14 15 16 17 18 19 20 21 22 23 24 25 26 27 28 29 30 31 32 33 34 35 36 37 38 39 40 41 42 43 44 45 46 47 48 49 50 51 52 53 54 55 56 57 58 59 60 61 62 63 64 65 66 67 68 69 70 71 72 73 74 75 76 77 78 79 80 81 82 83 84 85 86 87 88 89 90 91 92 93 94 95 96 97 98 99 100 101 102 103 104 105 106 107 108 109 110 111 112 113 114 115 116 117 118 119 120 121 122 123 124 125 126 127 128 129 130 131 132 133 134 135 136 137 138 139 140 141 142 143 144 145 146 147 148 149 150 151 152 153 154 155 156 157 158 159 160 161 162 163 164 165 166 167 168 169 170 171 172 173 174 175 176 177 178 179 180 181 182 183 184 185 186 187 188 189 190 191 192 193 194 195 196 197 198 199 200 201 202 | |
Go back to the terminal and apply terraform.
Verify that the autoscaler is running.
To test autoscaler, let's create nginx deployment.
| k8s/nginx.yaml | |
|---|---|
In a separate terminal, you can watch autoscaler logs just to make sure you don't have any errors.
Now let's apply nginx Kubernetes deployment.
In a few seconds, you should get a few more nodes.
Deploy AWS Load Balancer Controller
Finally, let's deploy the AWS Load Balancer Controller to the EKS cluster.
You can use it to create ingresses as well as services of type LoadBalancer.
For the ingress load balancer controller creates an application load balancer, and for the service, it creates a network load balancer.
I also have a detailed tutorial and a bunch of examples of how to use this controller. In this video, we are going to deploy it with Helm and quickly verify that we can create ingress.
Since we're going to deploy a load balancer controller with Helm, we need to define terraform helm provider first.
Similar to cluster-autoscaler, we need to create an IAM role for the load balancer controller with permissions to create and manage AWS load balancers. We're going to deploy it to the same kube-system namespace in Kubernetes.
Then the helm release. By default, it creates two replicas, but for the demo, we can use a single one. Then you need to specify the EKS cluster name, Kubernetes service account name and provide annotation to allow this service account to assume the AWS IAM role.
The load balancer controller uses tags to discover subnets in which it can create load balancers.
We also need to update terraform vpc module to include them.
It uses an elb tag to deploy public load balancers to expose services to the internet and internal-elb for the private load balancers to expose services only within your VPC.
| terraform/1-vpc.tf | |
|---|---|
The last change that we need to make in our EKS cluster is to allow access from the EKS control plane to the webhook port of the AWS load balancer controller.
| terraform/2-eks.tf | |
|---|---|
We're done with terraform; now let's apply.
Check if the controller is running.
You can watch logs with the following command.
To test, let's create an echo server deployment with ingress.
Then apply the YAML.
To make ingress work, we need to create a CNAME record. Get the application load balancer DNS name and create a CNAME record in your DNS hosting provider.
In a few minutes, you can try to access your ingress.