Skip to content

How to create Application Load Balancer using Terraform? (AWS ALB | HTTPS)

  • You can find the source code for this video in my GitHub Repo.

Intro

In this video, we will create an application load balancer in AWS using Terraform.

  • In the first example, we will manually register EC2 instances to the load balancer. This approach is useful when you have a stateful application, and you cannot use an auto-scaling group.
  • In the second example, we will use an auto-scaling group that will automatically spin up new EC2 instances based on the load and registers them with the target group that belongs to the load balancer. It's perfect for stateless applications such as REST APIs or other web services.

For the demo, we will create a Golang REST API and use Packer to build an AMI image. Packer build will also include a test suite to verify that our app is properly installed.

Create Golang REST API

First of all, we need an application that we can use to create a demo with the application load balancer. I decided to build one instead of using one of the open-source demo apps for two reasons.

  • First, I want my app to serve traffic and expose health check on different ports. Typically you would have an app that listens on port 8080, for example, and it may have a very simple health check for DevOps to quickly check the status of the app. It may be exposed to the Internet as well. But you also want to implement a proper health check endpoint that can verify all necessary dependencies for the app. It can check the database connection, response duration, etc. Those health checks should not be exposed to the Internet and only be used by your monitoring tools and a load balancer to route traffic to only healthy hosts. Our app will listen on port 8080, will have a simple /ping endpoint, and expose a health check on port 8081.

  • The second reason I want to show you is how to build a packer image and run tests to verify that the app is installed correctly.

I chose to use Go lang for the app. We will use a Gin web framework to build a simple REST api. Let's import all necessary libraries. To create two http web servers, we would need an errgroup.

my-app/main.go
package main

import (
    "log"
    "net/http"
    "os"
    "time"

    "github.com/gin-gonic/gin"
    "golang.org/x/sync/errgroup"
)

var (
    g errgroup.Group
)

Next, let's create a getHostname handler for the /hostname endpoint. It returns the hostname reported by the kernel of the node where the app is running.

my-app/main.go
// getHostname returns the host name reported by the kernel.
func getHostname(c *gin.Context) {
    name, err := os.Hostname()
    if err != nil {
        panic(err)
    }
    c.IndentedJSON(http.StatusOK, gin.H{"hostname": name})
}

Then create another handler for the health check. Right now, it returns JSON with status ready, but in practice, it should check all the dependencies for the app, such as database connection.

my-app/main.go
// getHealthStatus returns the health status of your API.
func getHealthStatus(c *gin.Context) {
    c.JSON(http.StatusOK, gin.H{"status": "ready"})
}

Optionally you can have an endpoint to quickly check the status of the app. It can be exposed to the internet.

my-app/main.go
// ping quick check to verify API status.
func ping(c *gin.Context) {
    c.JSON(http.StatusOK, gin.H{"message": "pong"})
}

Now we need to create two routes. The first main router will provide /hostname and /ping endpoint on port 8080.

my-app/main.go
func mainRouter() http.Handler {
    engine := gin.New()
    engine.Use(gin.Recovery())
    engine.GET("/hostname", getHostname)
    engine.GET("/ping", ping)
    return engine
}

The job for the second router is to only serve the /health endpoint on port 8081.

my-app/main.go
func healthRouter() http.Handler {
    engine := gin.New()
    engine.Use(gin.Recovery())
    engine.GET("/health", getHealthStatus)
    return engine
}

In the main function, we need to initialize servers and associate them with corresponding routers. Then spin up goroutines for the main server and for the health server.

my-app/main.go
func main() {
    mainServer := &http.Server{
        Addr:         ":8080",
        Handler:      mainRouter(),
        ReadTimeout:  5 * time.Second,
        WriteTimeout: 10 * time.Second,
    }

    healthServer := &http.Server{
        Addr:         ":8081",
        Handler:      healthRouter(),
        ReadTimeout:  5 * time.Second,
        WriteTimeout: 10 * time.Second,
    }

    g.Go(func() error {
        err := mainServer.ListenAndServe()
        if err != nil && err != http.ErrServerClosed {
            log.Fatal(err)
        }
        return err
    })

    g.Go(func() error {
        err := healthServer.ListenAndServe()
        if err != nil && err != http.ErrServerClosed {
            log.Fatal(err)
        }
        return err
    })

    if err := g.Wait(); err != nil {
        log.Fatal(err)
    }
}

You can find go.mod and go.sum in my GitHub repository.

Create AWS VPC

As always, to make this tutorial self-contained, let's create AWS VPC using terraform.

We will start with defining aws provider and setting up version constraints for the provider and terraform itself.

terraform/0-provider.tf
provider "aws" {
  region = "us-east-1"
}

terraform {
  required_providers {
    aws = {
      source  = "hashicorp/aws"
      version = "~> 4.30.0"
    }
  }

  required_version = "~> 1.0"
}

Then the VPC resource with CIDR range /16, which will give us around 65 thousand IP addresses.

terraform/1-vpc.tf
1
2
3
4
5
6
7
resource "aws_vpc" "main" {
  cidr_block = "10.0.0.0/16"

  tags = {
    Name = "main"
  }
}

Internet Gateway to provide internet access for public subnets.

terraform/2-igw.tf
1
2
3
4
5
6
7
resource "aws_internet_gateway" "igw" {
  vpc_id = aws_vpc.main.id

  tags = {
    Name = "igw"
  }
}

Then let's define two private and two public subnets.

terraform/3-subnets.tf
resource "aws_subnet" "private_us_east_1a" {
  vpc_id            = aws_vpc.main.id
  cidr_block        = "10.0.0.0/19"
  availability_zone = "us-east-1a"

  tags = {
    "Name" = "private-us-east-1a"
  }
}

resource "aws_subnet" "private_us_east_1b" {
  vpc_id            = aws_vpc.main.id
  cidr_block        = "10.0.32.0/19"
  availability_zone = "us-east-1b"

  tags = {
    "Name" = "private-us-east-1b"
  }
}

resource "aws_subnet" "public_us_east_1a" {
  vpc_id                  = aws_vpc.main.id
  cidr_block              = "10.0.64.0/19"
  availability_zone       = "us-east-1a"
  map_public_ip_on_launch = true

  tags = {
    "Name" = "public-us-east-1a"
  }
}

resource "aws_subnet" "public_us_east_1b" {
  vpc_id                  = aws_vpc.main.id
  cidr_block              = "10.0.96.0/19"
  availability_zone       = "us-east-1b"
  map_public_ip_on_launch = true

  tags = {
    "Name" = "public-us-east-1b"
  }
}

NAT Gateway to provide Internet access in private subnets along with Elastic IP address.

terraform/4-nat.tf
resource "aws_eip" "nat" {
  vpc = true

  tags = {
    Name = "nat"
  }
}

resource "aws_nat_gateway" "nat" {
  allocation_id = aws_eip.nat.id
  subnet_id     = aws_subnet.public_us_east_1a.id

  tags = {
    Name = "nat"
  }

  depends_on = [aws_internet_gateway.igw]
}

Finally, the route tables to associate private subnets with NAT Gateway and public subnets with Internet Gateway.

terraform/5-routes.tf
resource "aws_route_table" "private" {
  vpc_id = aws_vpc.main.id

  route {
    cidr_block     = "0.0.0.0/0"
    nat_gateway_id = aws_nat_gateway.nat.id
  }

  tags = {
    Name = "private"
  }
}

resource "aws_route_table" "public" {
  vpc_id = aws_vpc.main.id

  route {
    cidr_block = "0.0.0.0/0"
    gateway_id = aws_internet_gateway.igw.id
  }

  tags = {
    Name = "public"
  }
}

resource "aws_route_table_association" "private_us_east_1a" {
  subnet_id      = aws_subnet.private_us_east_1a.id
  route_table_id = aws_route_table.private.id
}

resource "aws_route_table_association" "private_us_east_1b" {
  subnet_id      = aws_subnet.private_us_east_1b.id
  route_table_id = aws_route_table.private.id
}

resource "aws_route_table_association" "public_us_east_1a" {
  subnet_id      = aws_subnet.public_us_east_1a.id
  route_table_id = aws_route_table.public.id
}

resource "aws_route_table_association" "public_us_east_1b" {
  subnet_id      = aws_subnet.public_us_east_1b.id
  route_table_id = aws_route_table.public.id
}

To create all these networking components, initialize terraform and apply.

terraform init
terraform apply

Create Packer Image

Now let's create a packer AMI image and install my-app. We're going to use this image in the terraform code to create EC2 instances in the first example and to create a launch template and auto scaling group in the second one.

Similar to terraform, we can explicitly require providers and set version constraints. In this case, we want an amazon provider equal to or higher than 1.1.4.

packer/my-app.pkr.hcl
1
2
3
4
5
6
7
8
packer {
  required_plugins {
    amazon = {
      version = "~> v1.1.4"
      source  = "github.com/hashicorp/amazon"
    }
  }
}

Next is the amazon-ebs Packer builder that is able to create Amazon AMIs backed by EBS volumes for use in EC2.

  • In this resource, we can define the AMI image name; to make it unique, we can use a timestamp.
  • Depending on the resource requirements for the build, you can select the appropriate instance_type. This is not the instance type to run the app; it's a temporary EC2 instance to build the image only. It will be destroyed right after the Packer finishes the installation.
  • We also need to specify where we want to build this image; in my case, it will be us-east-1.
  • From the AWS console, find the ID of the public subnet with the default route to the internet gateway and use in subnet_id. You can use private subnets only if you have a VPN or you run Packer inside the AWS VPC.
  • To find a base image (Ubuntu 22.04 LTS) for Packer in our region, we can use source_ami_filter.
  • Then based on your Linux distribution, specify the default user for Packer to ssh. For Ubuntu, it's an ubuntu user; if you use Amazon Linux 2 or the Amazon Linux AMI, the user name is ec2-user, and so forth.
packer/my-app.pkr.hcl
source "amazon-ebs" "my-app" {
  ami_name      = "my-app-{{ timestamp }}"
  instance_type = "t3.small"
  region        = "us-east-1"
  subnet_id     = "subnet-0849265f27f387c50"

  source_ami_filter {
    filters = {
      name                = "ubuntu/images/*ubuntu-jammy-22.04-amd64-server-*"
      root-device-type    = "ebs"
      virtualization-type = "hvm"
    }
    most_recent = true
    owners      = ["099720109477"]
  }

  ssh_username = "ubuntu"

  tags = {
    Name = "My App"
  }
}

Then the build section.

  • For the source, select the amazon-ebs resource that we just created.
  • To copy local files from your machine where you run Packer, you can use file provisioner. Always copy your files to the temporary directory and then use scripts or inline commands to move them to the correct destinations. We will create all these local files in a minute.
  • To execute arbitrary commands inside the EC2, you can use a script or scripts if you have more than one that you want to execute.
  • Also, you can use inline commands; for example, we need to move the systemd service file to /etc, start the service, and enable it.
  • Optionally you can run some tests for your image, but for that, you need to additionally install inspect tool on your machine. You can skip this step by commenting out this provisioner.
packer/my-app.pkr.hcl
build {
  sources = ["source.amazon-ebs.my-app"]

  provisioner "file" {
    destination = "/tmp"
    source      = "files"
  }

  provisioner "shell" {
    script = "scripts/bootstrap.sh"
  }

  provisioner "shell" {
    inline = [
      "sudo mv /tmp/files/my-app.service /etc/systemd/system/my-app.service",
      "sudo systemctl start my-app",
      "sudo systemctl enable my-app"
    ]
  }

  # Requires inspec to be installed on the host system: https://github.com/inspec/inspec
  # For mac, run "brew install chef/chef/inspec"
  provisioner "inspec" {
    inspec_env_vars = ["CHEF_LICENSE=accept"]
    profile         = "inspec"
    extra_arguments = ["--sudo", "--reporter", "html:/tmp/my-app-index.html"]
  }
}

Next, we need to create all those local files. Let's start with the systemd service definition.

  • The important part here is to specify the ExecStart command and configure Restart if the app exits or fails for some reason.
  • You can also declare environment variables; for example, set GIN_MODE to release to run this app in production mode.
packer/files/my-app.service
[Unit]
Description=My App
After=network.target
StartLimitIntervalSec=0

[Service]
Type=simple
ExecStart=/home/ubuntu/go/bin/my-app

User=ubuntu

Environment=GIN_MODE=release

Restart=always
RestartSec=1

[Install]
WantedBy=multi-user.target

Then the script to install our Go app. Typically you would have a CI pipeline that builds the source and produces the binary you can install on the EC2 instance. You don't need to install golang on ubuntu; it's just to simplify this process. You can use exactly the same script and install this app from my repo.

packer/scripts/bootstrap.sh
1
2
3
4
5
6
#!/bin/bash

set -e

sudo apt-get -y install golang-go
go install github.com/antonputra/tutorials/lessons/127/my-app@main

Optionally you can create a test suit for your AMI image.

packer/inspec/inspec.yml
1
2
3
4
5
6
7
8
---
name: my-app-validation
title: My App AMI Validation
maintainer: DevOps
copyright: DevOps
license: MIT license
summary: Test suite for My App
version: 1.0.1

To create tests, you can use ruby language and built-in functions to test different scenarios. For example, we can verify that the systemd file exists and that the service is installed and running.

packer/inspec/controls/test-my-app.rb
title 'Ensure my-app is properly installed and running'

    describe file('/etc/systemd/system/my-app.service') do
        it { should exist }
    end

    describe service('my-app') do
        it { should be_installed }
        it { should be_enabled }
        it { should be_running }
    end

We're ready to build the AMI image with Packer.

packer build my-app.pkr.hcl

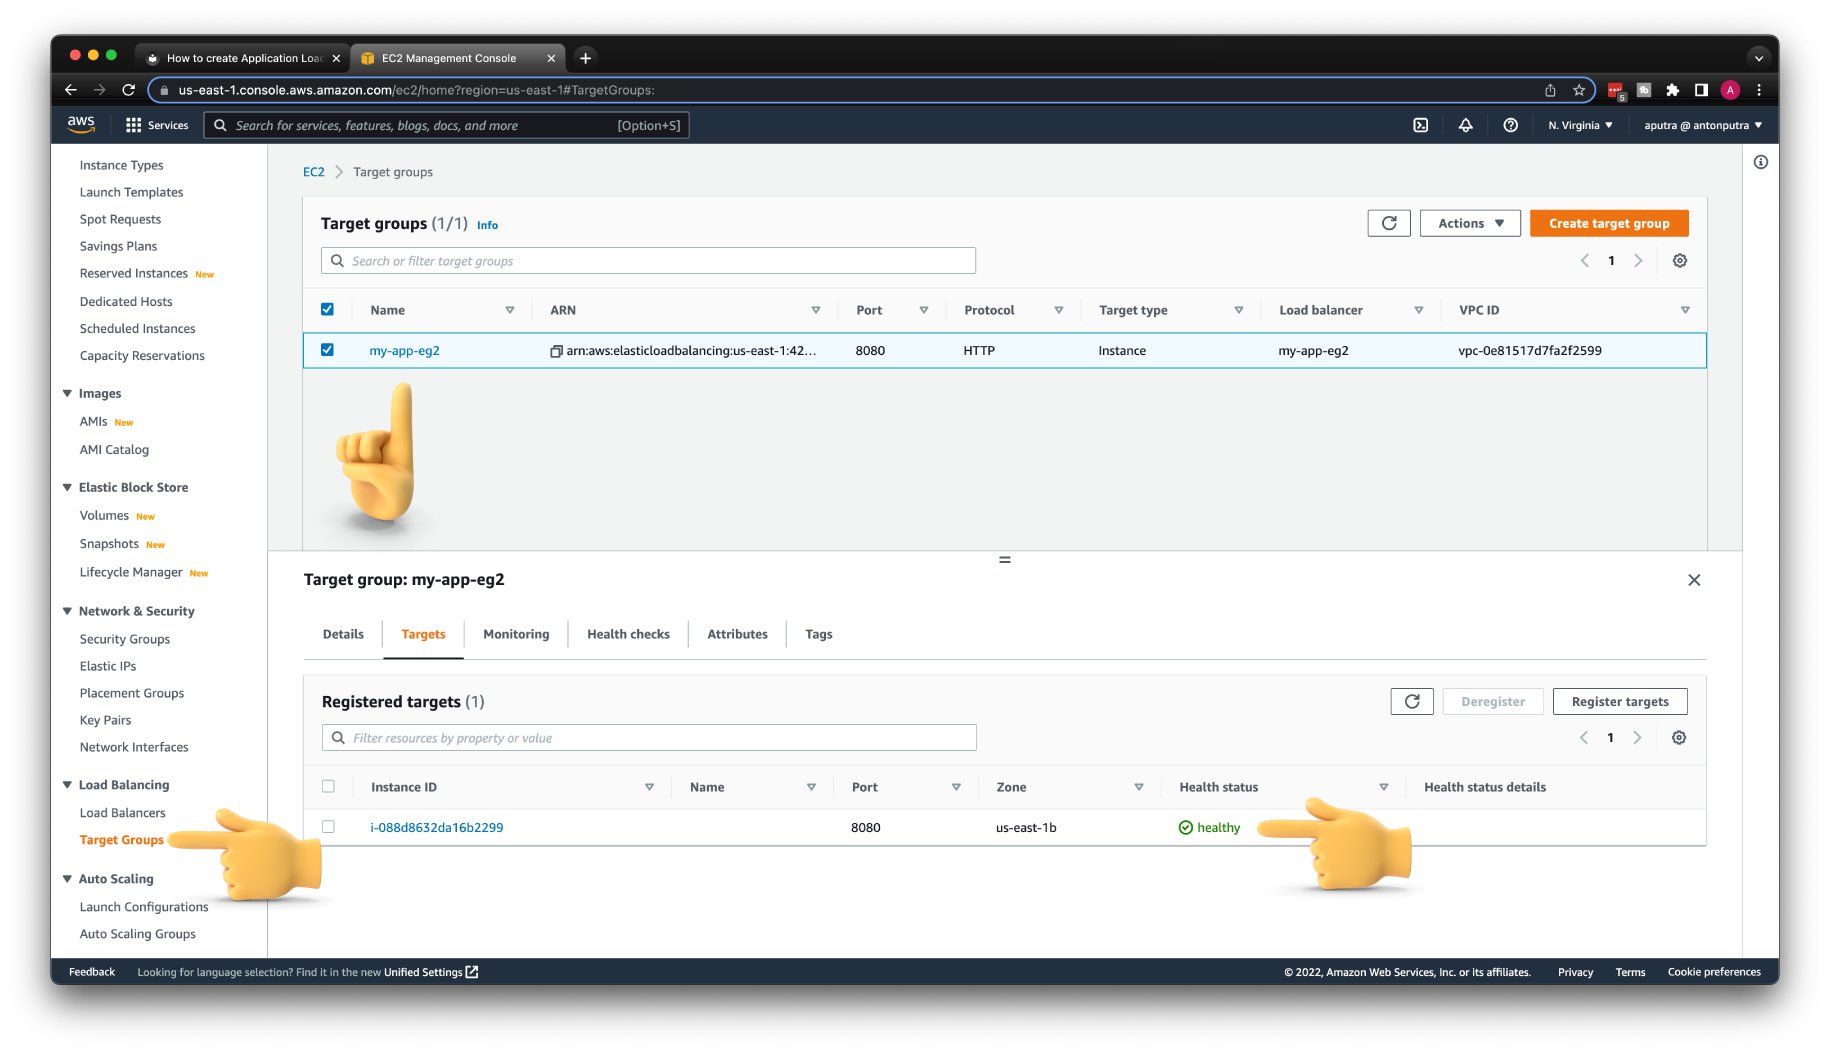
Create AWS ALB with EC2 backend

In the first example, we will create an application load balancer and manually register EC2 instances. This approach is common when you have a stateful application or maybe even a database where you don't want to use an auto-scaling group.

When you need to create multiple EC2 instances or any other resources, the best way is to use a map instead of a count variable. In that case, you can target individual instances, for example, if you need to scale one single EC2 or increase a disk size.

In this example, we have two instances of the app with instance type and subnet id to spread them between different availability zones.

terraform/6-example-1.tf
locals {
  web_servers = {
    my-app-00 = {
      machine_type = "t3.micro"
      subnet_id    = aws_subnet.private_us_east_1a.id
    }
    my-app-01 = {
      machine_type = "t3.micro"
      subnet_id    = aws_subnet.private_us_east_1b.id
    }
  }
}

The application load balancer can have its own security group compared to the network load balancer that inherits security rules from the EC2 instances. Since we need to create two security groups and reference them in each other, we need to use the aws_security_group terraform resource to create an empty security group and separately aws_security_group_rule to open ports. Otherwise, you will get a cyclic dependency error.

Create one security group for the EC2 instances and the second one for the application load balancer.

terraform/6-example-1.tf
resource "aws_security_group" "ec2_eg1" {
  name   = "ec2-eg1"
  vpc_id = aws_vpc.main.id
}

resource "aws_security_group" "alb_eg1" {
  name   = "alb-eg1"
  vpc_id = aws_vpc.main.id
}
  • Now we need to open the main 8080 port from the application load balancer to the EC2 instance.
  • Then the 8081 port for the health check.
  • When you create a security group with terraform, it will automatically remove all egress rules. If your app requires internet access, you can open it with the full_egree_ec2 resource, which is a good starting point.
terraform/6-example-1.tf
resource "aws_security_group_rule" "ingress_ec2_traffic" {
  type                     = "ingress"
  from_port                = 8080
  to_port                  = 8080
  protocol                 = "tcp"
  security_group_id        = aws_security_group.ec2_eg1.id
  source_security_group_id = aws_security_group.alb_eg1.id
}

resource "aws_security_group_rule" "ingress_ec2_health_check" {
  type                     = "ingress"
  from_port                = 8081
  to_port                  = 8081
  protocol                 = "tcp"
  security_group_id        = aws_security_group.ec2_eg1.id
  source_security_group_id = aws_security_group.alb_eg1.id
}

# resource "aws_security_group_rule" "full_egress_ec2" {
#   type              = "egress"
#   from_port         = 0
#   to_port           = 0
#   protocol          = "-1"
#   security_group_id = aws_security_group.ec2_eg1.id
#   cidr_blocks       = ["0.0.0.0/0"]
# }

Next, firewall rules for the application load balancer.

  • First, we want to open port 80 for all incoming requests from the internet. In the following example, we will use HTTPS.
  • Then we need to open the egress rule to redirect requests to the EC2 instances. Also, we need one rule for the health check.
terraform/6-example-1.tf
resource "aws_security_group_rule" "ingress_alb_traffic" {
  type              = "ingress"
  from_port         = 80
  to_port           = 80
  protocol          = "tcp"
  security_group_id = aws_security_group.alb_eg1.id
  cidr_blocks       = ["0.0.0.0/0"]
}

resource "aws_security_group_rule" "egress_alb_traffic" {
  type                     = "egress"
  from_port                = 8080
  to_port                  = 8080
  protocol                 = "tcp"
  security_group_id        = aws_security_group.alb_eg1.id
  source_security_group_id = aws_security_group.ec2_eg1.id
}

resource "aws_security_group_rule" "egress_alb_health_check" {
  type                     = "egress"
  from_port                = 8081
  to_port                  = 8081
  protocol                 = "tcp"
  security_group_id        = aws_security_group.alb_eg1.id
  source_security_group_id = aws_security_group.ec2_eg1.id
}

Now we can create EC2 instances.

  • To iterate over the map object with EC2 instances, you can use the for_each function.
  • Then specify the AMI ID that you got from the Packer output, or you can find it in the AWS console under Amazon Machine Images.
  • We can use the machine_type attribute for instance type.
  • If you plan to ssh to the instance, you can specify the key_name. I would suggest to use a session manager instead.
  • Then the subnet_id is where to create the virtual machine.
  • Finally, use the security group that we defined earlier.
terraform/6-example-1.tf
resource "aws_instance" "my_app_eg1" {
  for_each = local.web_servers

  ami           = "ami-07309549f34230bcd"
  instance_type = each.value.machine_type
  key_name      = "devops"
  subnet_id     = each.value.subnet_id

  vpc_security_group_ids = [aws_security_group.ec2_eg1.id]

  tags = {
    Name = each.key
  }
}

The application load balancer uses the target group to distribute traffic to your application instances.

  • Our app listens on port 8080 using the plain HTTP protocol.
  • You need to provide a VPC id, and optionally you can configure slow_start if your application needs time to warm up. The default value is 0.
  • Then you can select the algorithm type; the default is round_robin, but you can also choose least_outstanding_requests.
  • There is also an optional block for stickiness if you need it; I will disable it for now.
  • The health check block is very important. If the health check on the EC2 instance fails, the load balancer removes it from the pool. First, you need to enable it. Then specify port 8081 for the health check. The protocol is HTTP and /health endpoint. You can customize the status code. To indicate that the instance is healthy, I send a 200 status code.
terraform/6-example-1.tf
resource "aws_lb_target_group" "my_app_eg1" {
  name       = "my-app-eg1"
  port       = 8080
  protocol   = "HTTP"
  vpc_id     = aws_vpc.main.id
  slow_start = 0

  load_balancing_algorithm_type = "round_robin"

  stickiness {
    enabled = false
    type    = "lb_cookie"
  }

  health_check {
    enabled             = true
    port                = 8081
    interval            = 30
    protocol            = "HTTP"
    path                = "/health"
    matcher             = "200"
    healthy_threshold   = 3
    unhealthy_threshold = 3
  }
}

To manually register EC2 instances to the target group, you need to iterate over each virtual machine and attach it to the group using the traffic 8080 port.

terraform/6-example-1.tf
resource "aws_lb_target_group_attachment" "my_app_eg1" {
  for_each = aws_instance.my_app_eg1

  target_group_arn = aws_lb_target_group.my_app_eg1.arn
  target_id        = each.value.id
  port             = 8080
}

Now the load balancer itself. There are two schemas available to you in AWS.

  • You can make the load balancer private, which can be accessed only within VPC, or make it public to accept requests from the internet.
  • Then the load balancer type, which is the application load balancer and dedicated security group that allows requests on port 80 and outbound traffic to EC2 instances on ports 8080 and 8081.
  • Optionally you can enable access_logs that can be stored in an S3 bucket. In the log, you can find who initiated the connection to your load balancer. It can be costly if you have a lot of traffic.
  • For the load balancer, you also need to specify subnets where you want to provision it. Since it's a public load balancer, I will pick public subnets.
terraform/6-example-1.tf
resource "aws_lb" "my_app_eg1" {
  name               = "my-app-eg1"
  internal           = false
  load_balancer_type = "application"
  security_groups    = [aws_security_group.alb_eg1.id]

  # access_logs {
  #   bucket  = "my-logs"
  #   prefix  = "my-app-lb"
  #   enabled = true
  # }

  subnets = [
    aws_subnet.public_us_east_1a.id,
    aws_subnet.public_us_east_1b.id
  ]
}

Each load balancer needs a listener to accept incoming requests.

  • In the listener, you can define the port; in our case, it's 80, and a protocol which is plain HTTP.
  • Also, you need an default_action to route traffic somewhere. Here we forward all incoming requests to our target group on port 8080.
terraform/6-example-1.tf
resource "aws_lb_listener" "http_eg1" {
  load_balancer_arn = aws_lb.my_app_eg1.arn
  port              = "80"
  protocol          = "HTTP"

  default_action {
    type             = "forward"
    target_group_arn = aws_lb_target_group.my_app_eg1.arn
  }
}

We are ready to create the first load balancer. Head over to the terminal and apply terraform.

terraform apply

You can get the hostname of the load balancer and use it to test the app. First, let's try the /ping endpoint with curl. It should return {"message":"pong"} and 200 status code.

curl -i my-app-eg1-221258210.us-east-1.elb.amazonaws.com/ping

Also, you can access the /hostname endpoint.

curl -i my-app-eg1-221258210.us-east-1.elb.amazonaws.com/hostname

But if you try to hit the /health endpoint, you'll get 404 page not found because it is only accessible by the application load balancer.

curl -i my-app-eg1-221258210.us-east-1.elb.amazonaws.com/health

Create AWS ALB with Auto Scaling Group

In the second example, instead of manually registering EC2 instances, we will attach an application load balancer to the auto-scaling group. Based on the load, it can scale up or down the number of EC2 instances to handle the traffic.

For this example, we don't need a map with EC2 instances, but we need the same security groups. We can reuse security groups from example one, but to make it a self-contain example, let's quickly recreate them.

terraform/7-example-2.tf
1
2
3
4
5
6
7
8
9
resource "aws_security_group" "ec2_eg2" {
  name   = "ec2-eg2"
  vpc_id = aws_vpc.main.id
}

resource "aws_security_group" "alb_eg2" {
  name   = "alb-eg2"
  vpc_id = aws_vpc.main.id
}

Then the same firewall rules for the EC2 security group.

terraform/7-example-2.tf
resource "aws_security_group_rule" "ingress_ec2_eg2_traffic" {
  type                     = "ingress"
  from_port                = 8080
  to_port                  = 8080
  protocol                 = "tcp"
  security_group_id        = aws_security_group.ec2_eg2.id
  source_security_group_id = aws_security_group.alb_eg2.id
}

resource "aws_security_group_rule" "ingress_ec2_eg2_health_check" {
  type                     = "ingress"
  from_port                = 8081
  to_port                  = 8081
  protocol                 = "tcp"
  security_group_id        = aws_security_group.ec2_eg2.id
  source_security_group_id = aws_security_group.alb_eg2.id
}

# resource "aws_security_group_rule" "full_egress_ec2_eg2" {
#   type              = "egress"
#   from_port         = 0
#   to_port           = 0
#   protocol          = "-1"
#   security_group_id = aws_security_group.ec2_eg2.id
#   cidr_blocks       = ["0.0.0.0/0"]
# }

Now for the application load balancer, we need to open an additional 443 port to handle HTTPS traffic.

terraform/7-example-2.tf
resource "aws_security_group_rule" "ingress_alb_eg2_http_traffic" {
  type              = "ingress"
  from_port         = 80
  to_port           = 80
  protocol          = "tcp"
  security_group_id = aws_security_group.alb_eg2.id
  cidr_blocks       = ["0.0.0.0/0"]
}

resource "aws_security_group_rule" "ingress_alb_eg2_https_traffic" {
  type              = "ingress"
  from_port         = 443
  to_port           = 443
  protocol          = "tcp"
  security_group_id = aws_security_group.alb_eg2.id
  cidr_blocks       = ["0.0.0.0/0"]
}

resource "aws_security_group_rule" "egress_alb_eg2_traffic" {
  type                     = "egress"
  from_port                = 8080
  to_port                  = 8080
  protocol                 = "tcp"
  security_group_id        = aws_security_group.alb_eg2.id
  source_security_group_id = aws_security_group.ec2_eg2.id
}

resource "aws_security_group_rule" "egress_alb_eg2_health_check" {
  type                     = "egress"
  from_port                = 8081
  to_port                  = 8081
  protocol                 = "tcp"
  security_group_id        = aws_security_group.alb_eg2.id
  source_security_group_id = aws_security_group.ec2_eg2.id
}

Instead of creating EC2 instances, we need to define launch_template. The auto-scaling group will use it to spin up new VMs.

  • Replace image_id with the packer IAM image and key_name with yours.
terraform/7-example-2.tf
resource "aws_launch_template" "my_app_eg2" {
  name                   = "my-app-eg2"
  image_id               = "ami-07309549f34230bcd"
  key_name               = "devops"
  vpc_security_group_ids = [aws_security_group.ec2_eg2.id]
}

The target group and a health check are exactly the same.

terraform/7-example-2.tf
resource "aws_lb_target_group" "my_app_eg2" {
  name     = "my-app-eg2"
  port     = 8080
  protocol = "HTTP"
  vpc_id   = aws_vpc.main.id

  health_check {
    enabled             = true
    port                = 8081
    interval            = 30
    protocol            = "HTTP"
    path                = "/health"
    matcher             = "200"
    healthy_threshold   = 3
    unhealthy_threshold = 3
  }
}

The auto-scaling group will be responsible for creating and registering new EC2 instances with the load balancer.

  • You can specify min and max sizes for the group, but it's not enough to scale it automatically. It just defines the boundaries.
  • We want to create a load balancer in public subnets, but for the nodes, we want to keep them in private subnets without direct internet access.
  • To register this auto-scaling group with the target group, use target_group_arns.
  • Then provide the launch_template, and you can override the default instance_type, such as t3.micro.
terraform/7-example-2.tf
resource "aws_autoscaling_group" "my_app_eg2" {
  name     = "my-app-eg2"
  min_size = 1
  max_size = 3

  health_check_type = "EC2"

  vpc_zone_identifier = [
    aws_subnet.private_us_east_1a.id,
    aws_subnet.private_us_east_1b.id
  ]

  target_group_arns = [aws_lb_target_group.my_app_eg2.arn]

  mixed_instances_policy {
    launch_template {
      launch_template_specification {
        launch_template_id = aws_launch_template.my_app_eg2.id
      }
      override {
        instance_type = "t3.micro"
      }
    }
  }
}

To dynamically scale your auto-scaling group, you need to define a policy. In this example, we use CPU as a threshold. If the average CPU usage across all virtual machines exceeds 25%, add an additional EC2 instance. In production, you would set it closer to 80%.

terraform/7-example-2.tf
resource "aws_autoscaling_policy" "my_app_eg2" {
  name                   = "my-app-eg2"
  policy_type            = "TargetTrackingScaling"
  autoscaling_group_name = aws_autoscaling_group.my_app_eg2.name

  estimated_instance_warmup = 300

  target_tracking_configuration {
    predefined_metric_specification {
      predefined_metric_type = "ASGAverageCPUUtilization"
    }

    target_value = 25.0
  }
}

Next is the same load balancer resource; the only difference for this load balancer is that we open an additional 443 port in the security group.

terraform/7-example-2.tf
resource "aws_lb" "my_app_eg2" {
  name               = "my-app-eg2"
  internal           = false
  load_balancer_type = "application"
  security_groups    = [aws_security_group.alb_eg2.id]

  subnets = [
    aws_subnet.public_us_east_1a.id,
    aws_subnet.public_us_east_1b.id
  ]
}

Now the listener, let's start with the same port 80. Sometimes you have a requirement to accept the HTTP requests on port 80 and redirect them to secured port 443. We will add that rule later.

terraform/7-example-2.tf
resource "aws_lb_listener" "my_app_eg2" {
  load_balancer_arn = aws_lb.my_app_eg2.arn
  port              = "80"
  protocol          = "HTTP"

  default_action {
    type             = "forward"
    target_group_arn = aws_lb_target_group.my_app_eg2.arn
  }
}

Let's apply the terraform again and test the application load balancer.

terraform apply

Use the /ping endpoint to check the status of the Golang app.

curl -i my-app-eg2-831019548.us-east-1.elb.amazonaws.com/ping

If it fails, check if you have healthy targets in the target group. The same applies to the previous example.

Image title

Secure ALB with TLS certificate

The next step is to secure your app with HTTPS. For that, we need to create a custom domain and obtain a certificate.

Since I already have Route53 hosted zone, instead of resource type, I can use data to get a reference. You need to replace the name with your hosted zone.

terraform/7-example-2.tf
data "aws_route53_zone" "public" {
  name         = "antonputra.com"
  private_zone = false
}

To get a TLS certificate, you can use the aws_acm_certificate resource and provide a fully qualified domain name. In my case, it's api.antonputra.com.

terraform/7-example-2.tf
resource "aws_acm_certificate" "api" {
  domain_name       = "api.antonputra.com"
  validation_method = "DNS"
}

To prove that you own a domain, you need to create a TXT DNS record. In case we request a certificate for multiple domain names, let's iterate over all domains and create the necessary DNS records.

terraform/7-example-2.tf
resource "aws_route53_record" "api_validation" {
  for_each = {
    for dvo in aws_acm_certificate.api.domain_validation_options : dvo.domain_name => {
      name   = dvo.resource_record_name
      record = dvo.resource_record_value
      type   = dvo.resource_record_type
    }
  }

  allow_overwrite = true
  name            = each.value.name
  records         = [each.value.record]
  ttl             = 60
  type            = each.value.type
  zone_id         = data.aws_route53_zone.public.zone_id
}

There is a special terraform aws_acm_certificate_validation resource that can wait till the TLS certificate is issued. It's optional, but sometimes other resources may depend on a valid certificate to proceed, such as API Gateway.

terraform/7-example-2.tf
resource "aws_acm_certificate_validation" "api" {
  certificate_arn         = aws_acm_certificate.api.arn
  validation_record_fqdns = [for record in aws_route53_record.api_validation : record.fqdn]
}

Create a DNS record for your load balancer. You can use CNAME or, in AWS, it is preferable to use ALIAS records. It can be directly resolved to the IP address, which improves the speed of DNS lookup.

terraform/7-example-2.tf
resource "aws_route53_record" "api" {
  name    = aws_acm_certificate.api.domain_name
  type    = "A"
  zone_id = data.aws_route53_zone.public.zone_id

  alias {
    name                   = aws_lb.my_app_eg2.dns_name
    zone_id                = aws_lb.my_app_eg2.zone_id
    evaluate_target_health = false
  }
}

We have a custom DNS record and a valid certificate; now, we can create an HTTPS listener on our load balancer. You need to specify the certificate_arn and optionally can adjust the ssl_policy to match your requirements for clients.

Then the same default_action that will forward requests to the same target group on port 8080. The application load balancer will terminate TLS and create a new TCP connection using the plain HTTP protocol to your EC2 instances.

terraform/7-example-2.tf
resource "aws_lb_listener" "my_app_eg2_tls" {
  load_balancer_arn = aws_lb.my_app_eg2.arn
  port              = "443"
  protocol          = "HTTPS"
  certificate_arn   = aws_acm_certificate.api.arn
  ssl_policy        = "ELBSecurityPolicy-2016-08"

  default_action {
    type             = "forward"
    target_group_arn = aws_lb_target_group.my_app_eg2.arn
  }

  depends_on = [aws_acm_certificate_validation.api]
}

Frequently we want to accept requests on port 80 but immediately redirect requests on secured port 443 and use HTTPS protocol.

terraform/7-example-2.tf
resource "aws_lb_listener" "my_app_eg2" {
  load_balancer_arn = aws_lb.my_app_eg2.arn
  port              = "80"
  protocol          = "HTTP"

  # default_action {
  #   type             = "forward"
  #   target_group_arn = aws_lb_target_group.my_app_eg2.arn
  # }

  default_action {
    type = "redirect"

    redirect {
      port        = "443"
      protocol    = "HTTPS"
      status_code = "HTTP_301"
    }
  }
}

Finally, let's create an output variable to return the custom load balancer endpoint.

terraform/7-example-2.tf
output "custom_domain" {
  value = "https://${aws_acm_certificate.api.domain_name}/ping"
}

Go back to terraform and run apply.

terraform apply

Test your app with HTTPS and a custom domain.

curl -i https://api.antonputra.com/ping

If you try to use HTTP, the load balancer will redirect and enforce HTTPS.

curl -i -L http://api.antonputra.com/ping
Back to top