AWS API Gateway - WebSocket API + EC2 (HTTP & VPC Link & Auth & API Keys & Lambda Authorizer)
- You can find the source code for this video in my GitHub Repo.
Intro
In this video, we're going to create WebSocket API in AWS and integrate it with EC2 instances. The next video will cover integration with Lambda functions. For the demo, we will create a simple Chat App with access to DynamoDB to save users' connection IDs and remove them when they disconnect. Also, we will implement a custom sendmessage WebSocket route to push messages from the server to the client using the user's connection ID.
First, we will create public HTTP integration with the EC2 instance using its public IP address. Then we will convert it to private integration with VPC Link using a Network Load Balancer and an Auto Scaling Group.
Also, I'll show you multiple ways how to create and pass stage variables to your backend, including URL query parameters and in the body of the request.
We will create a custom domain for our API, and then I'll show you how to validate requests using Models and JSON schema.
To restrict access to our WebSocket API, we will use Lambda authorizer function.
WebSocket API also supports managing access and control with Usage Plans and API keys. You can use them to define throttling and usage quotas. For example, you can create a usage plan that will allow 500 API calls per month to your API.
You can find all the commands and a terraform code to reproduce this tutorial in the blog post and in my GitHub repository.
If you want to follow along, you can use my terraform code to create VPC along with other basic networking components. If you want to use your own existing VPC, it is totally fine. You can skip terraform code and continue from the next section.
First is an AWS provider and some version constraints.
| terraform/0-provider.tf | |
|---|---|
Then is a terraform file to create AWS VPC and enable DNS support.
| terraform/1-vpc.tf | |
|---|---|
AWS Internet Gateway to provide internet access for your subnets.
| terraform/2-igw.tf | |
|---|---|
Then subnets in different availability zones. We have two private and two public subnets with corresponding tags.
AWS Nat Gateway along with Elastic IP address. It will be used in private subnets.
| terraform/4-nat.tf | |
|---|---|
Finally, we need to create AWS Route Tables. The private route table will have a default route to NAT Gateway and associated with private students. The public table will have a default route to AWS Internet Gateway and will be associated with public subnets.
That's all for terraform, for now. You can switch to the terminal and run the following commands to create AWS VPC:
Create a WebSocket API in API Gateway
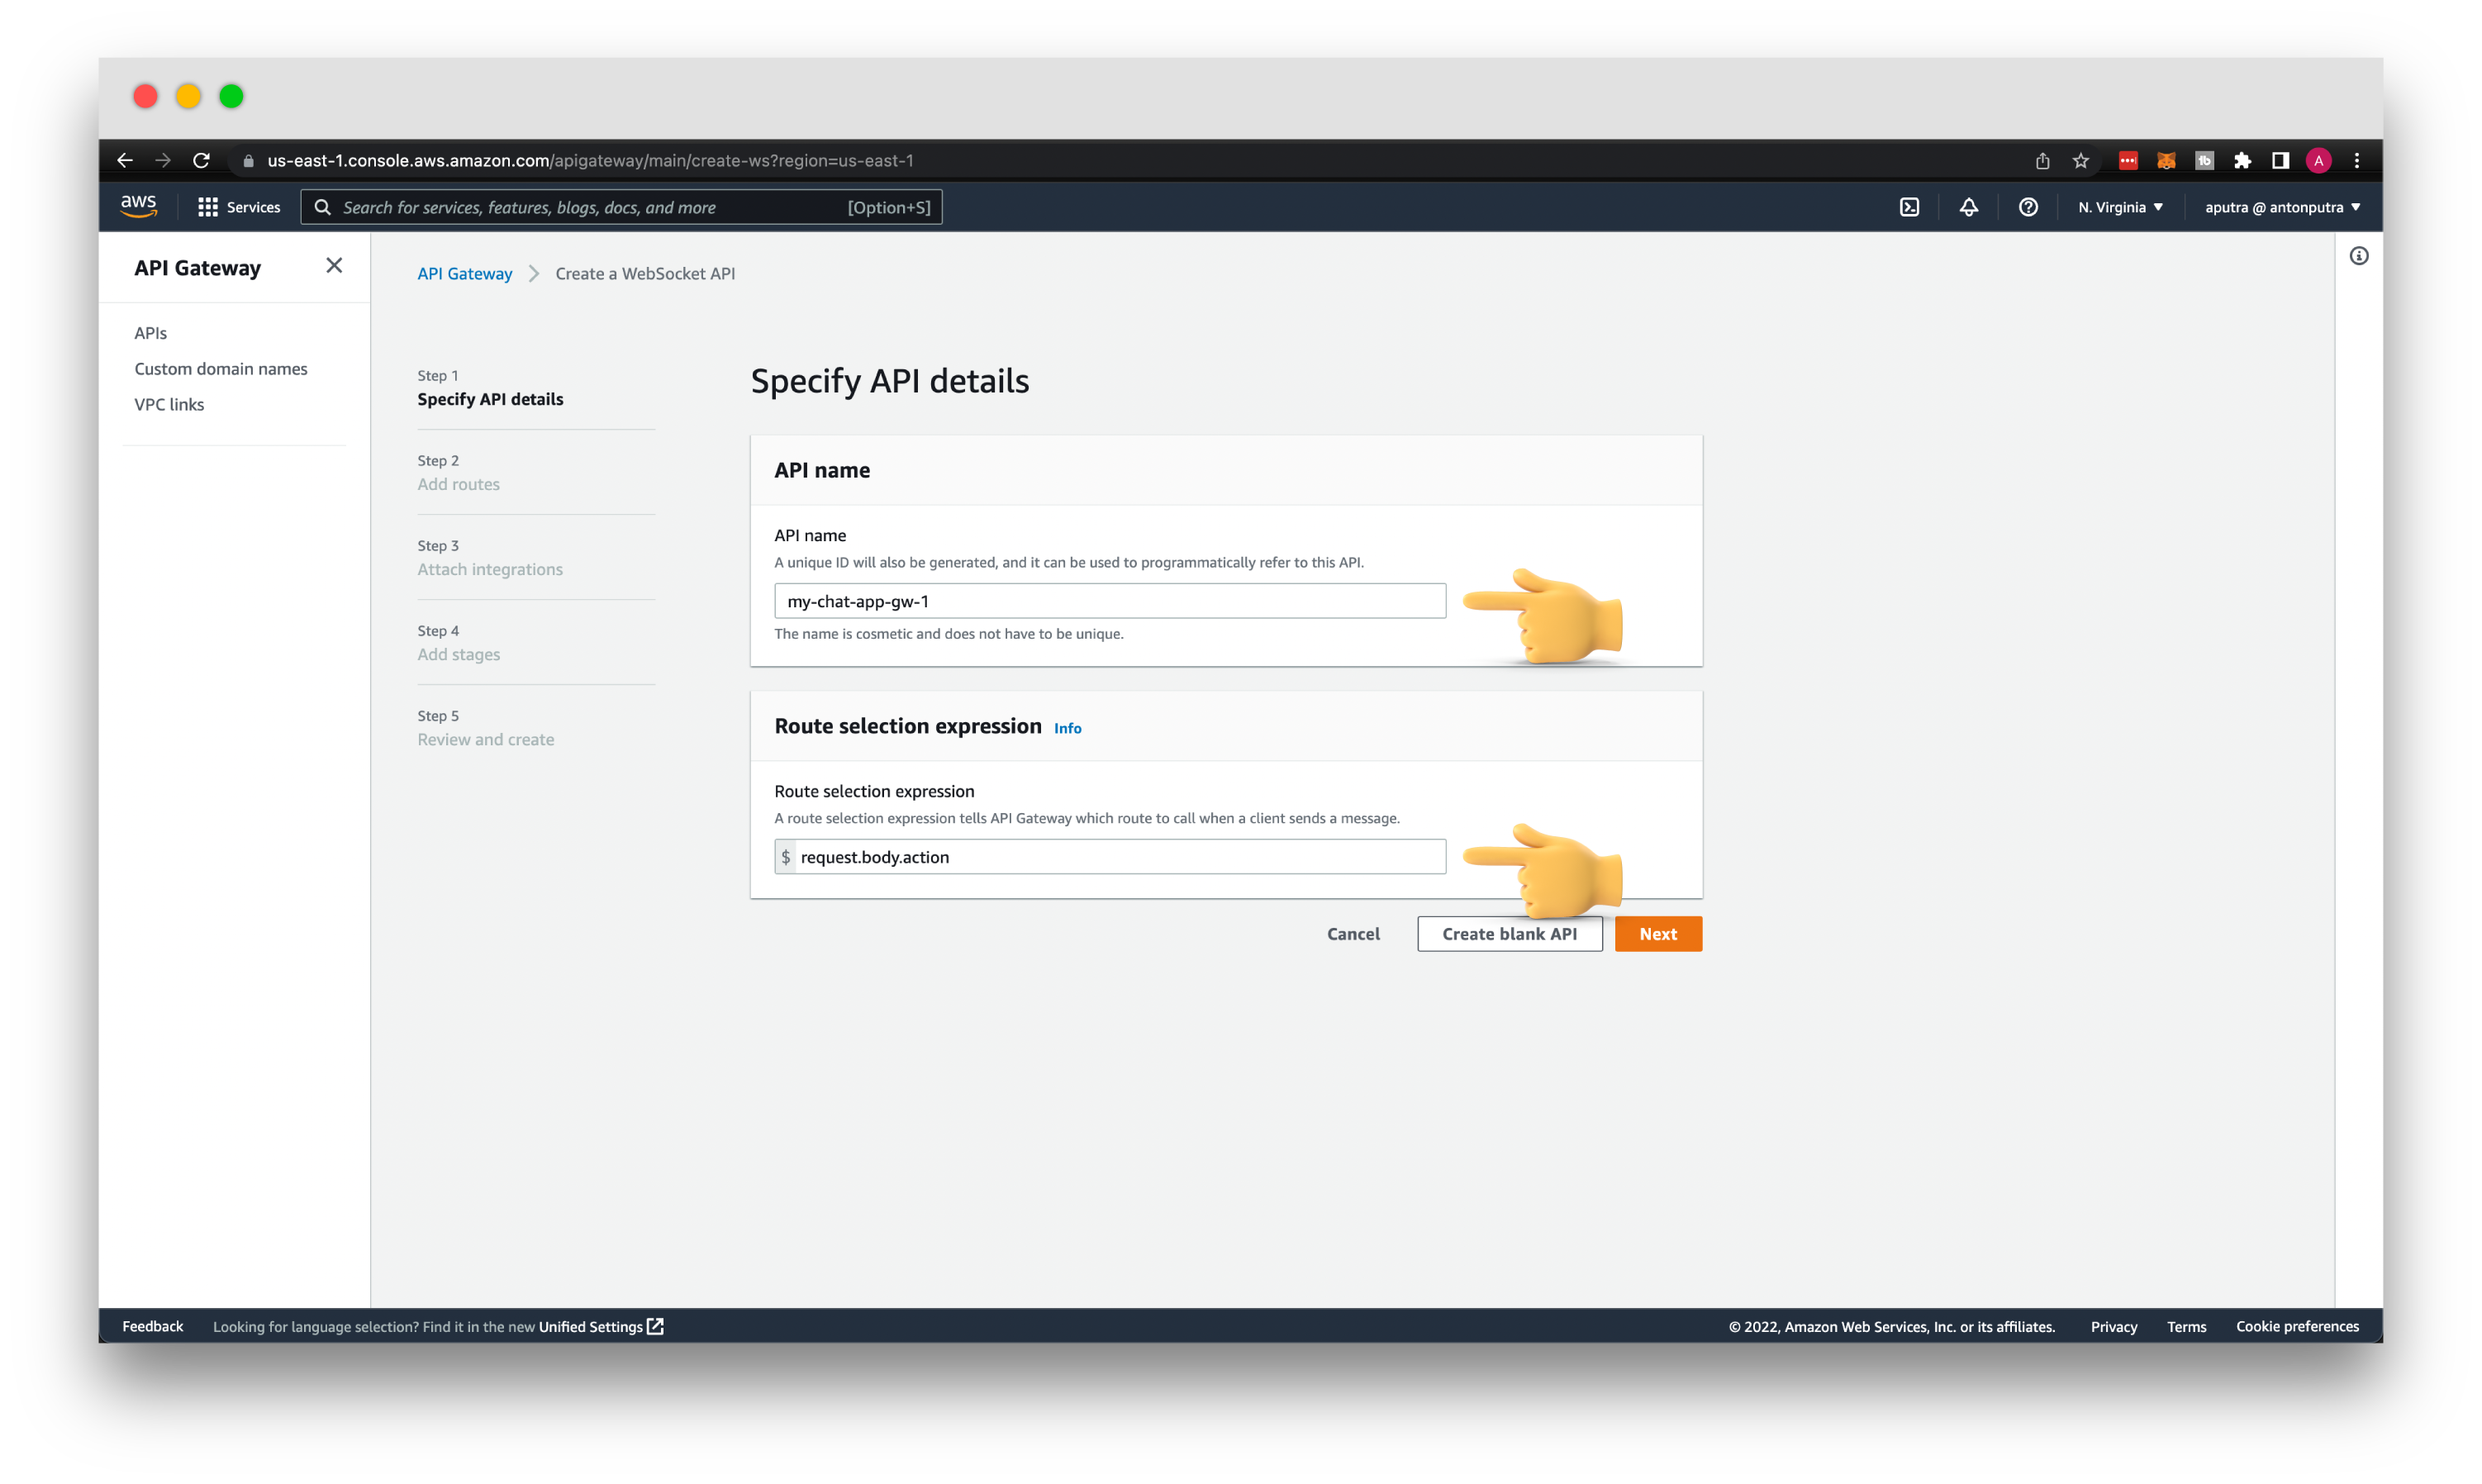
Let's create AWS API Gateway. For the API type, choose WebSocket API. Then give it a API name my-chat-app-gw-1, and for the Route selection expression, enter request.body.action.
For example, if the action is joinroom, invoke one HTTP endpoint, and if the action is sendmessage, use a different HTTP endpoint. I'll give you a few examples later.
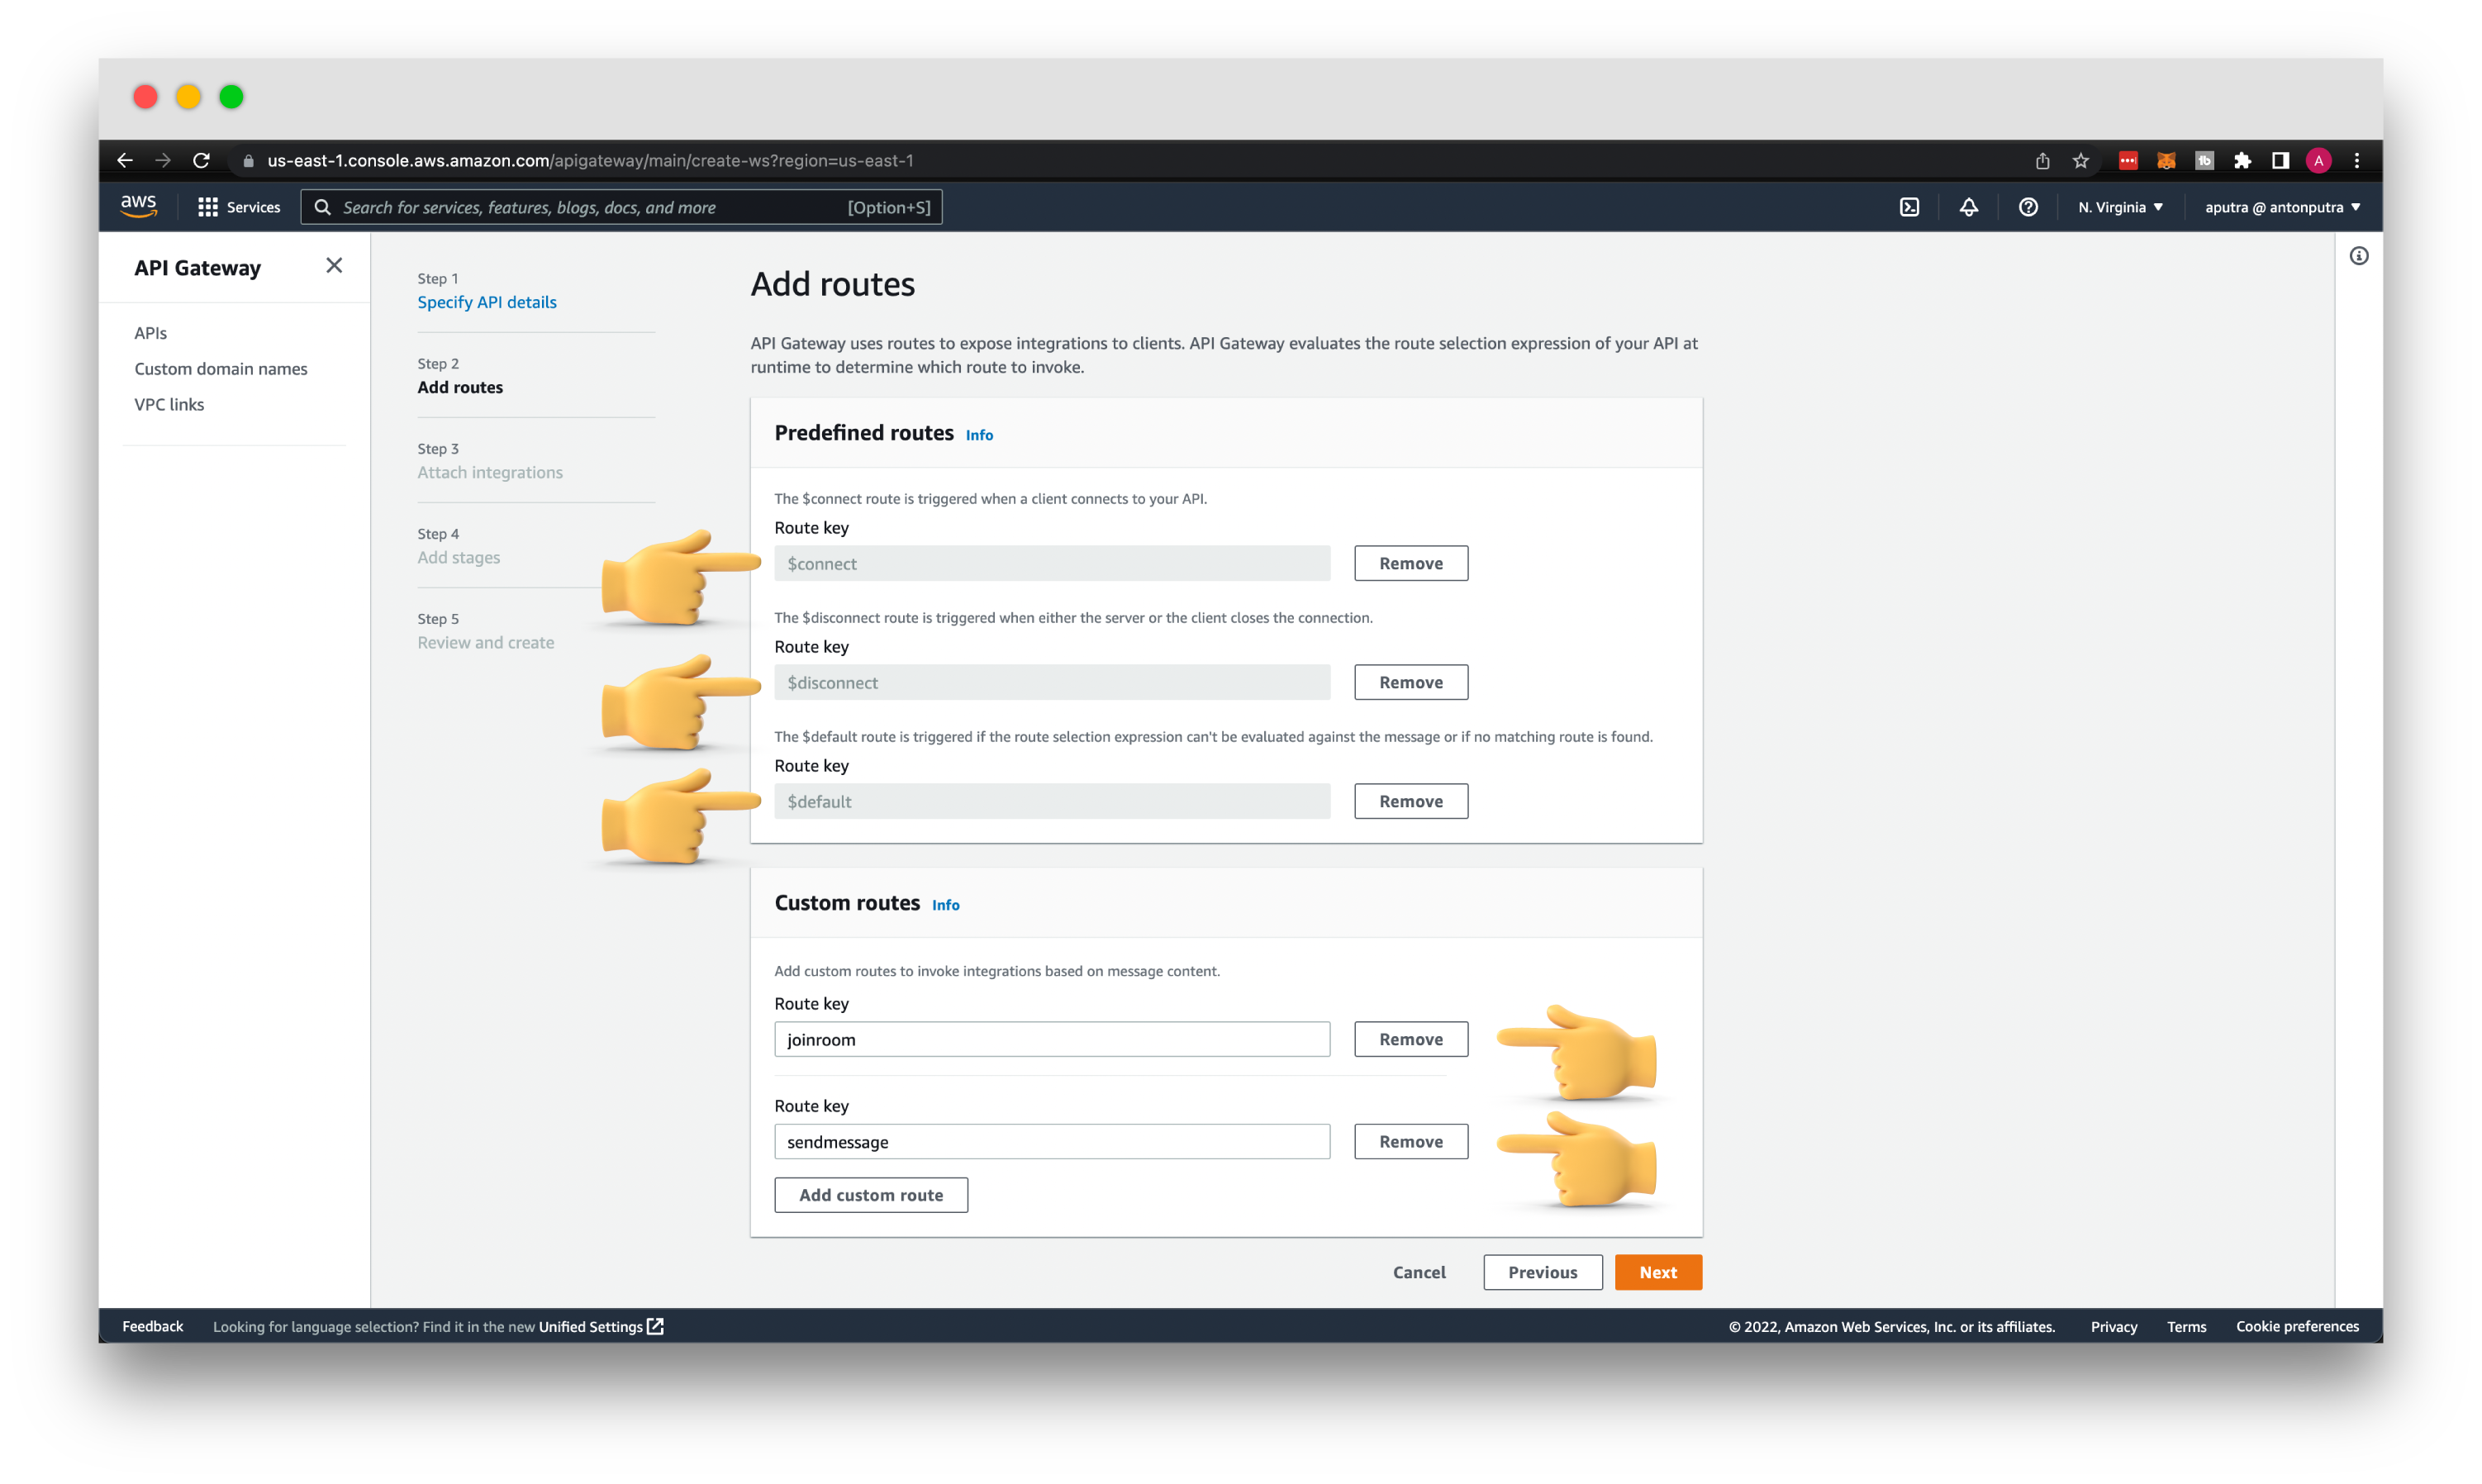
Add all three routes provided by AWS API Gateway. The first one is $connect, which will be invoked when the client connects to the API Gateway. At this point, you can perform authorization, check headers, and also this is the only route where you can validate API keys and usage plan quotas.
Then the $disconnect route. Websocket is a stateful protocol; when the client disconnects from your API, this route is invoked with corresponding integration. $default route is invoked when you send a non-JSON object or the action that is not in the list of possible routes.
Additionally, let's create a couple of custom routes. Since we're building the chat application, let's create a joinroom route. The second is a sendmessage route. I think it's obvious when those routes will be used.
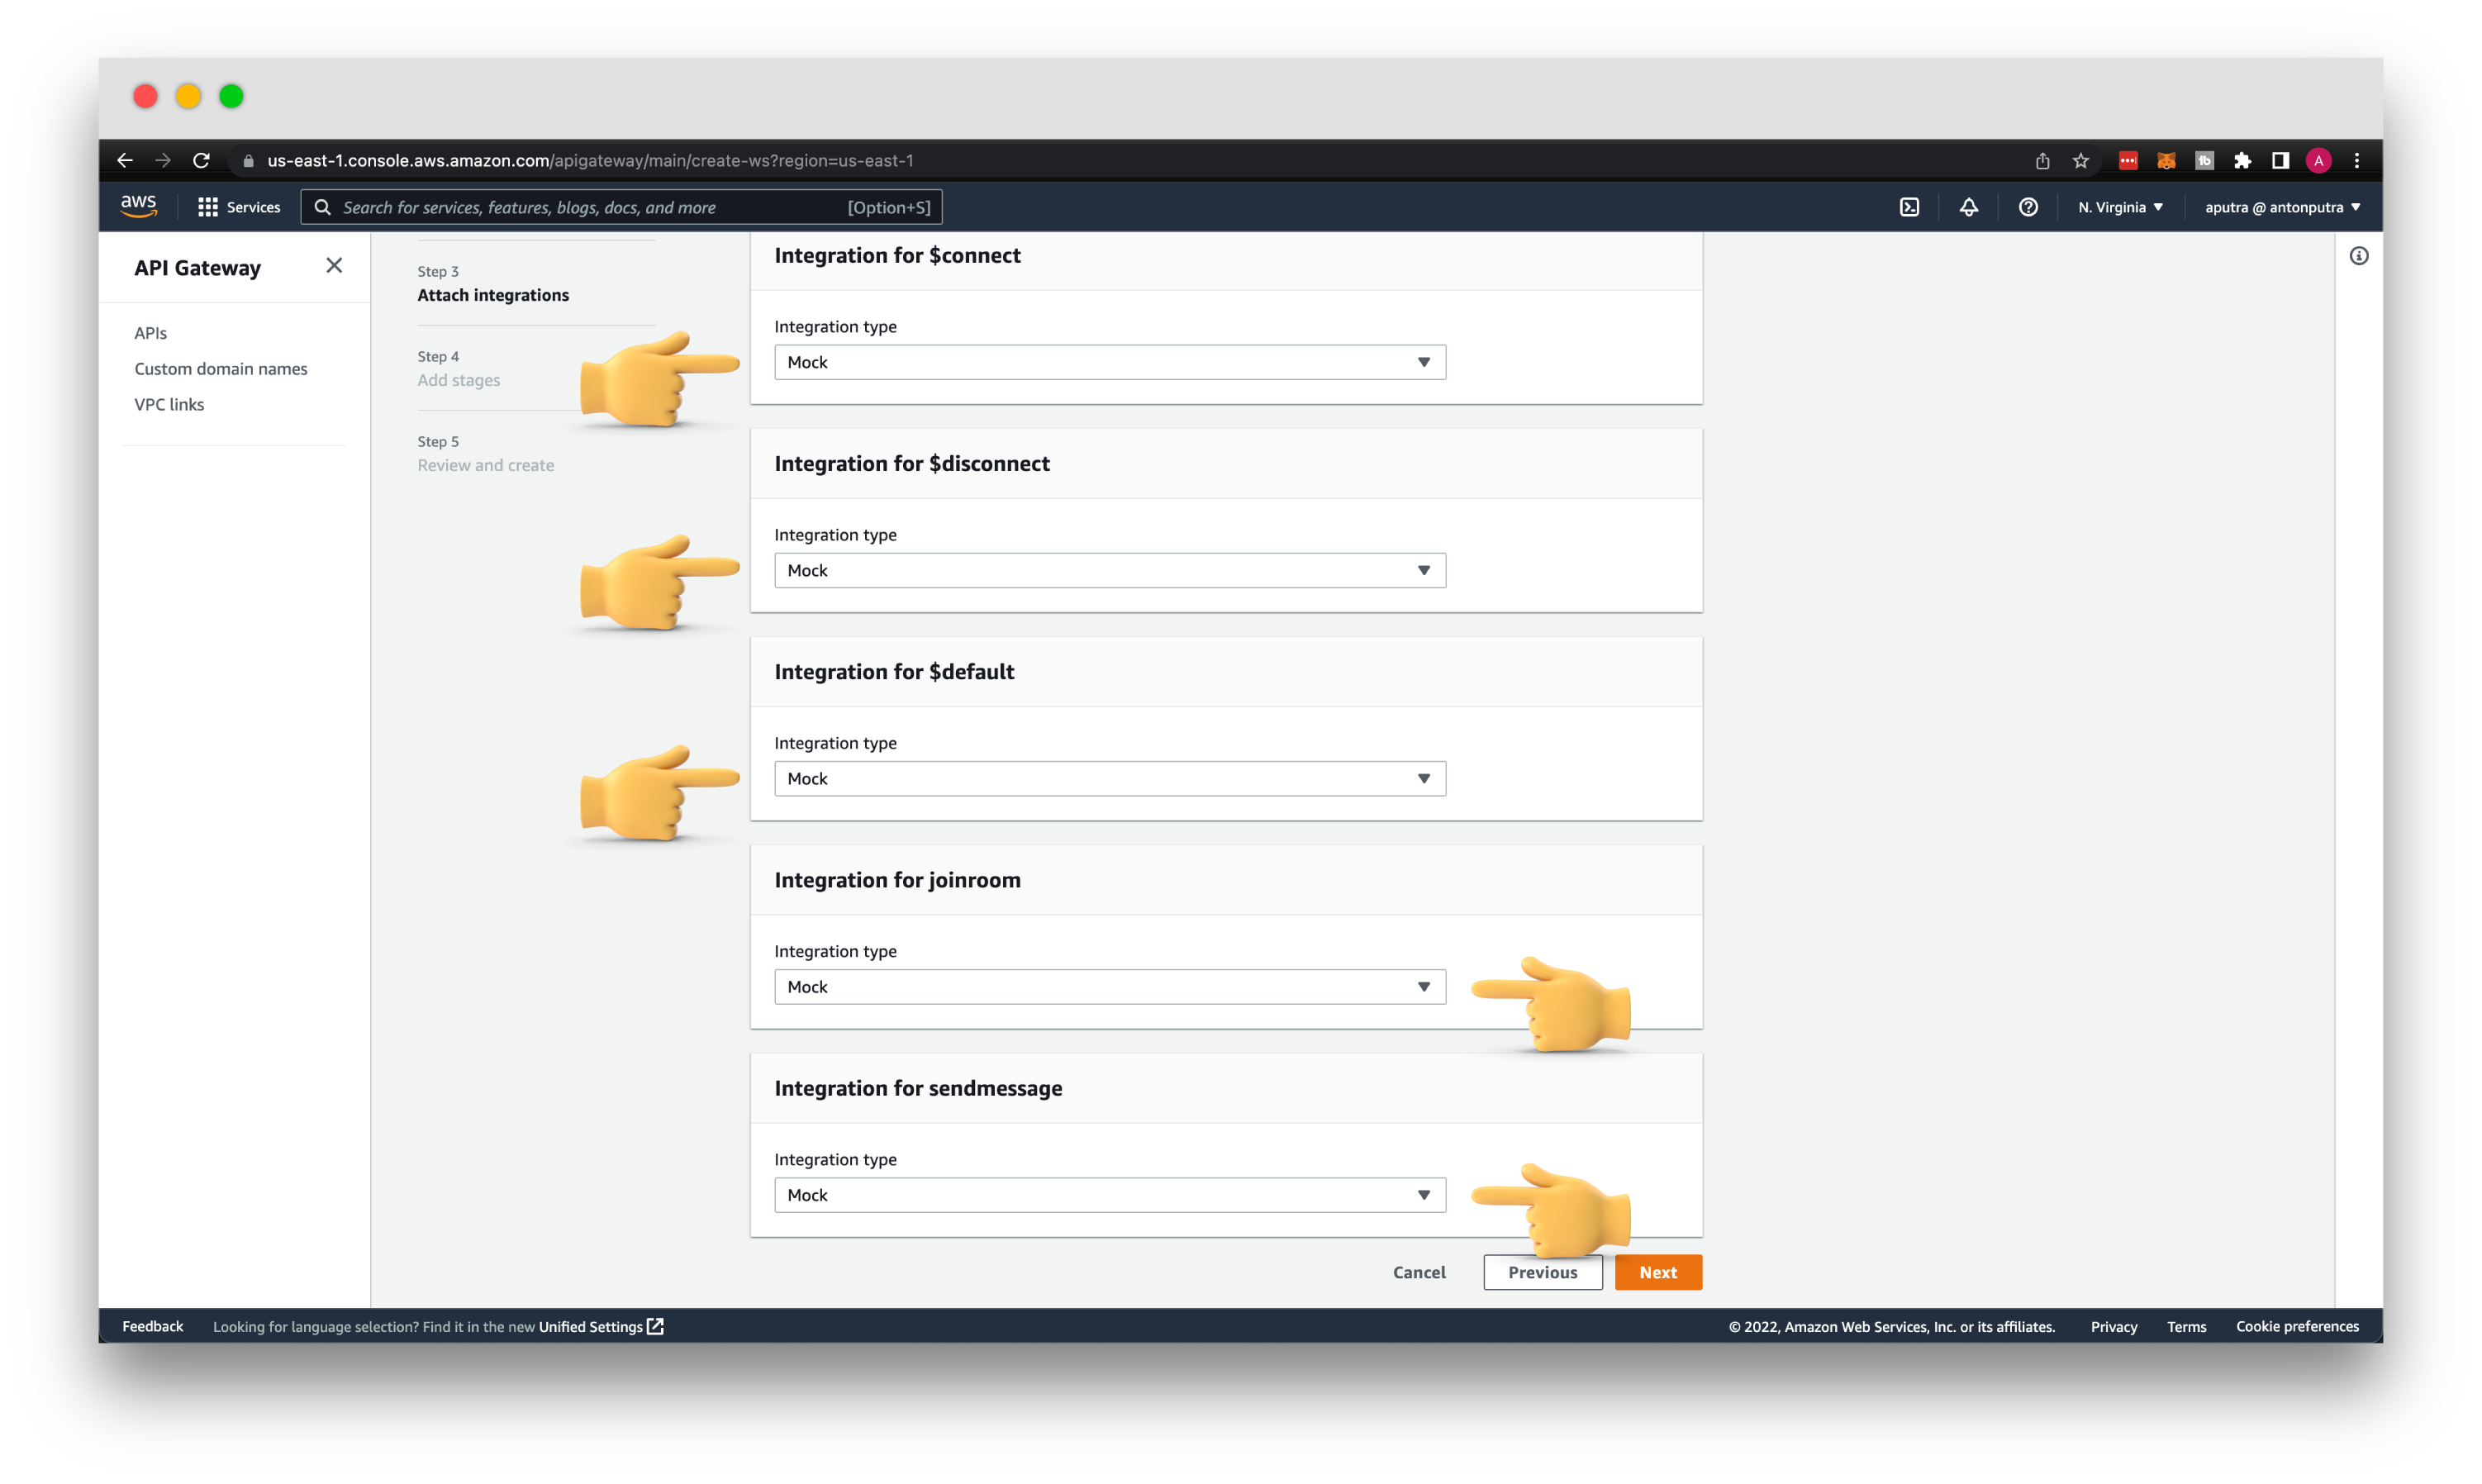
You can add Mock integration for all of the routes for now. It will be sufficient to test routing based on the action JSON object. Later we will update those integrations to real HTTP endpoints and VPC private integrations.
Then the stage name, it's independent environment. You can think of them as development, staging, production, and other environments that you may need for your development. Let's give it a name prod just to get a shorter URL.

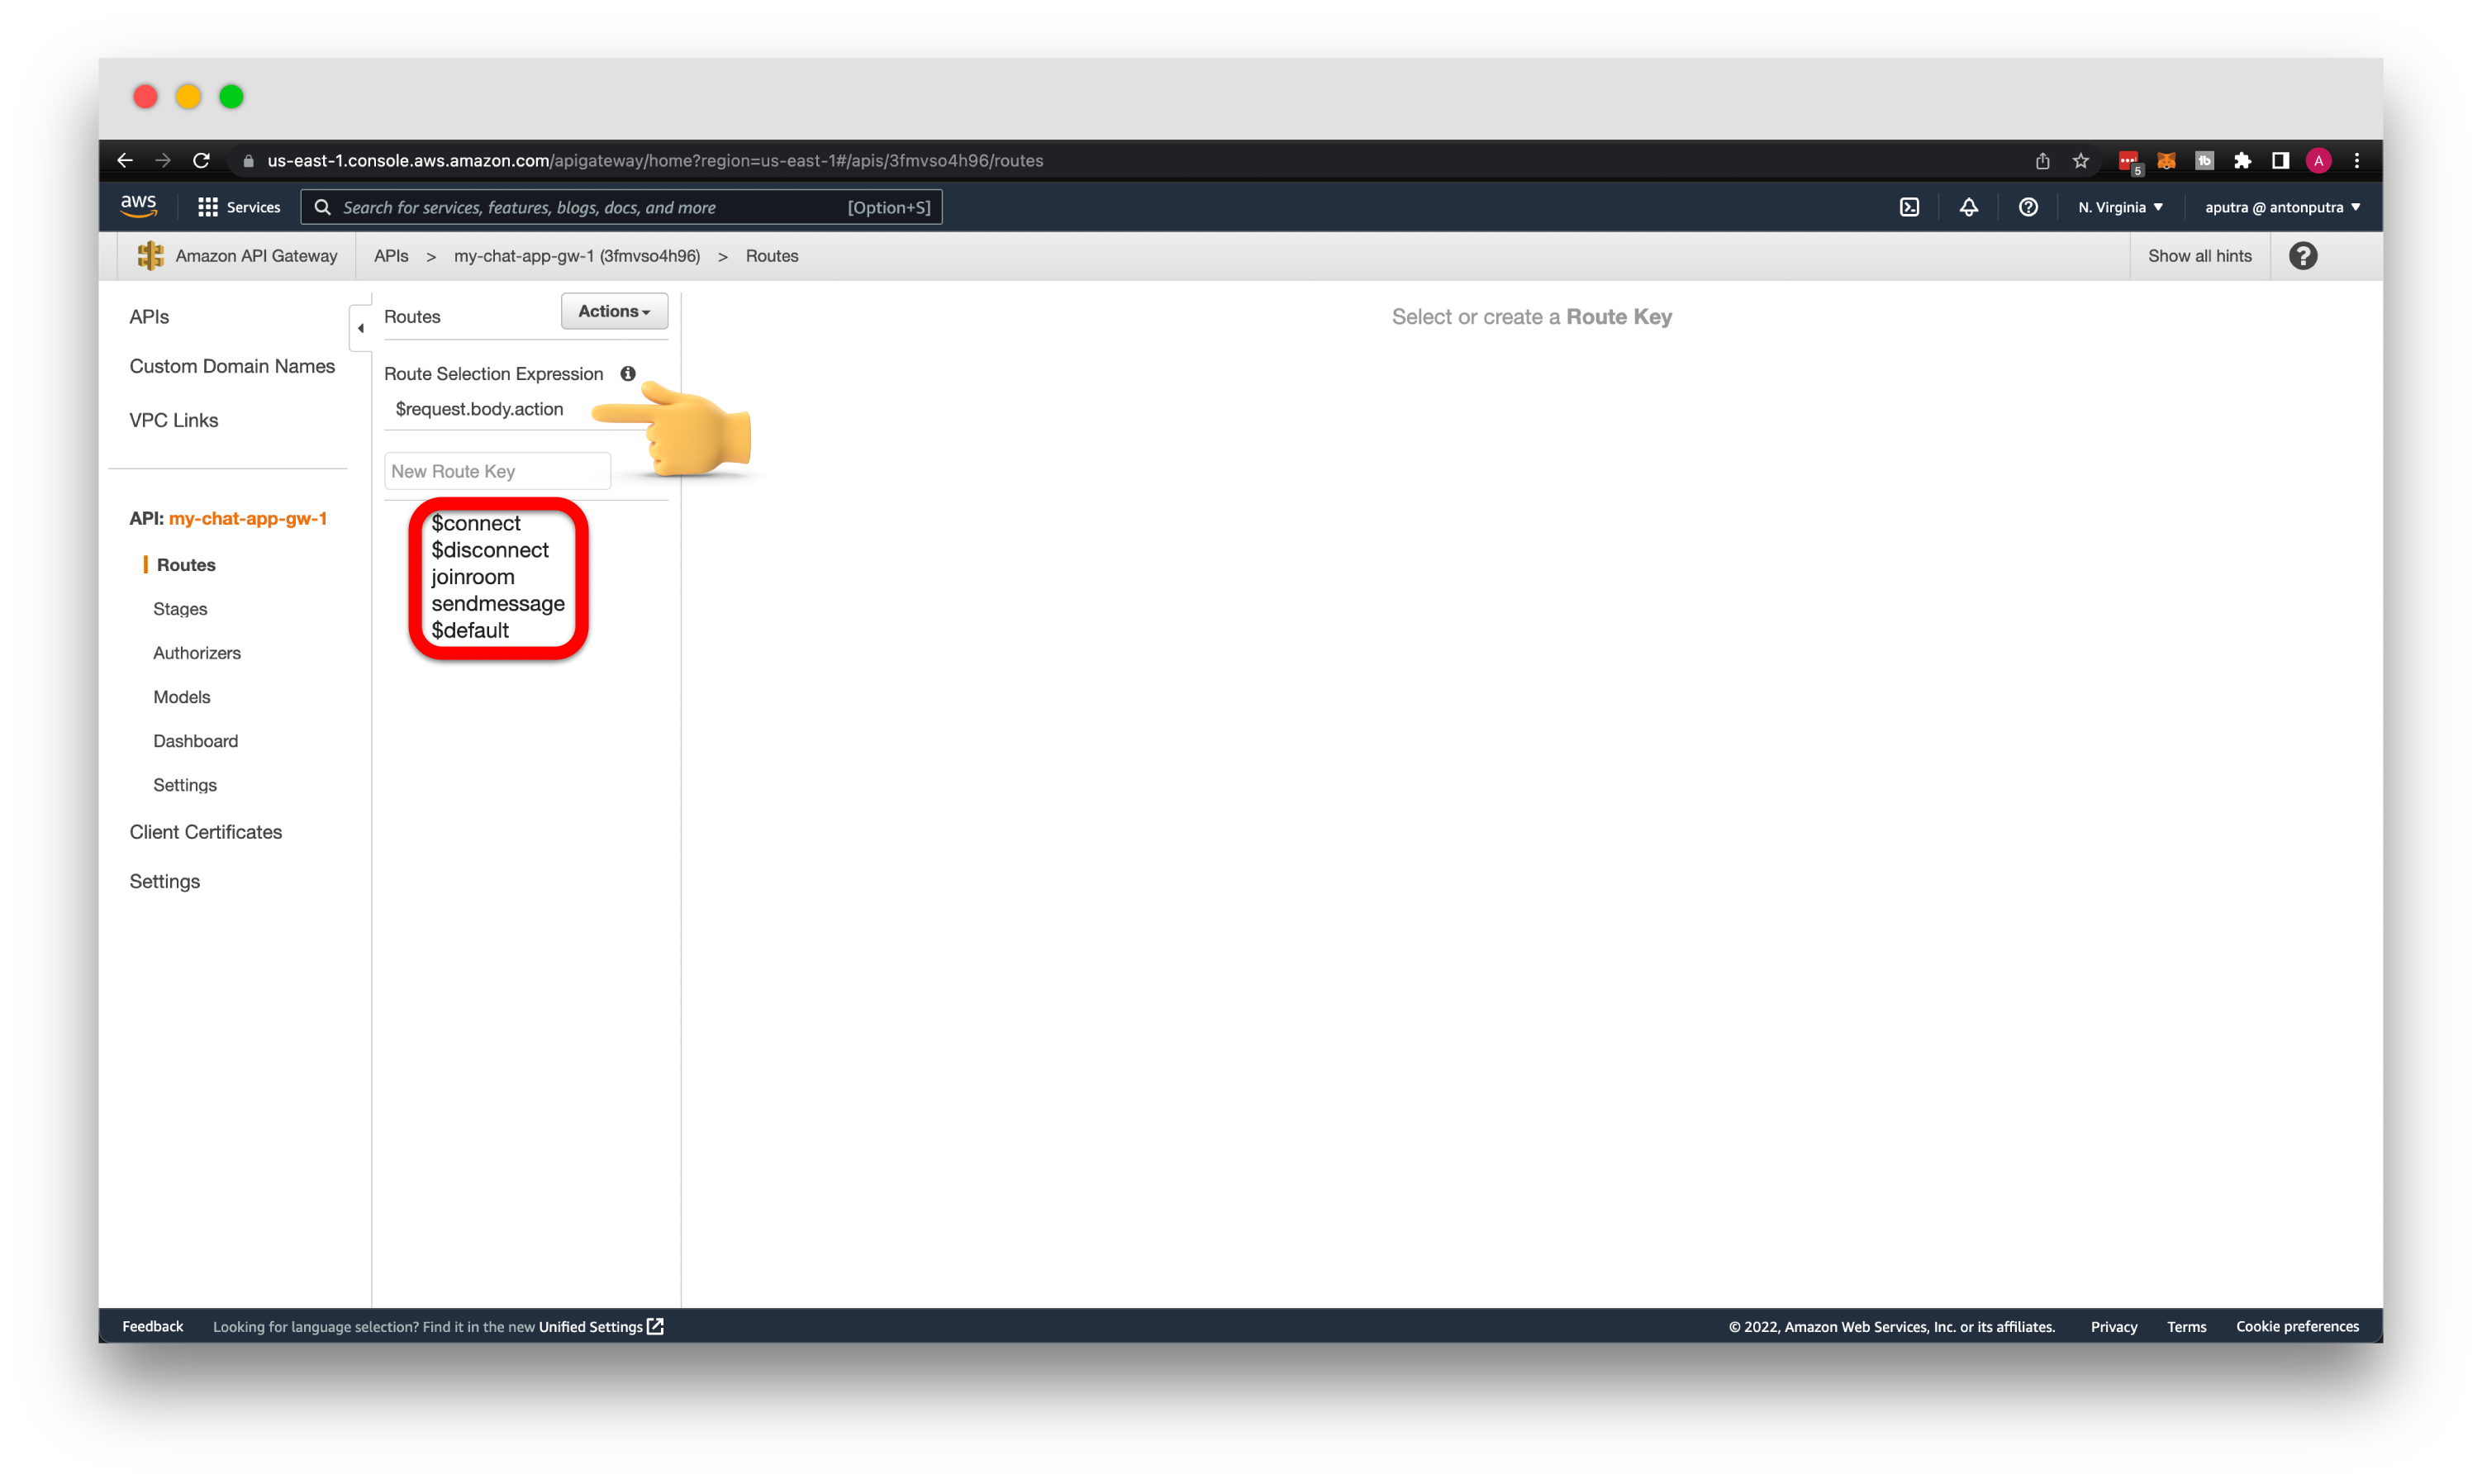
When you click create, you'll get 5 routes to choose from and a selection expression based on the action properly.
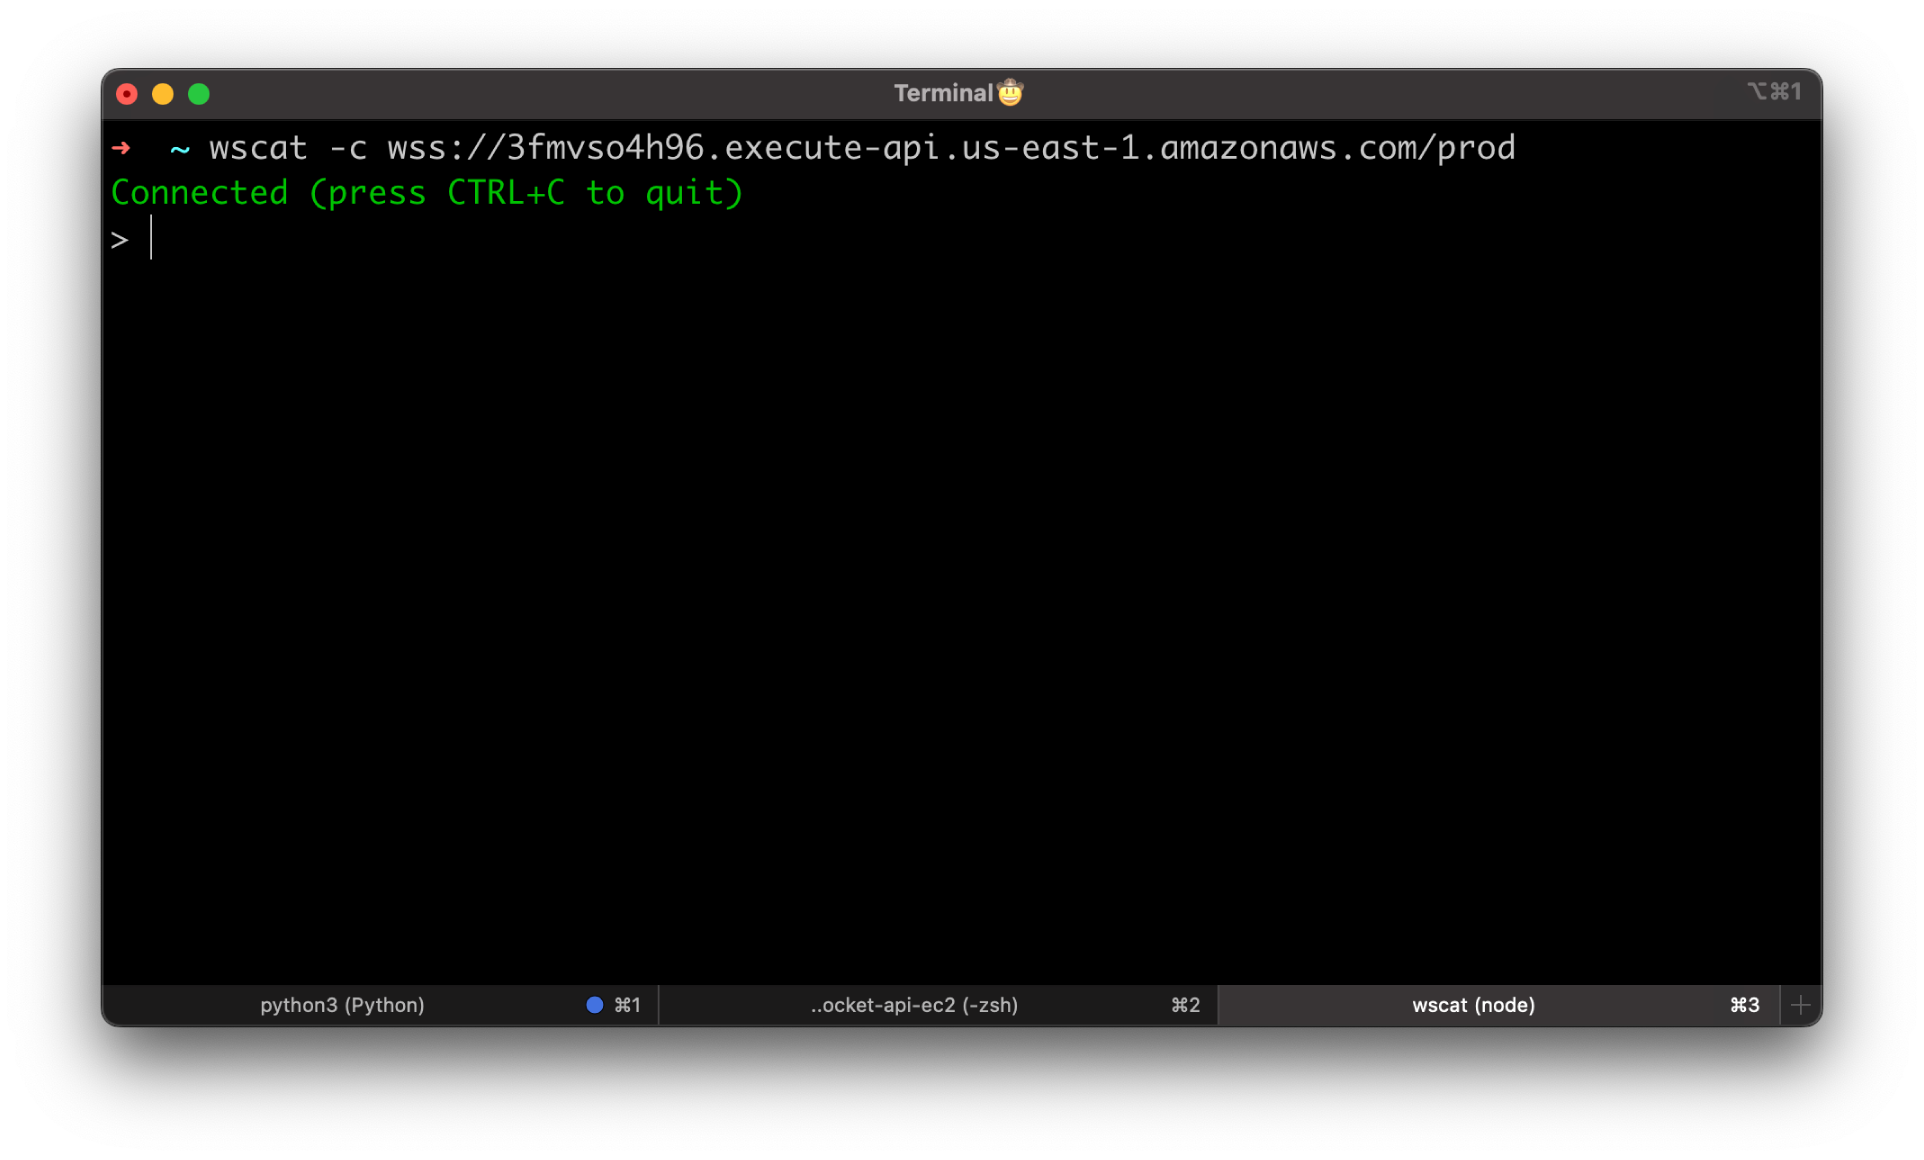
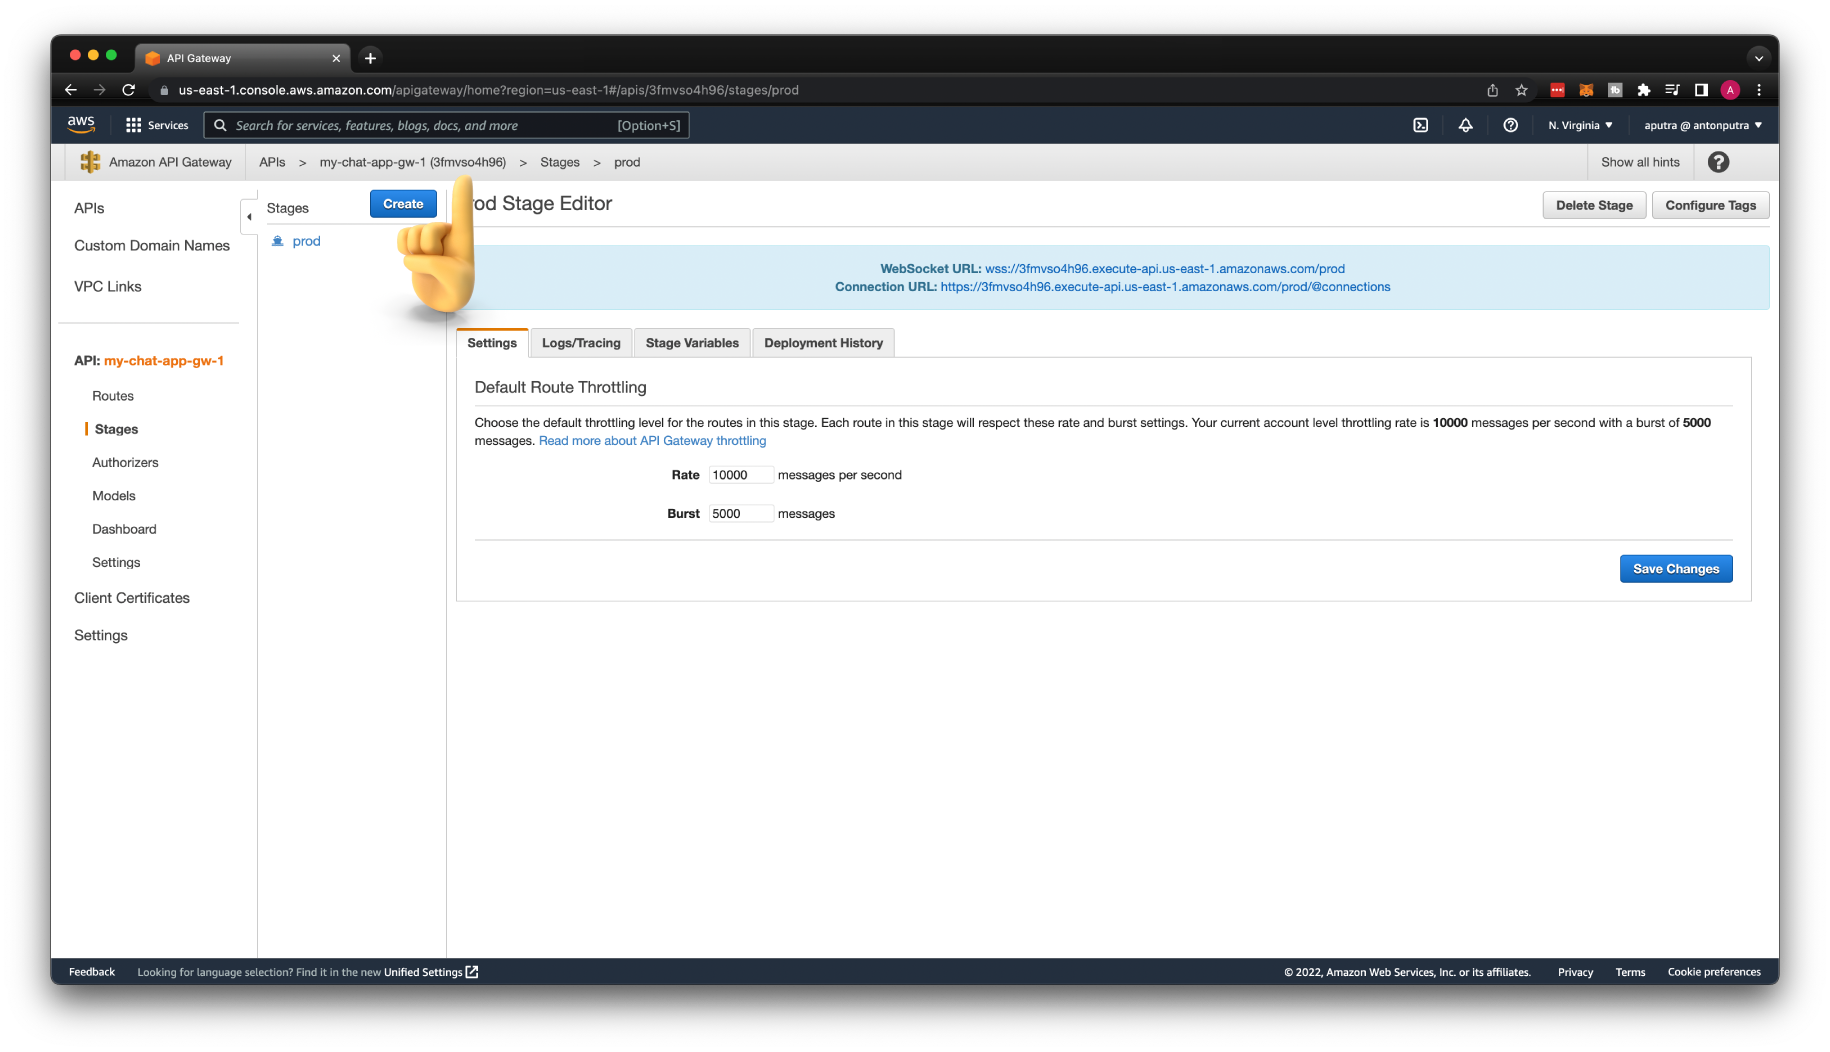
Now, we can start playing with our API. Go to Stages and select prod API stage. Then copy the WebSocket URL from the console. We will use it with the wscat tool to test routing.
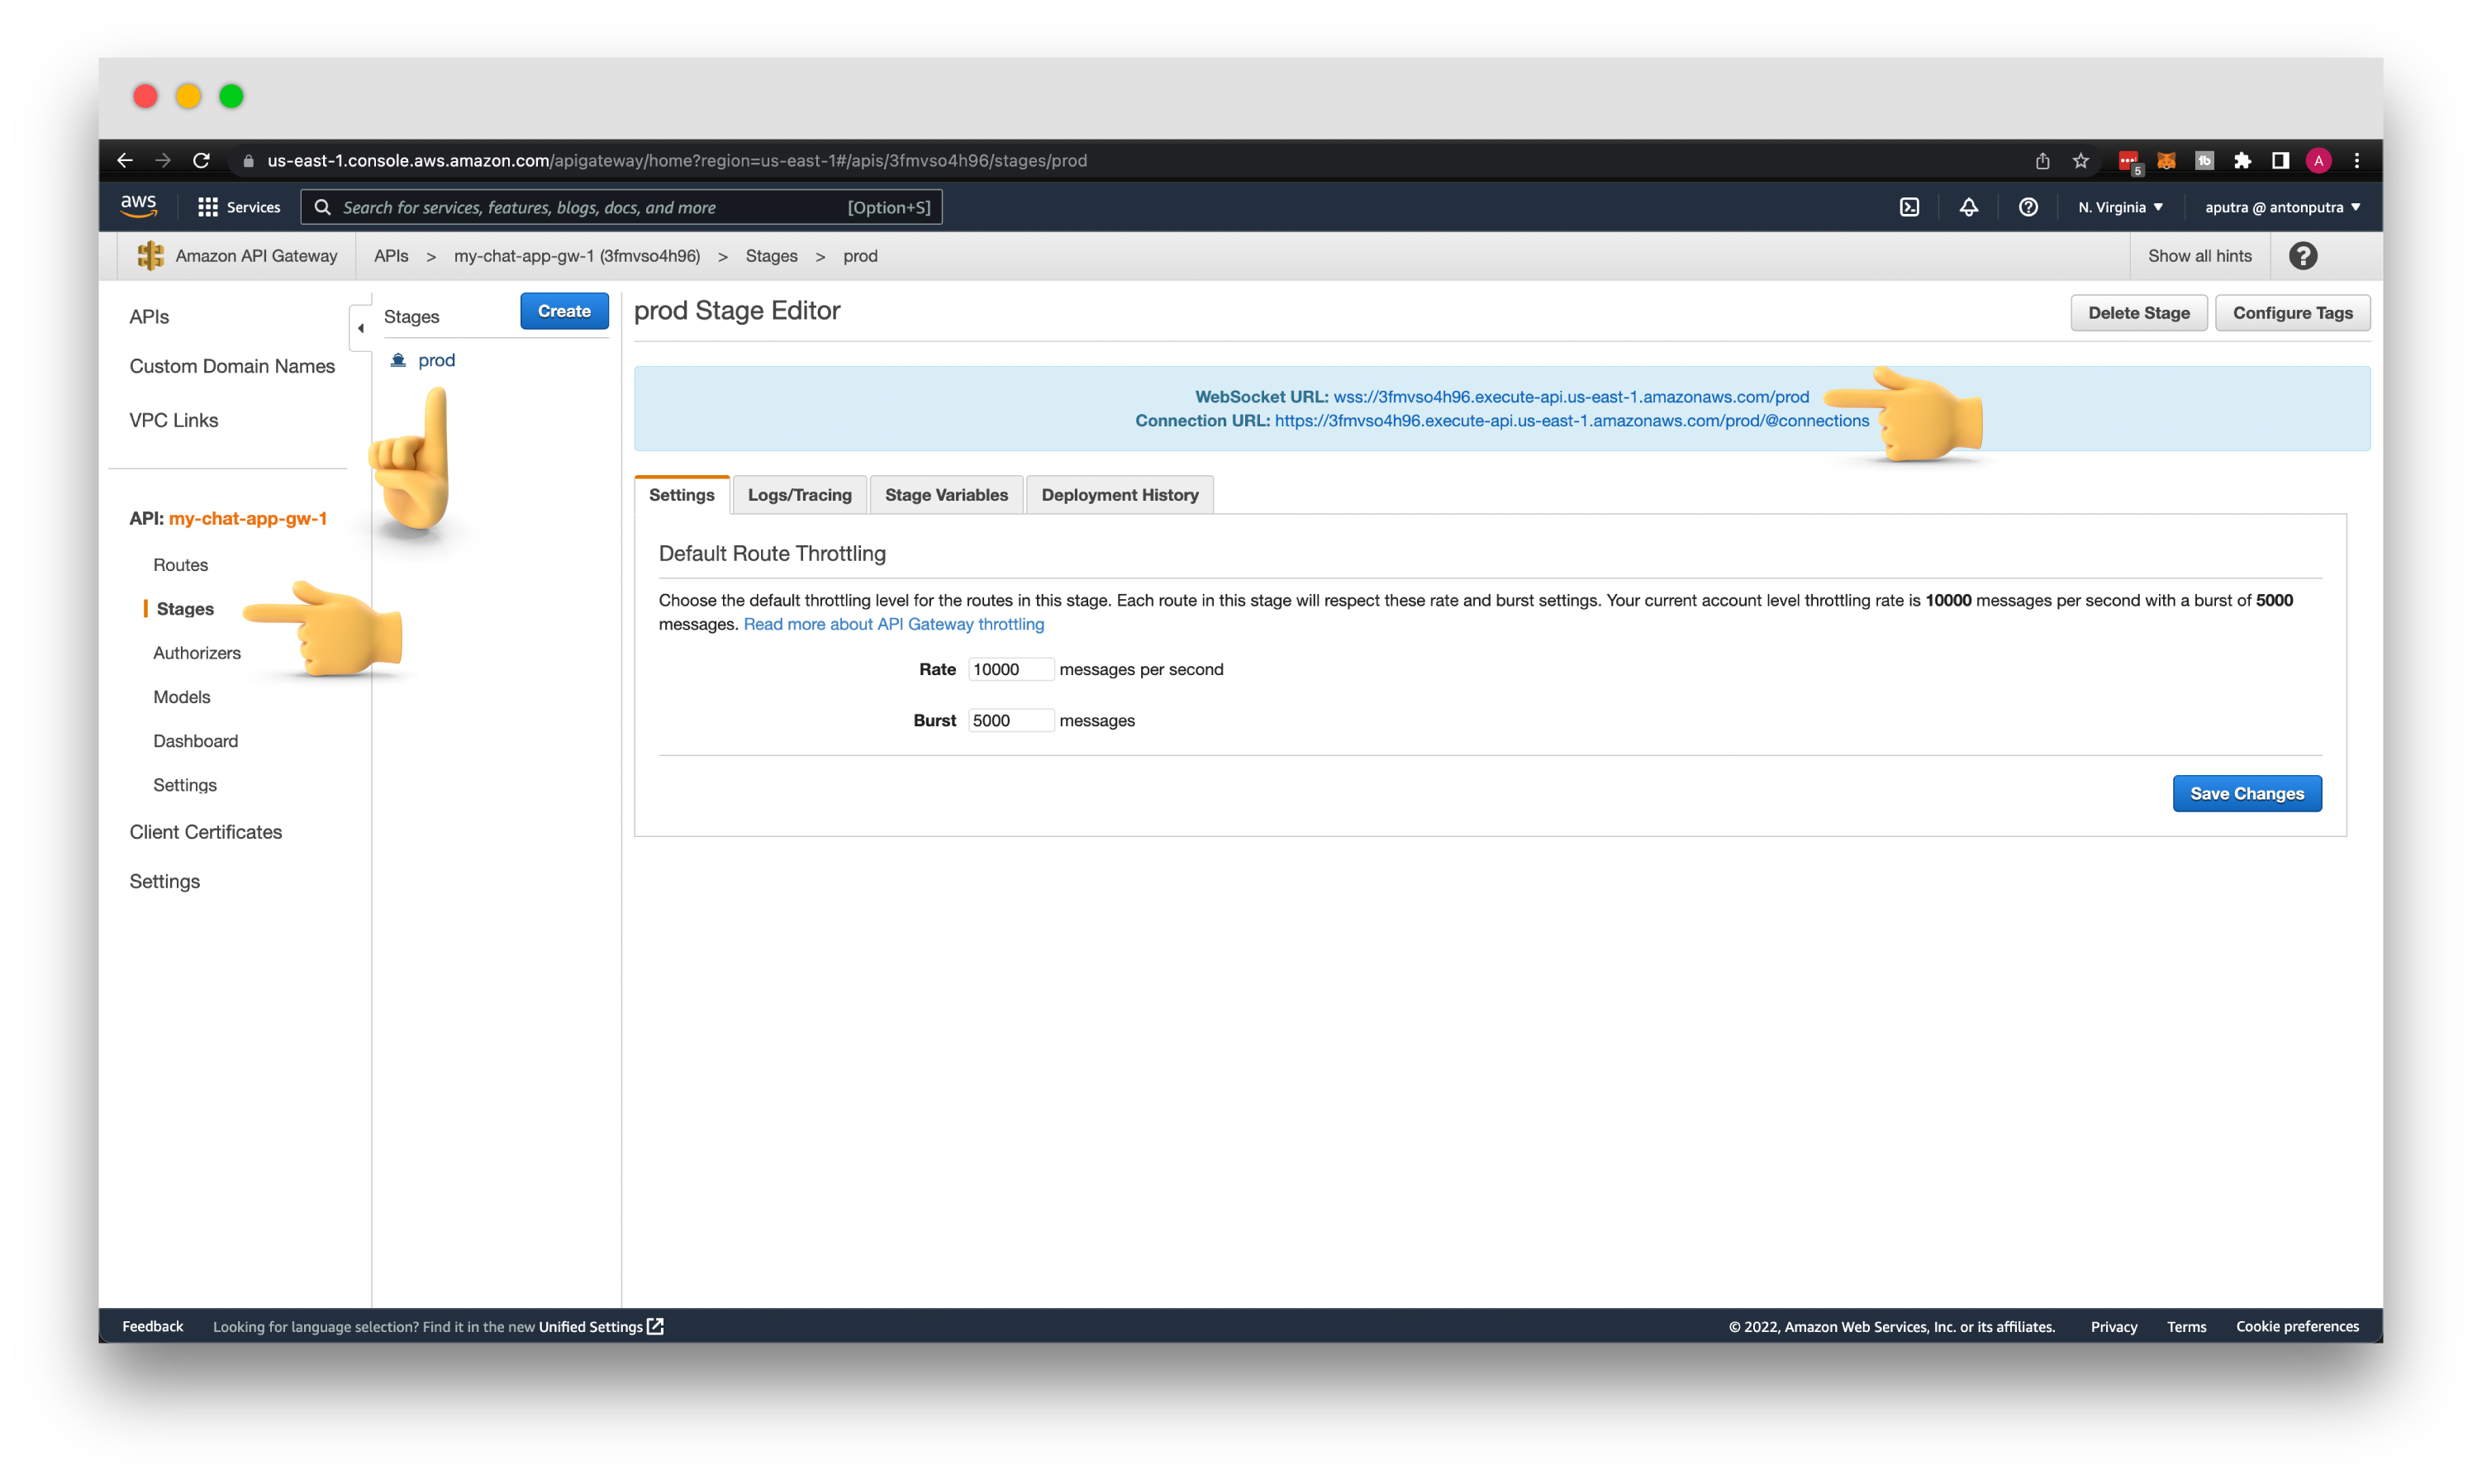
If you don't have a wscat yet, you can install it using the npm install command:
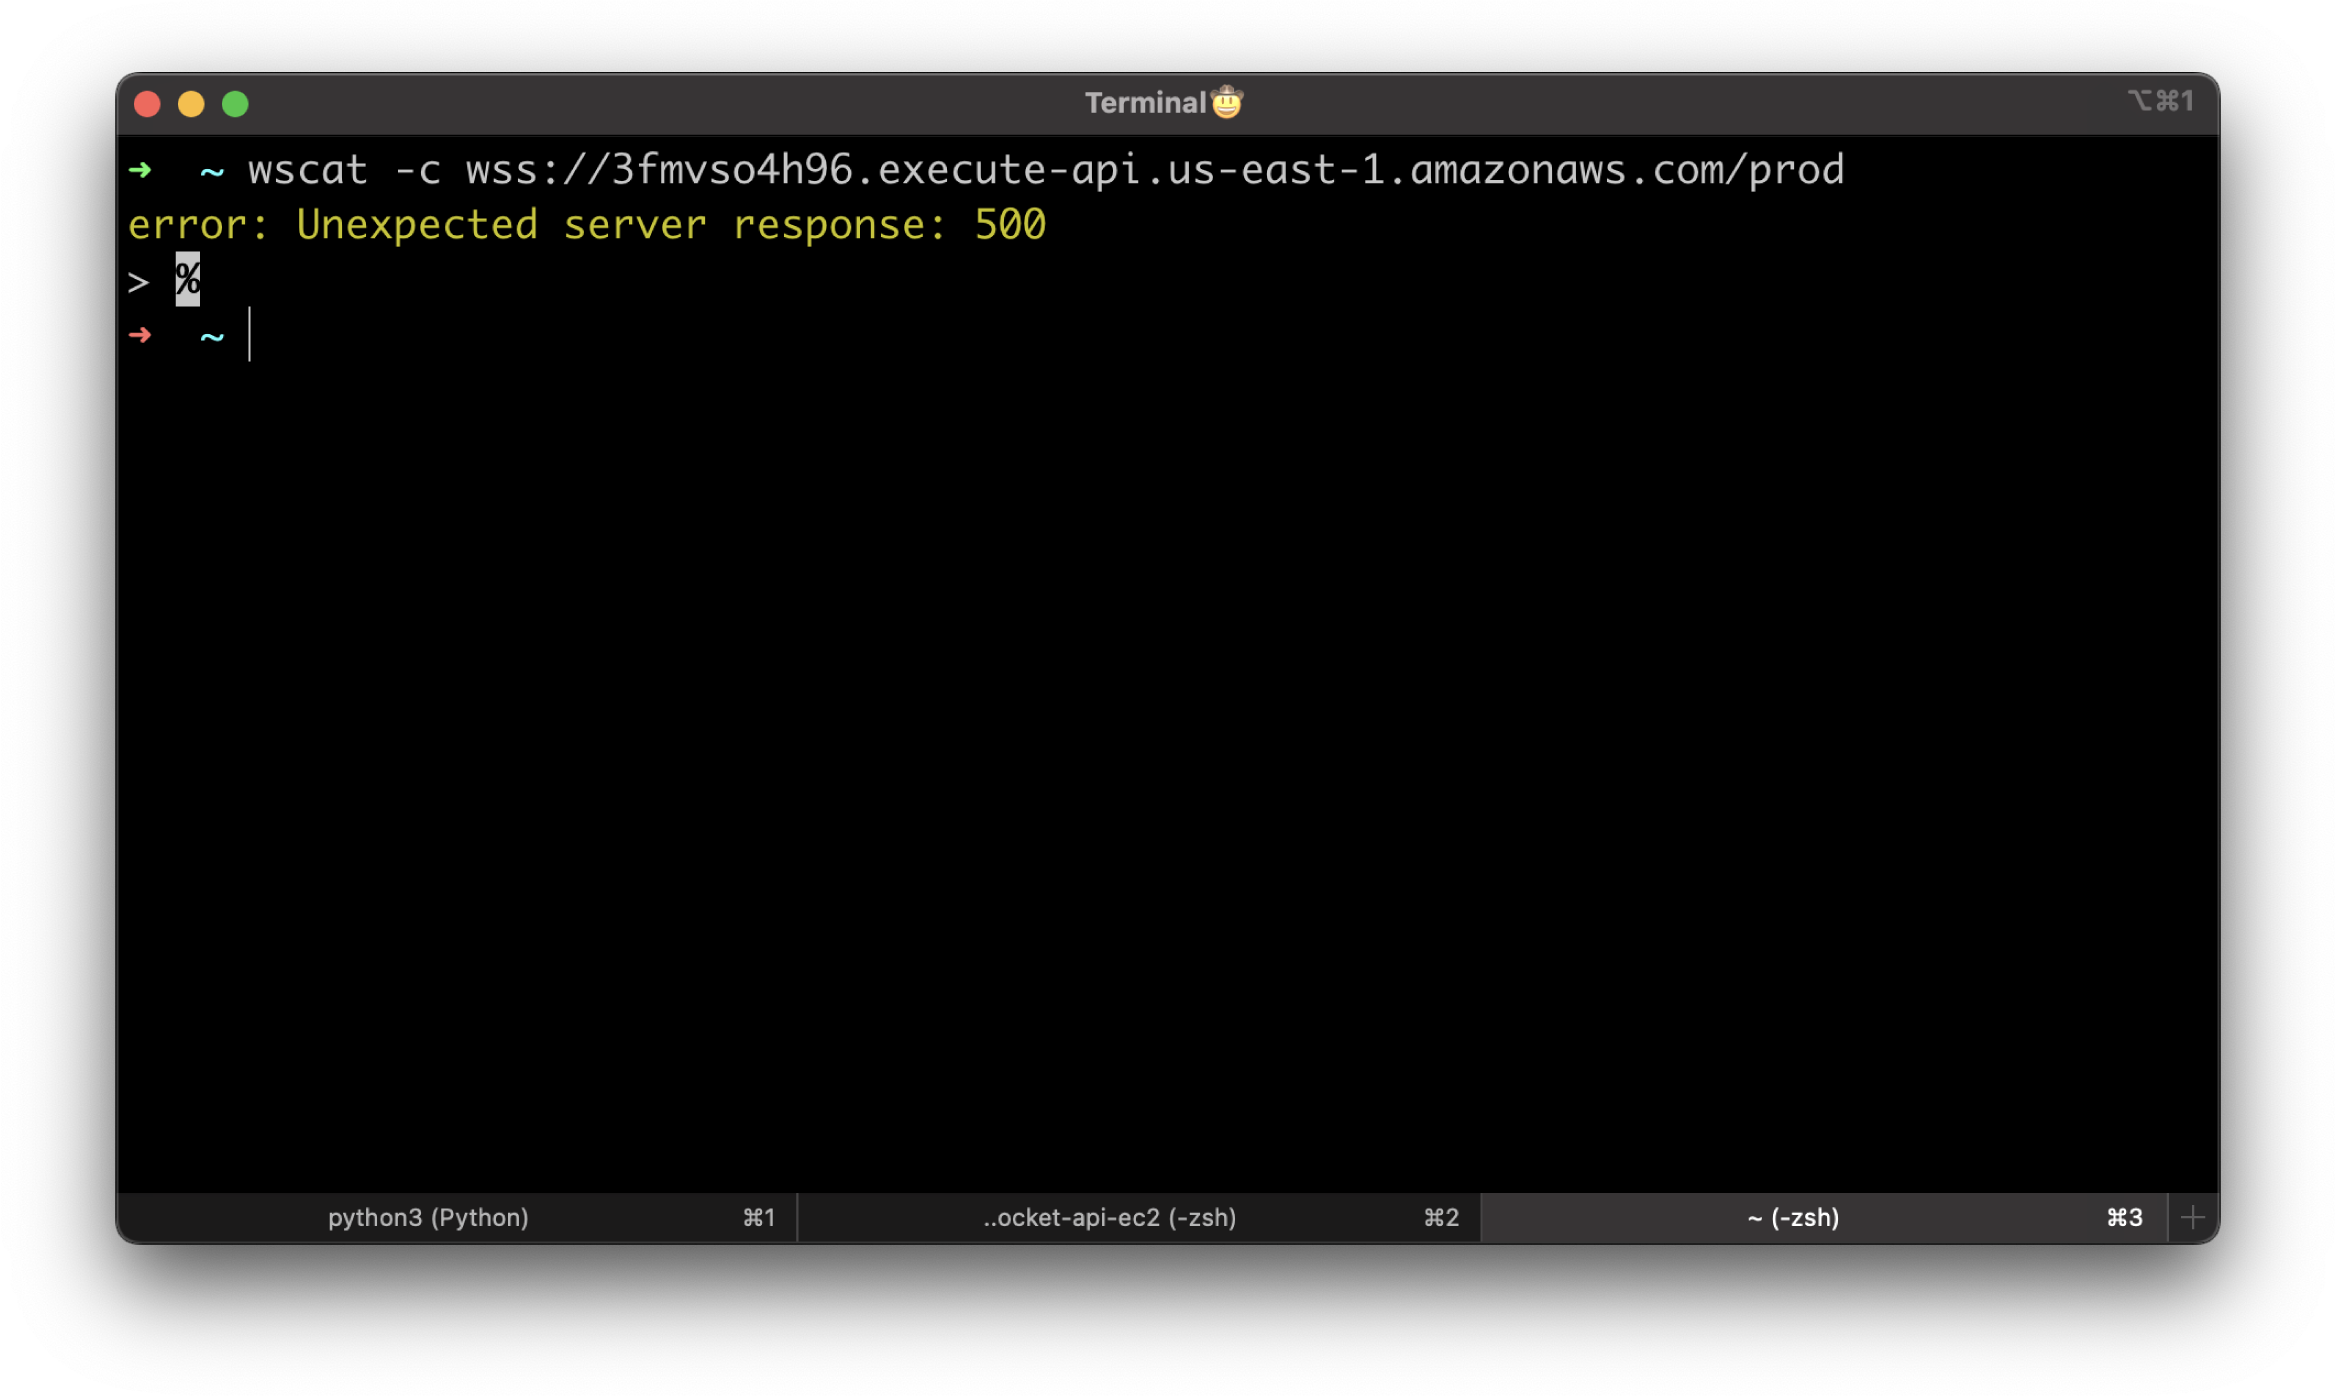
Let's try to connect to the WebSocket API using the stage link. -c stands for connect. You should get an error Unexpected server response: 500.
It's not very helpful. 500 HTTP status code usually means that something went wrong with a server. We would need more information to understand why we couldn't connect to the API Gateway.
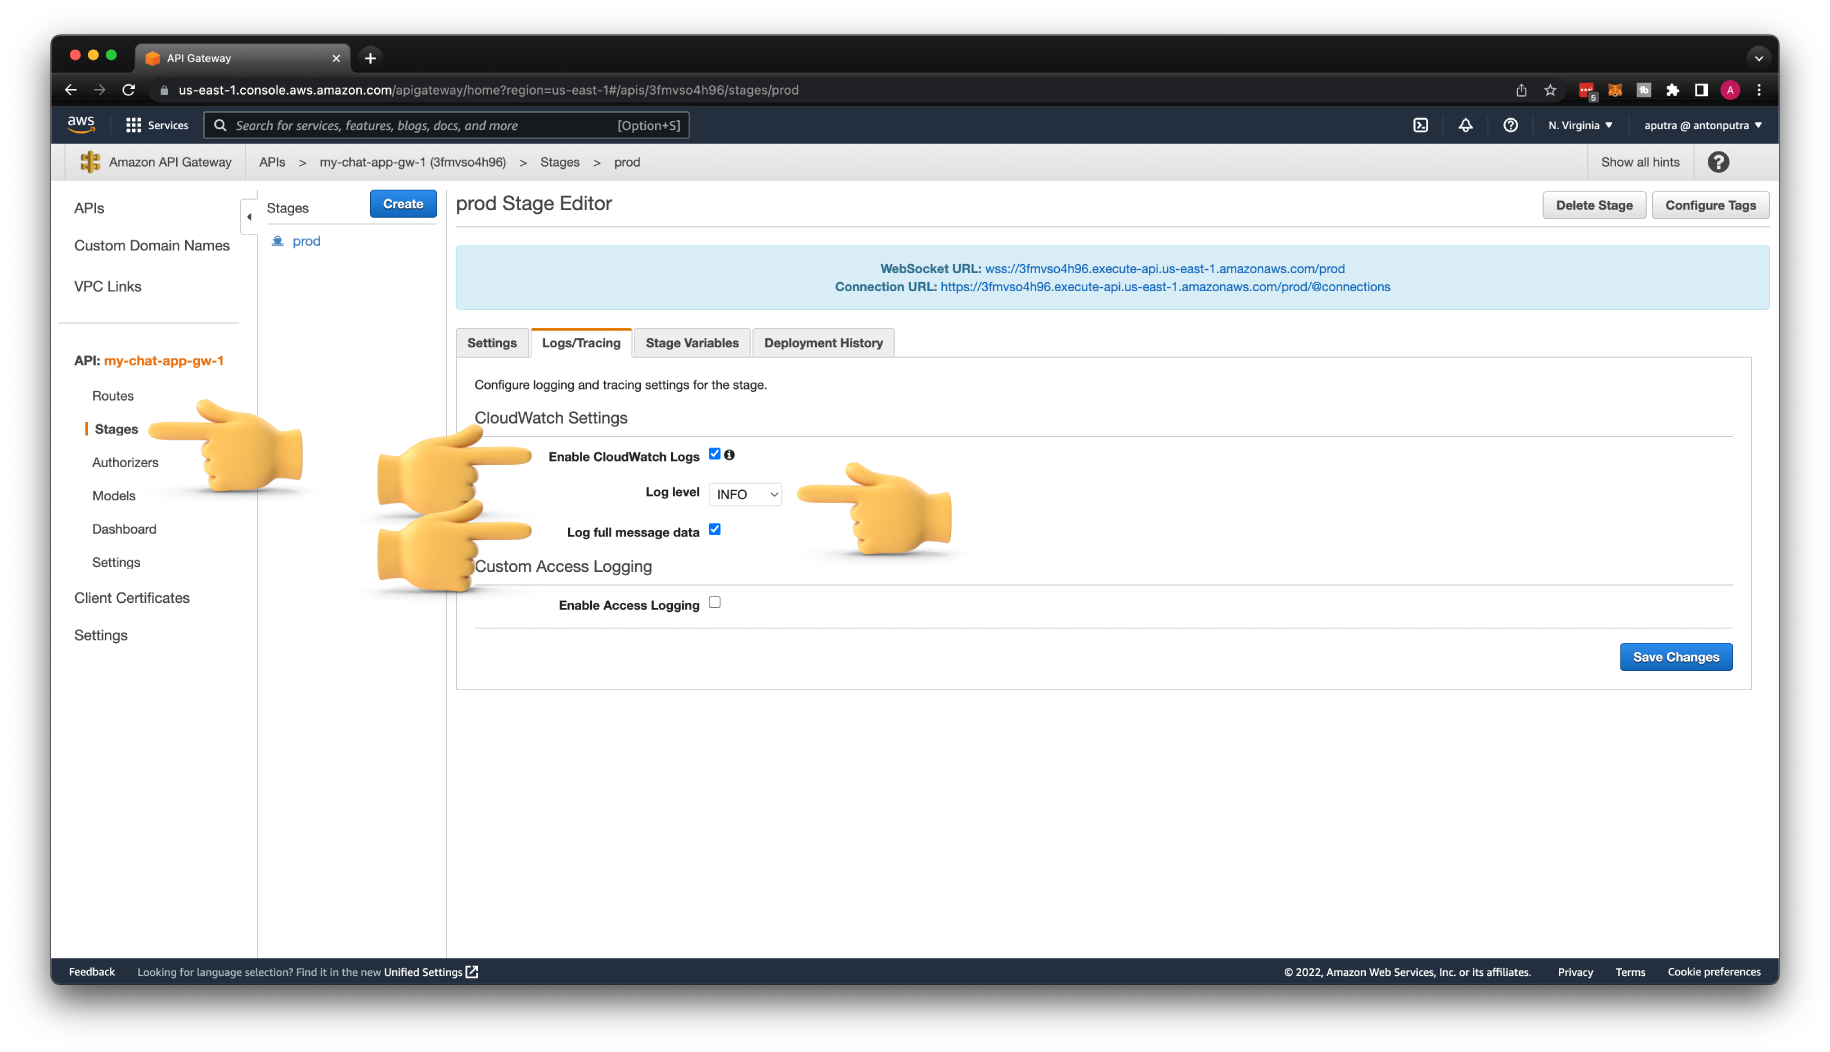
Let's go ahead and enable Amazon CloudWatch logs.
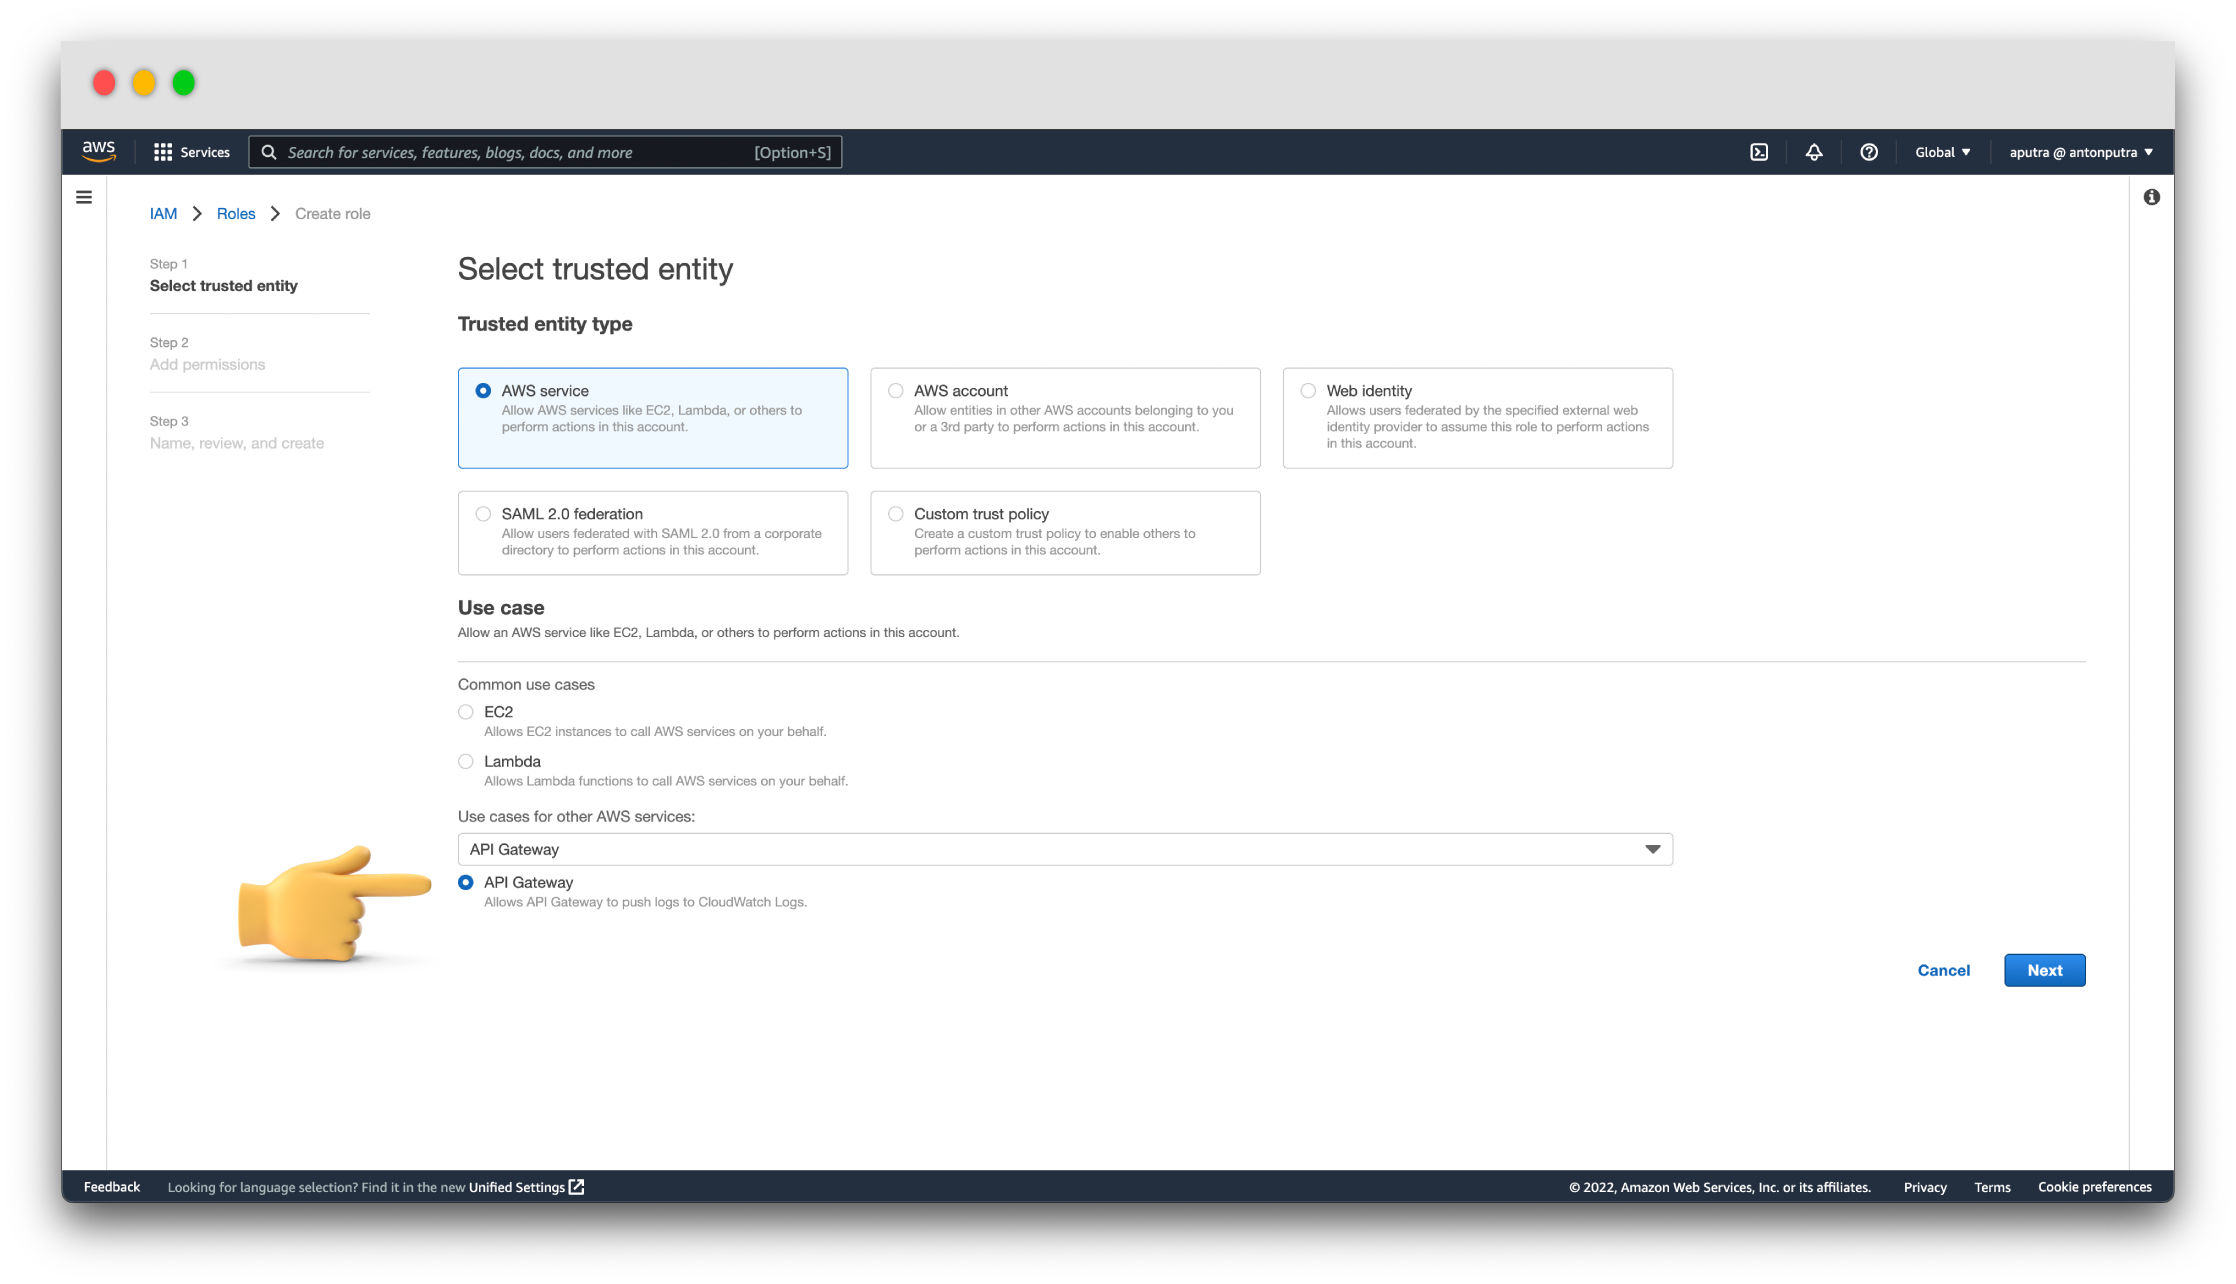
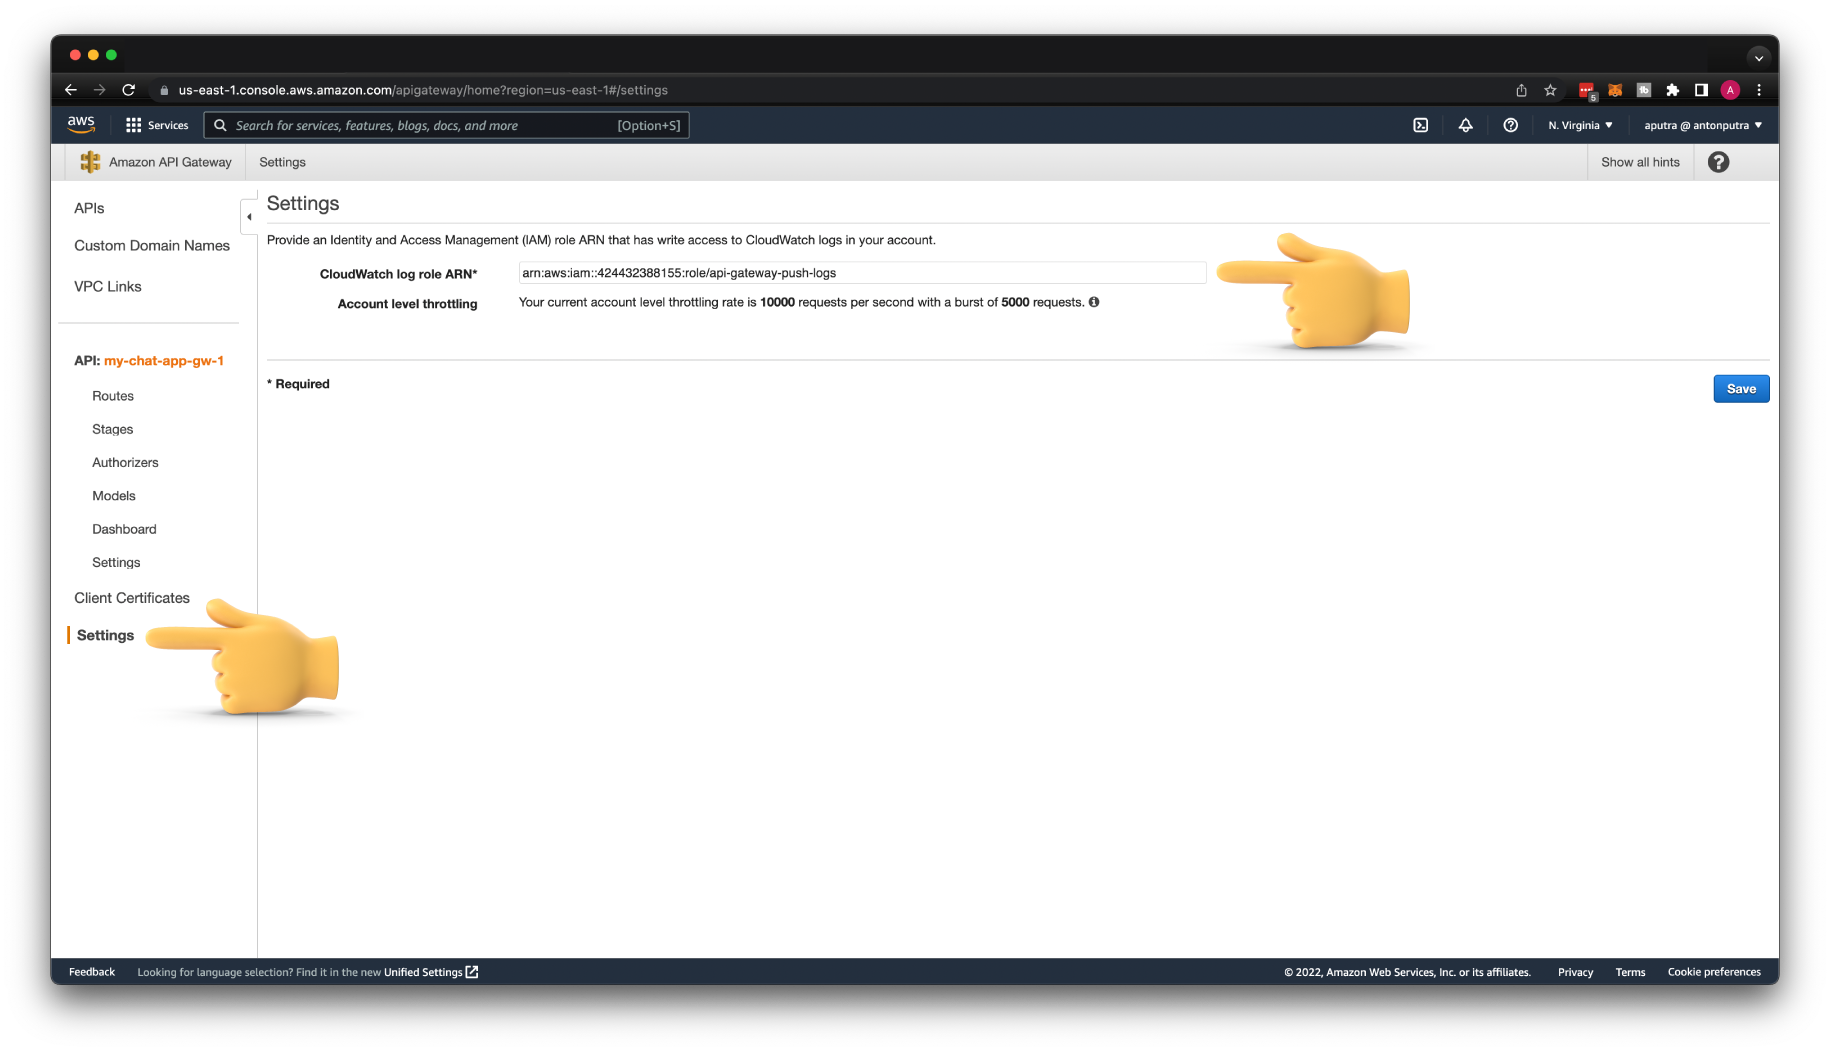
If you have never used API Gateway with CloudWatch, first, you need to create an IAM role and provide it in the API Gateway settings. Let's call it api-gateway-push-logs.
Then copy the ARN of this role and use it to provide write access for your API Gateway.
You should also get a new log group in CloudWatch /aws/apigateway/welcome indicating that integration is working.
To start getting logs in CloudWatch, you need to explicitly enable logs on each API Gateway stage. If you keep this setting in the production environment, you may get a large bill at the end of the month. I suggest you enable it only for debugging purposes or in development environments. However, you may keep the ERROR log level in production, but it's up to you.
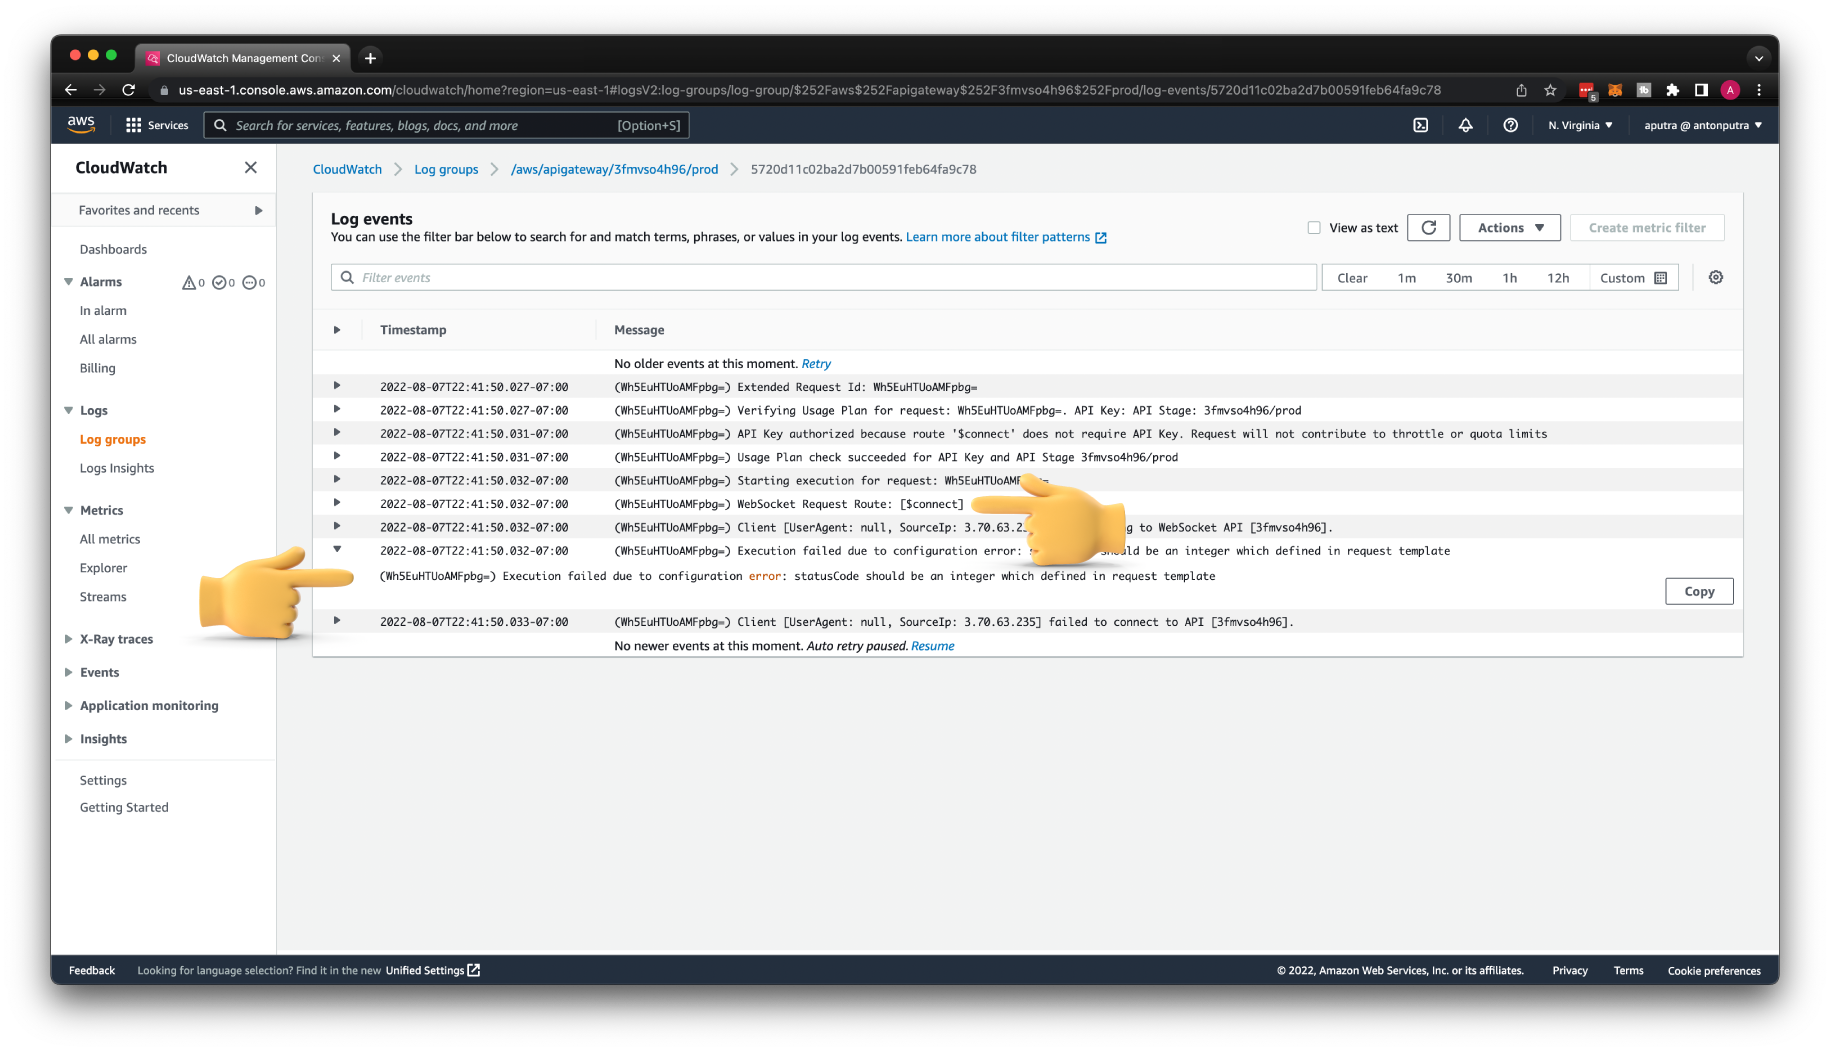
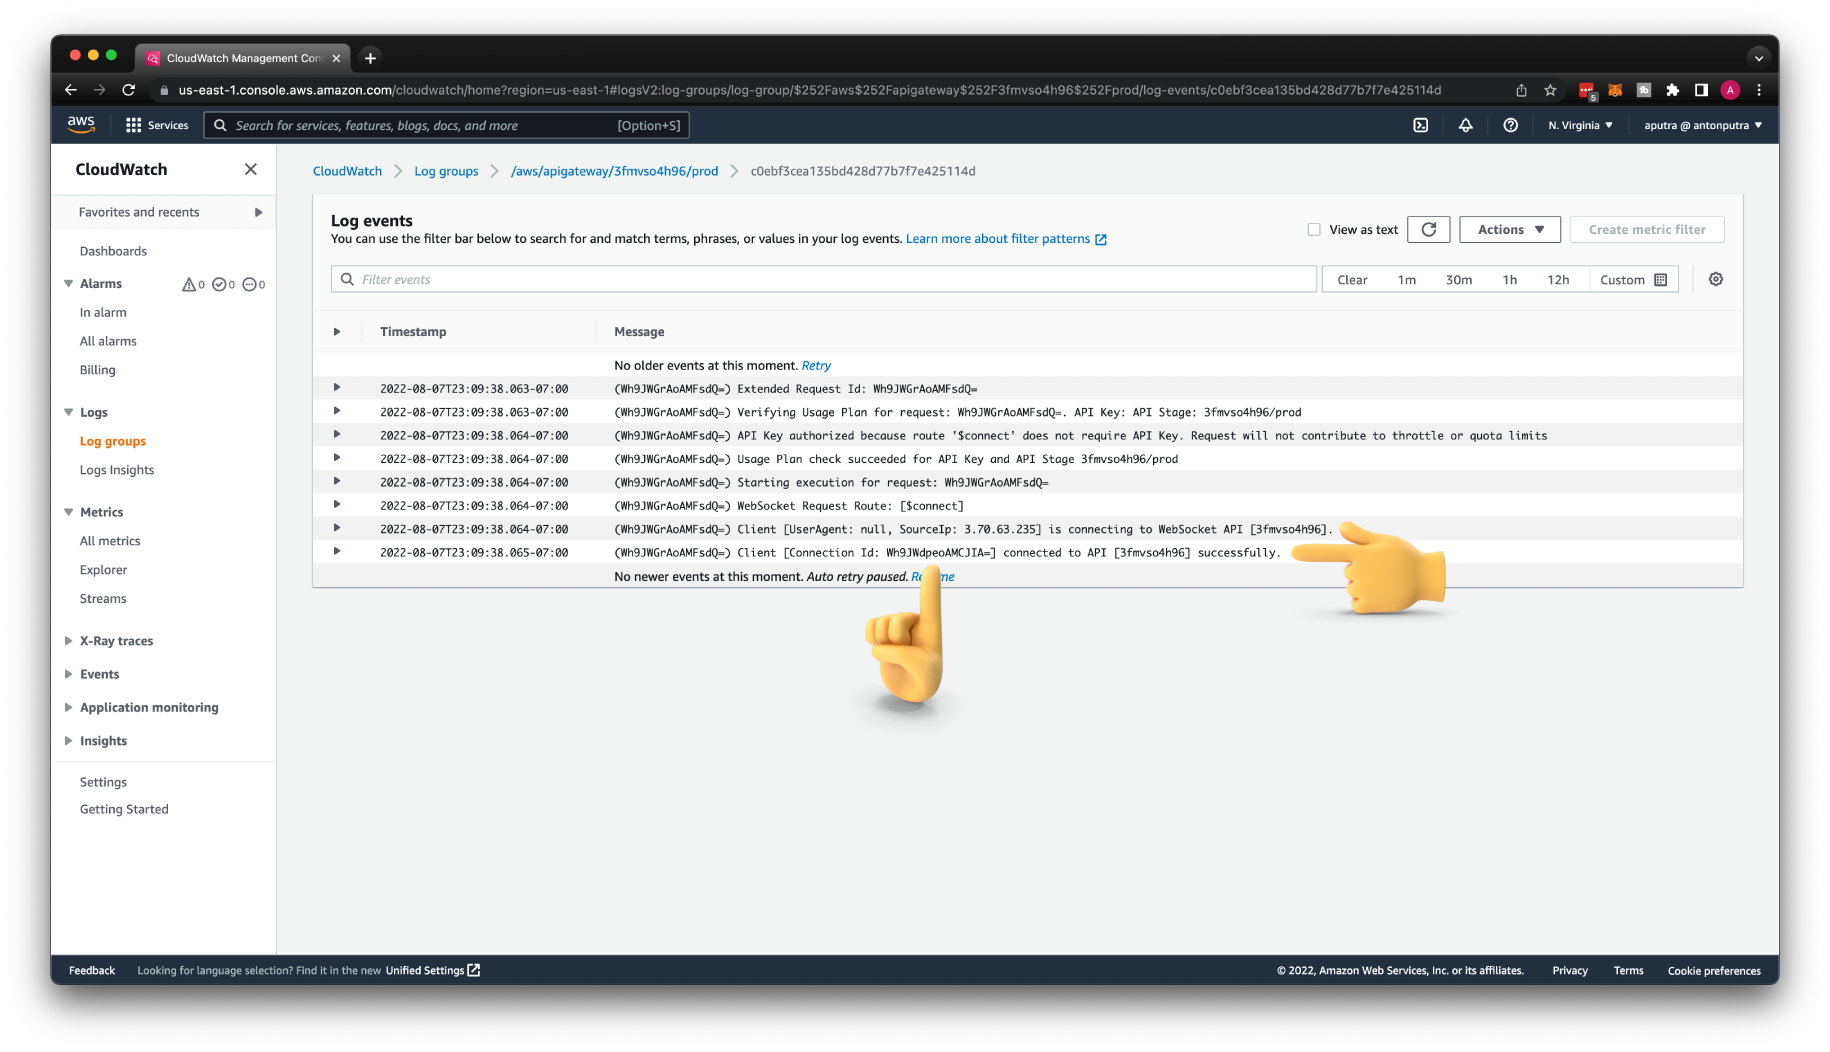
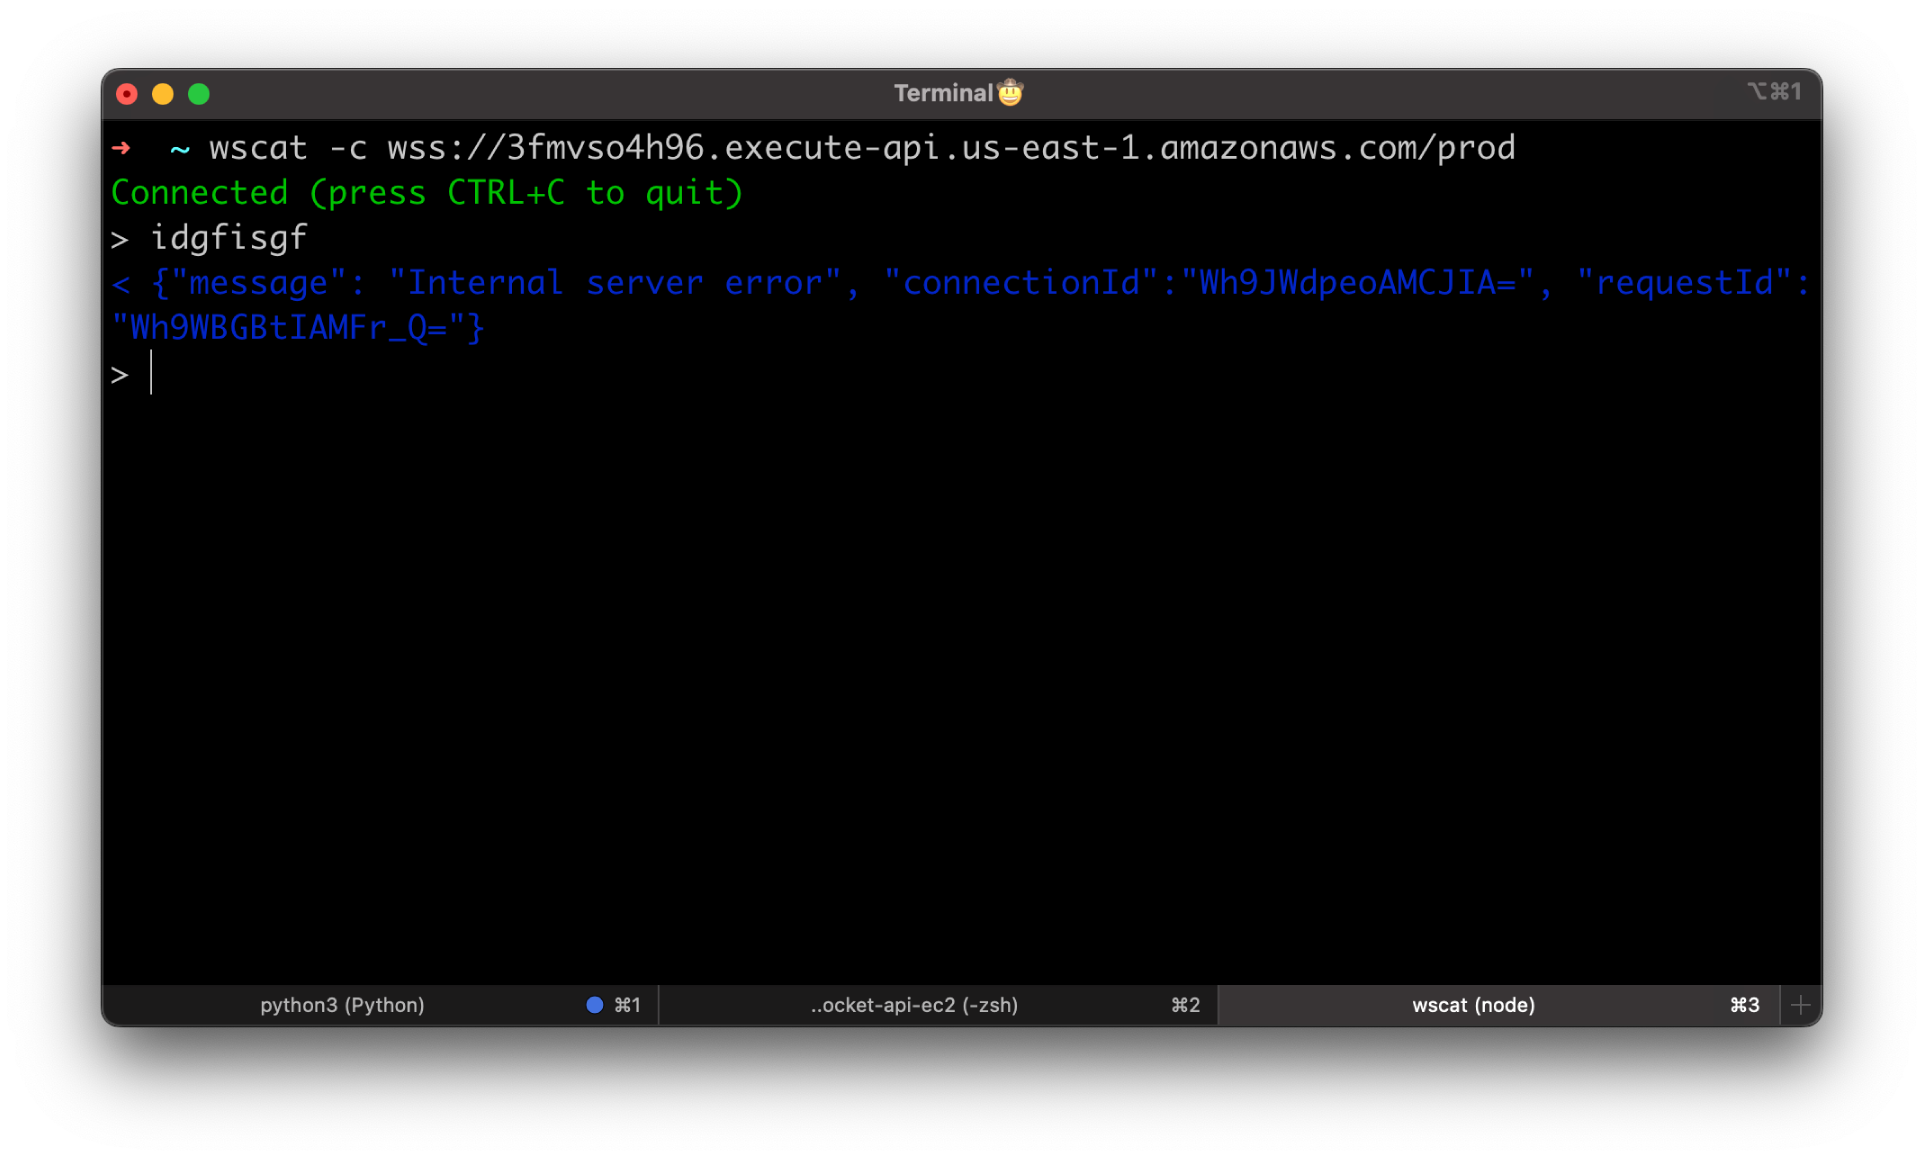
If you try to connect with wscat again, you'll get exactly the same error. But now, we can find the error description in the CloudWatch log.
wscat -c wss://3fmvso4h96.execute-api.us-east-1.amazonaws.com/prod
error: Unexpected server response: 500
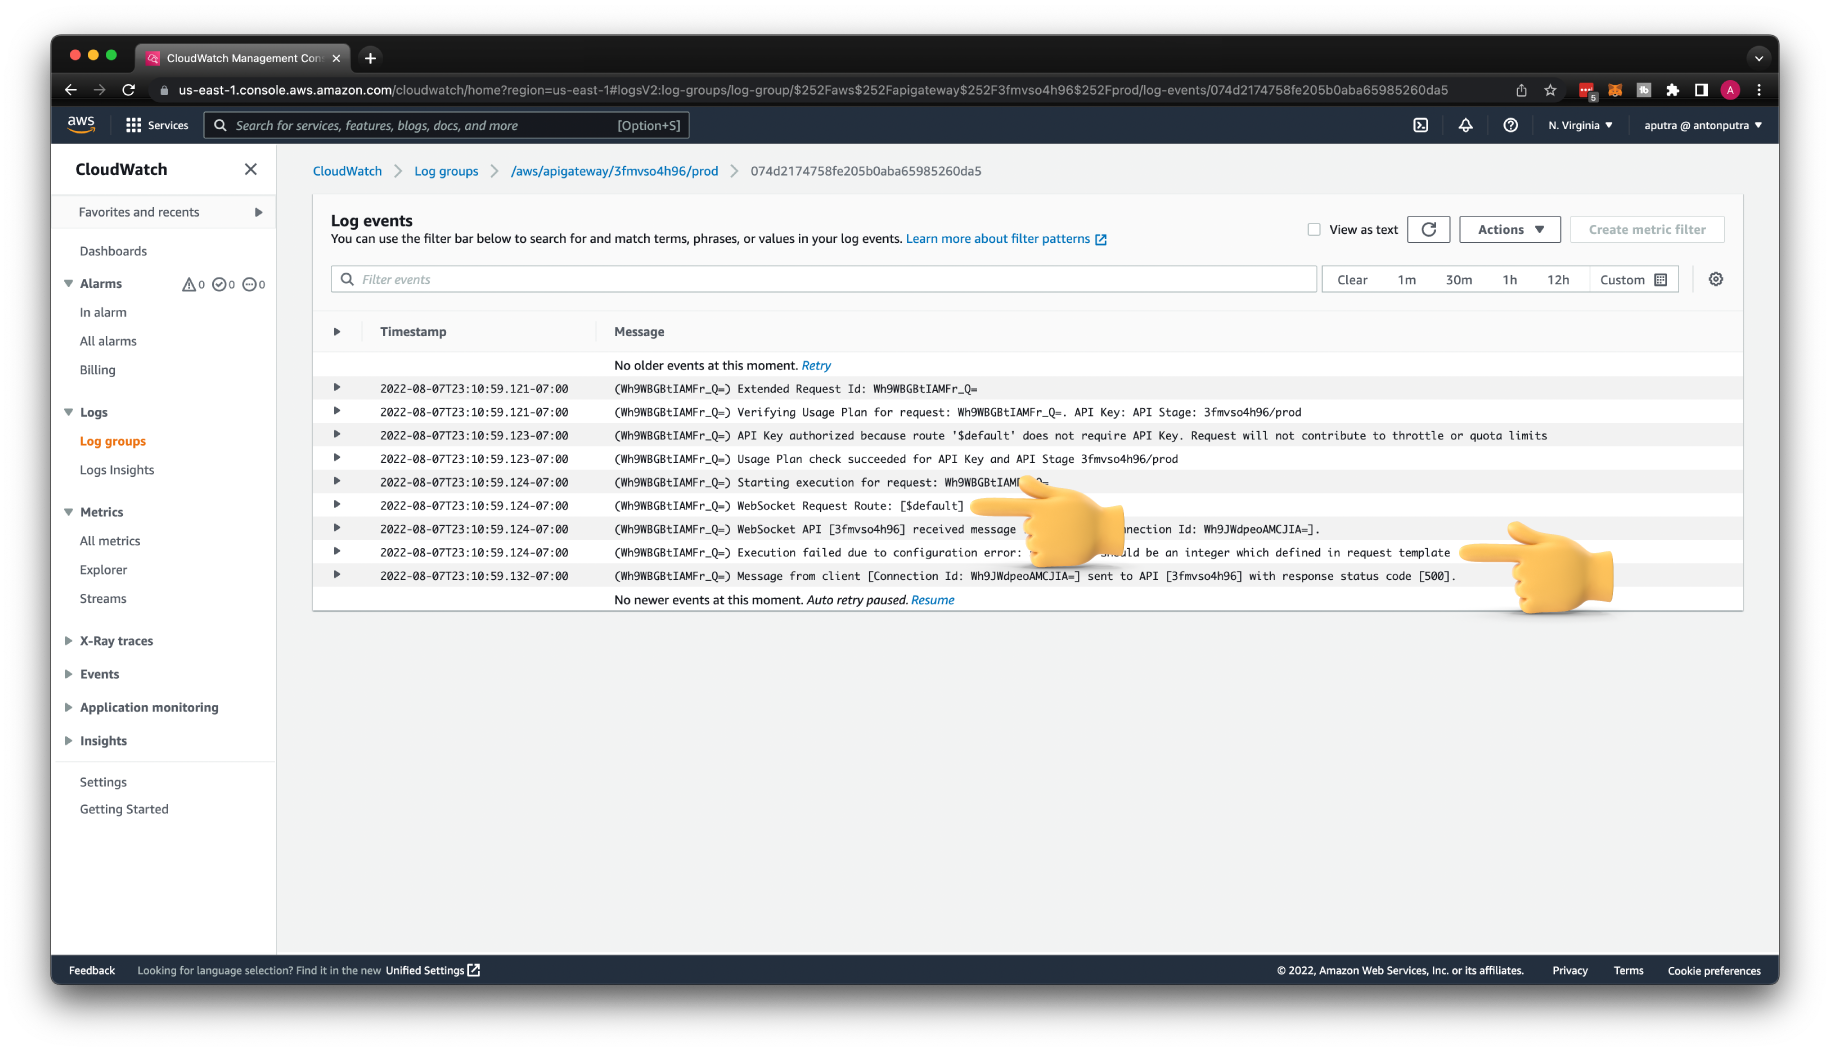
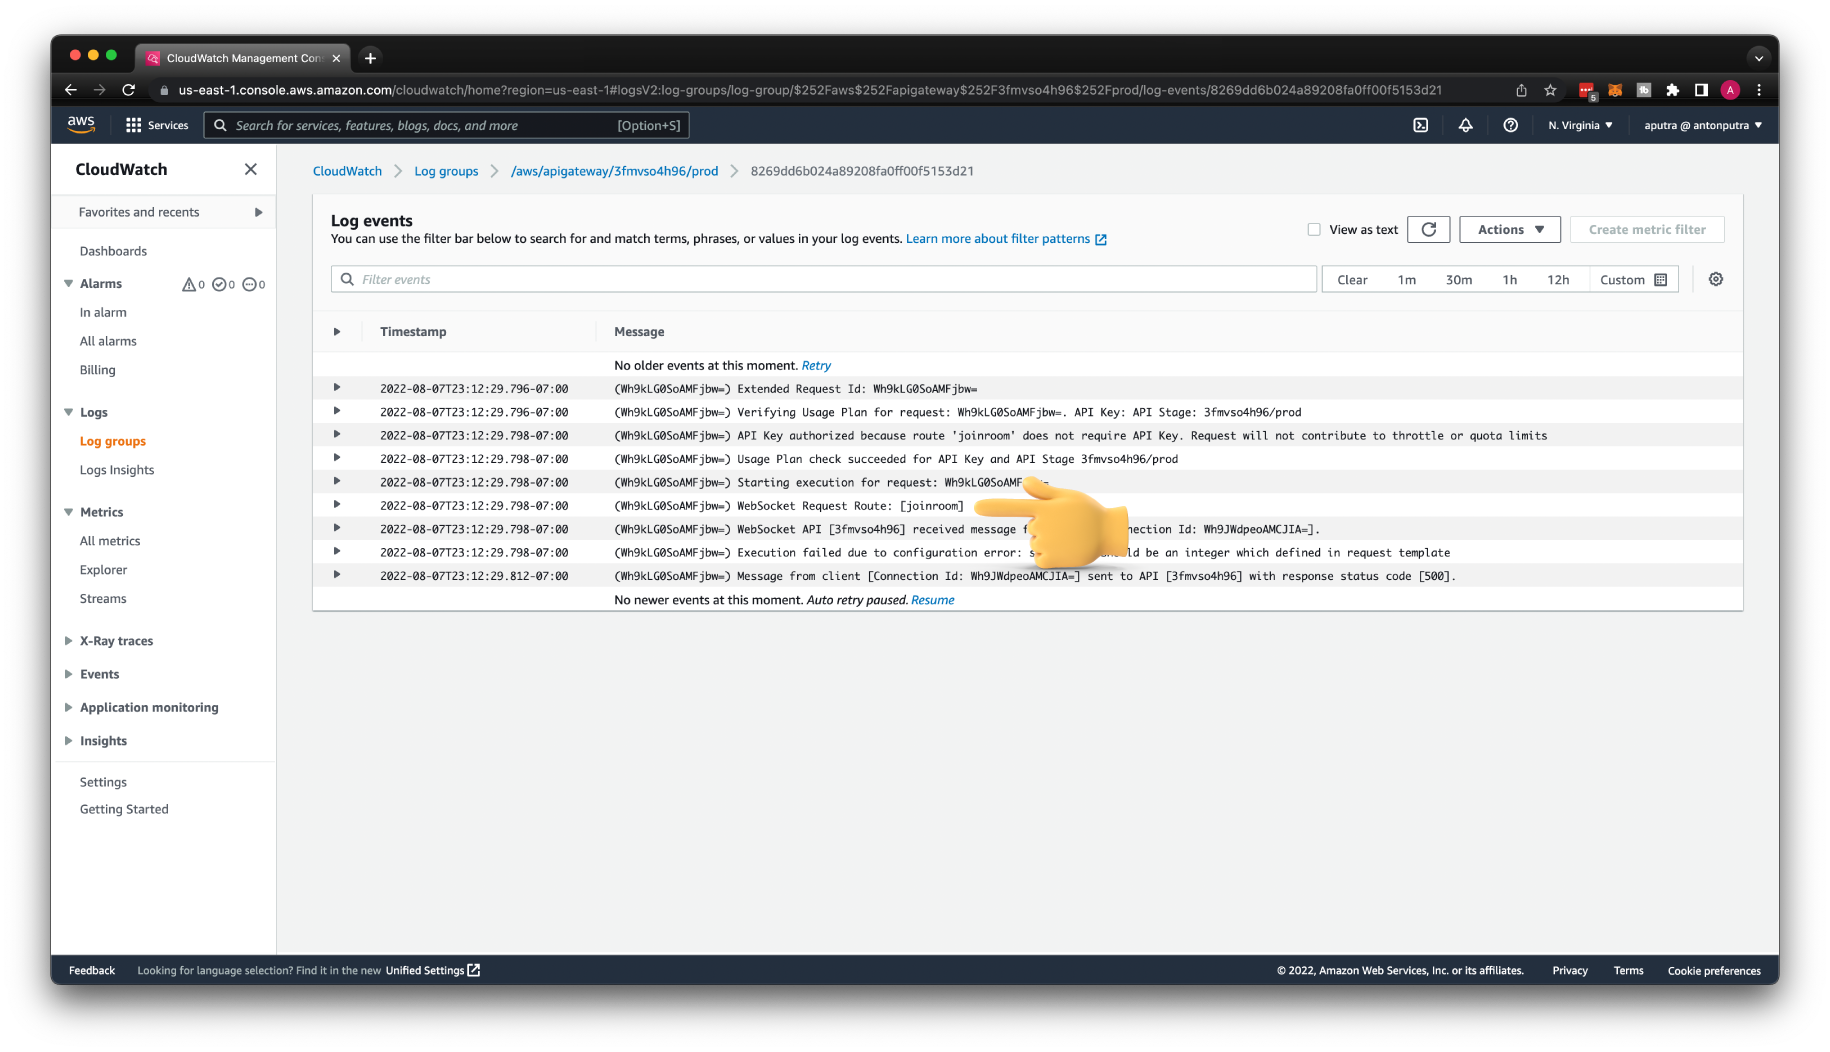
First of all, you can notice that the $connect route was used for that request. Then you can find the error message from the API Gateway: statusCode should be an integer which defined in request template. When we connect to the WebSocket API, our client expects to get a response.
Since we're using Mock integration, there is no backend and no response, but we can fake it. It's optional but maybe helpful for you and your development team to provide an endpoint that can accept connections when it's not even developed yet.
To configure the Mock integration backend to send a response, you need to create a Request Template. We will use this technique later as well when we need to send connectionId to the real backend.
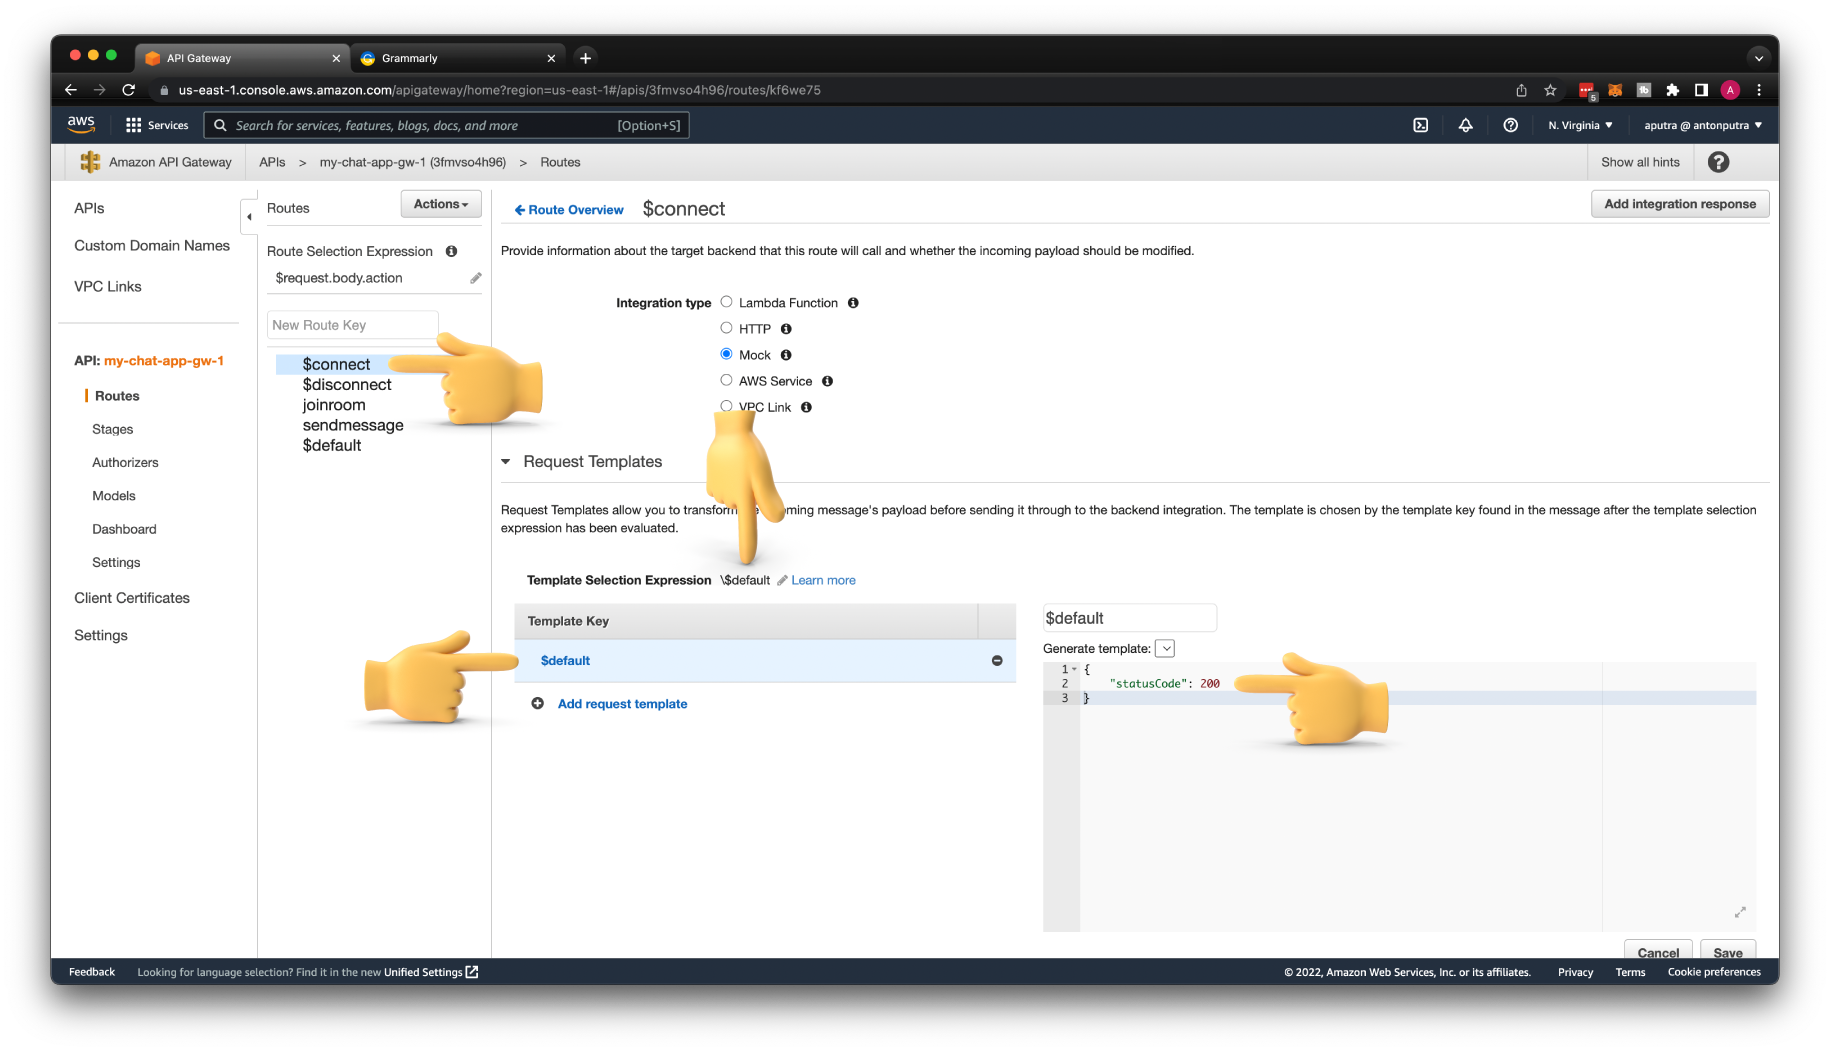
Select the $connect route and click on Integration Request above Mock type. Then use \$default for Template Selection Expression. Here we need to escape $ character.
For Template Key use just $default. This will match all the requests we send to the Mock integration. Finally, for the Generate template, paste the JSON object with successful status code 200.
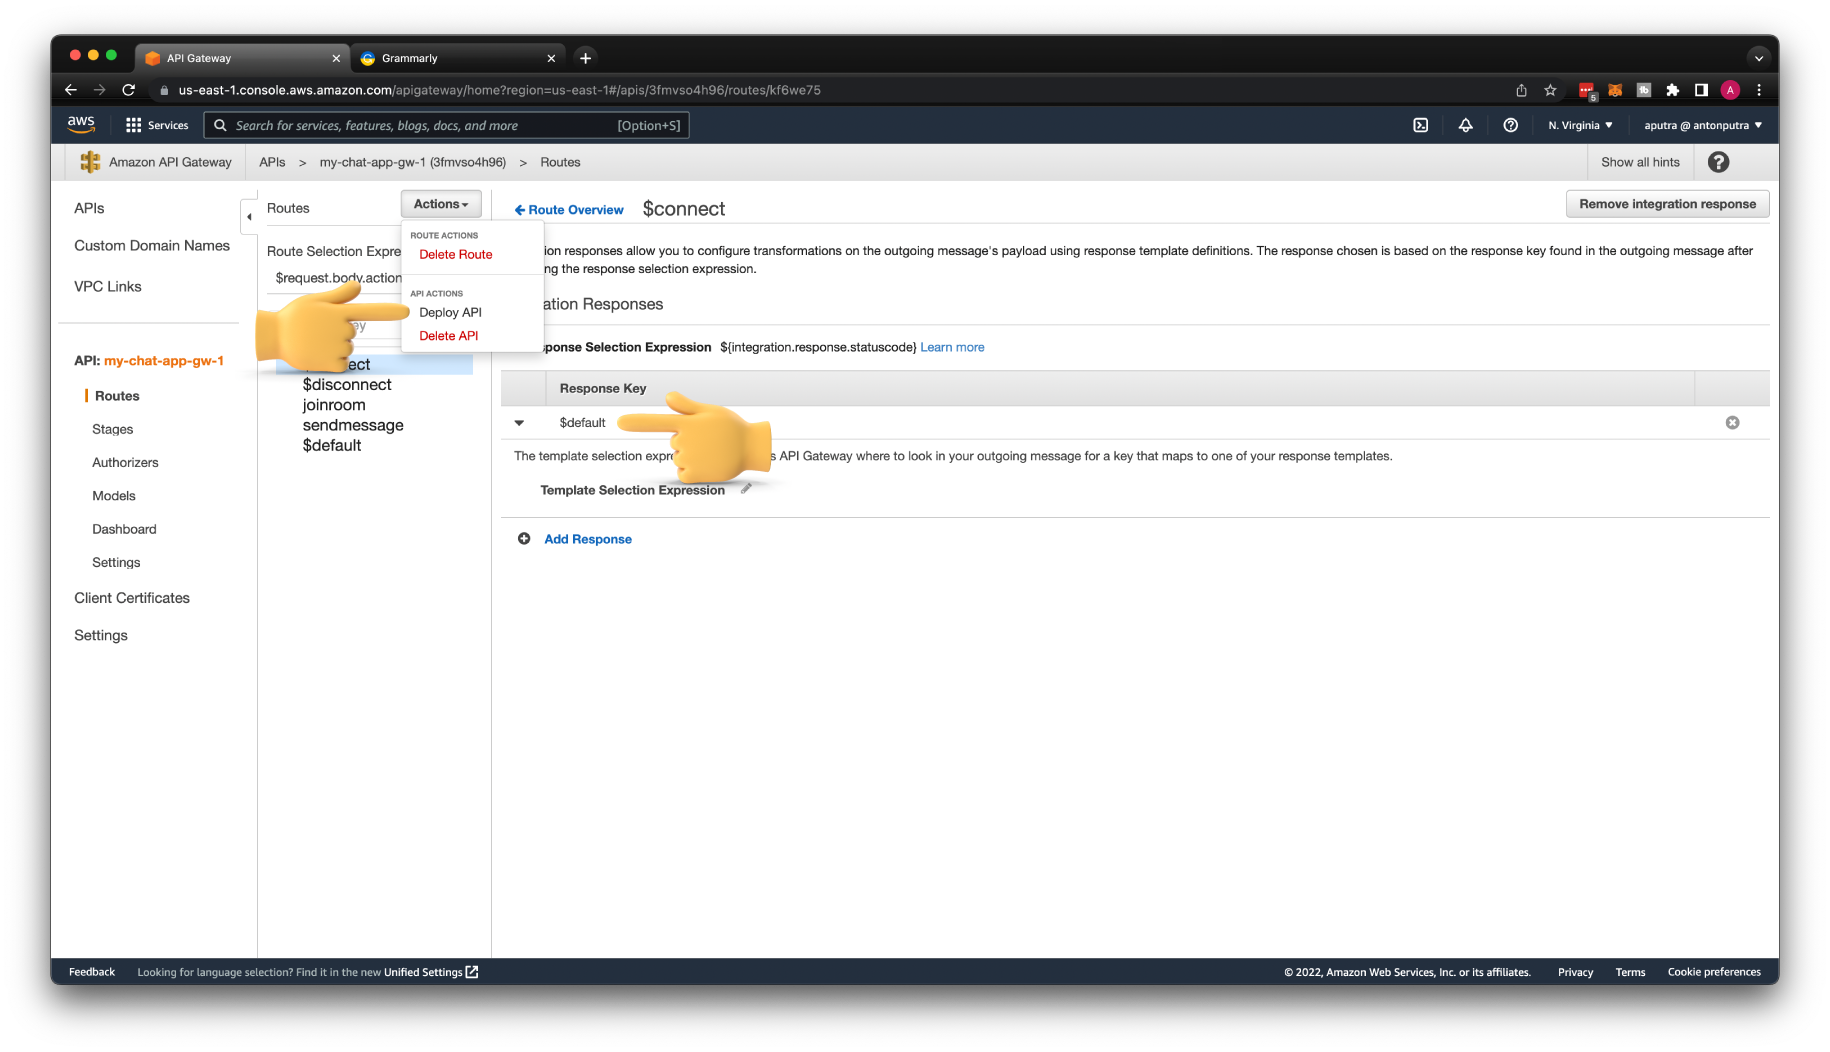
For this integration to work, we also need to add Integration Response. When you use Proxy, the response is automatically routed to your clients, but when you need to disable it, for example, if you want to add additional data to the backend, such as the connectionId of the client, you need to explicitly define the response using this template.
For the Response Key, you can either route all the responses from the backend to the client using $default key,
or you can match a specific response, for example 200, with the following regular expression: /2\d\d/
Don't forget to deploy your API to apply these changes. It may take a couple of minutes for the changes to take effect.
In a few minutes, try to connect to the API Gateway again. At this time you should be able to establish a successful connection.
If you open CloudWatch logs again, you should be able to find that the client is successfully connected.
By the way, this is a Connection Id that we will need to send anything back to the specific client later in this tutorial. You can synchronously reply to the client, but if you need to push something from the server if the client didn't request it, you need this Id.
Now let's test our routes. First, let's enter some garbage.
We got a familiar error, but the key here is that API Gateway routed this request to the $default route. Anything you send except the valid JSON object with action property that will match one of your routes will go to the $default route.
Next, let's try to test a valid route. Use joinroom action with roomname property.
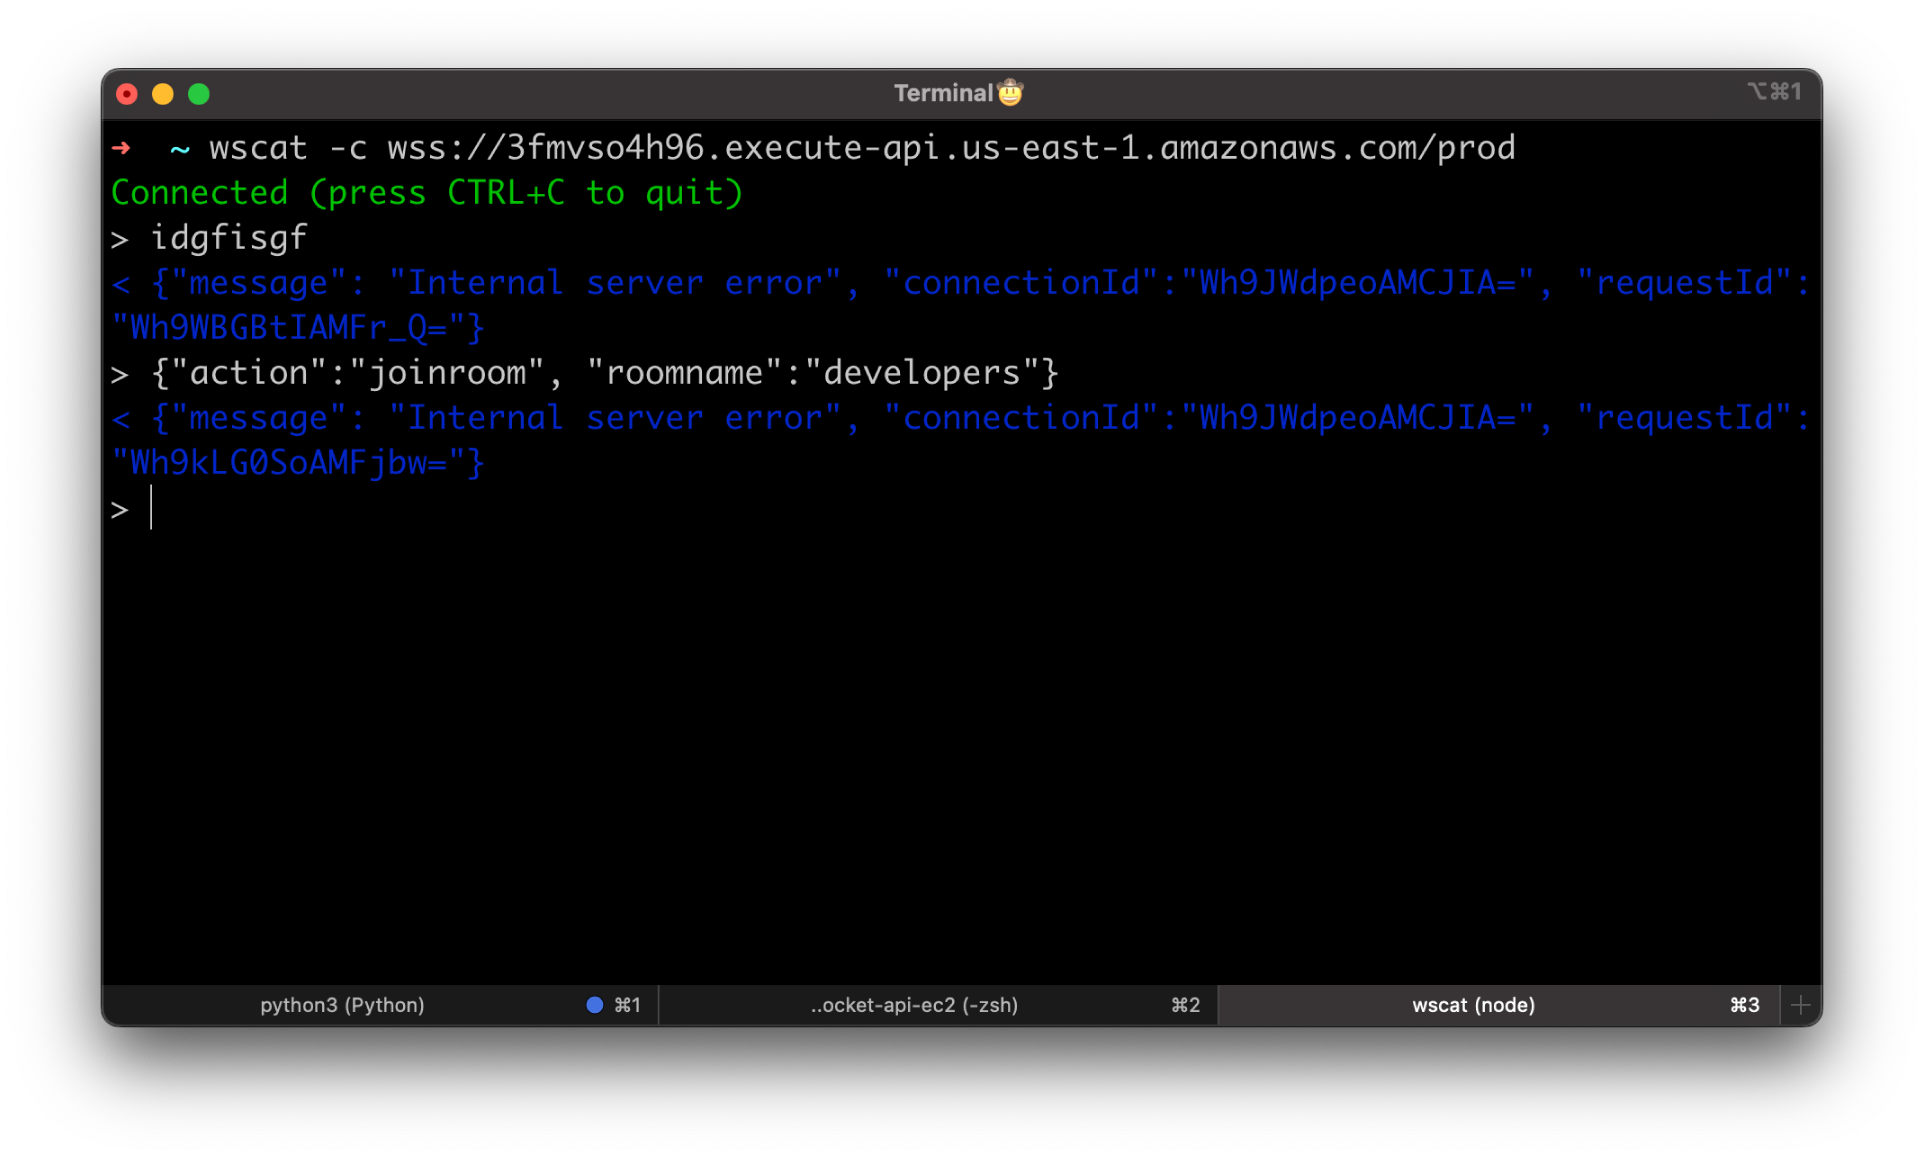
This time message was routed to joinroom custom route that we created.
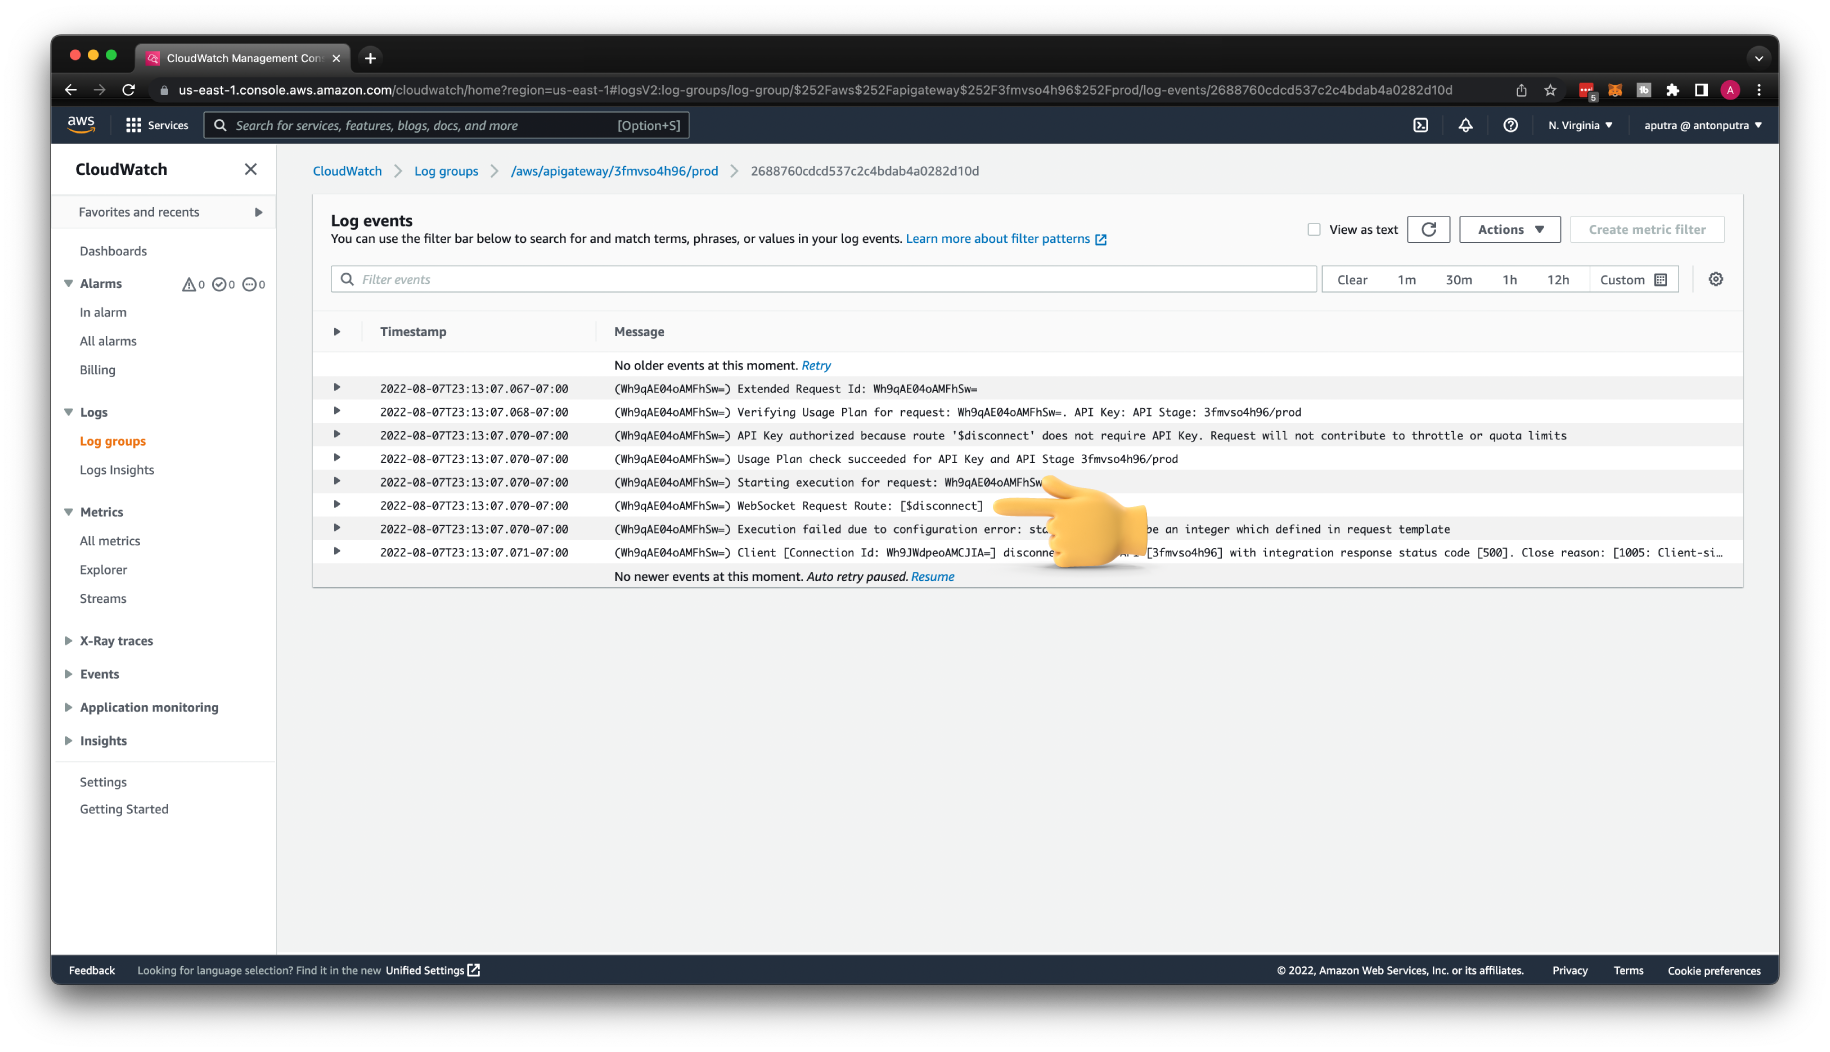
Let's do the final test. Let's close the connection you can use Ctrl+C to exit.

In the CloudWatch, you can find that the $disconnect route was used.
Create Public HTTP Backend Integration
We're going to start with a simple HTTP integration. When the API Gateway routes the message to one of the routes with HTTP integration. The request is redirected to the HTTP endpoint. It can be located in your VPC with the public IP address, or it can be the arbitrary endpoint on the Internet.
The problem with this approach, there is no easy way to restrict who can access your HTTP endpoint, so in most cases, it must have a public IP and be reachable from the Internet.
You're not going to use it in production often, but it's an easy way to get started and develop your backend. In one of the following sections, we will convert it to the VPC Link integration with the Network Load Balancer and Auto Scaling Group.
Create AWS Security Group
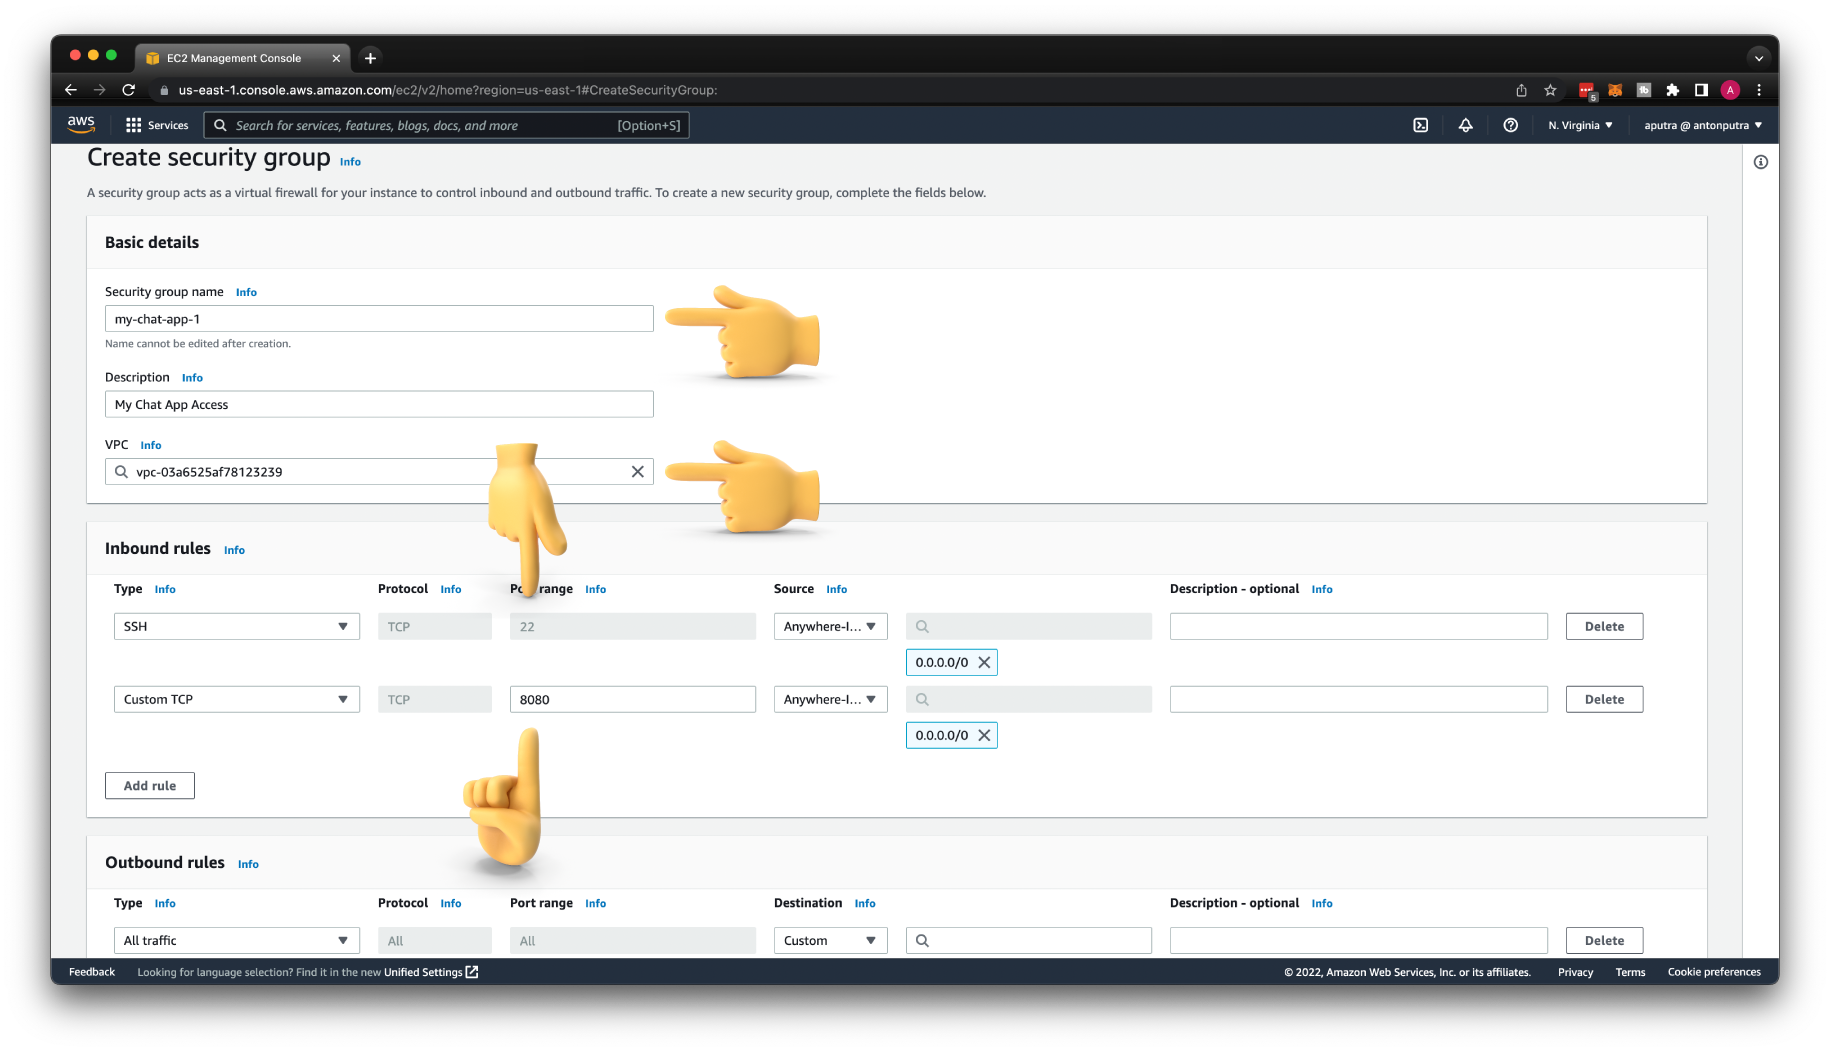
First of all, let's start by creating an AWS Security Group for our chat app. Let's call it my-chat-app-1 and give it a description of My Chat App Access.
We need to open port 22 to be able to SSH to the instance. Also, our chat app will listen on port 8080, so we need to open it as well.
Create AWS EC2 Instance
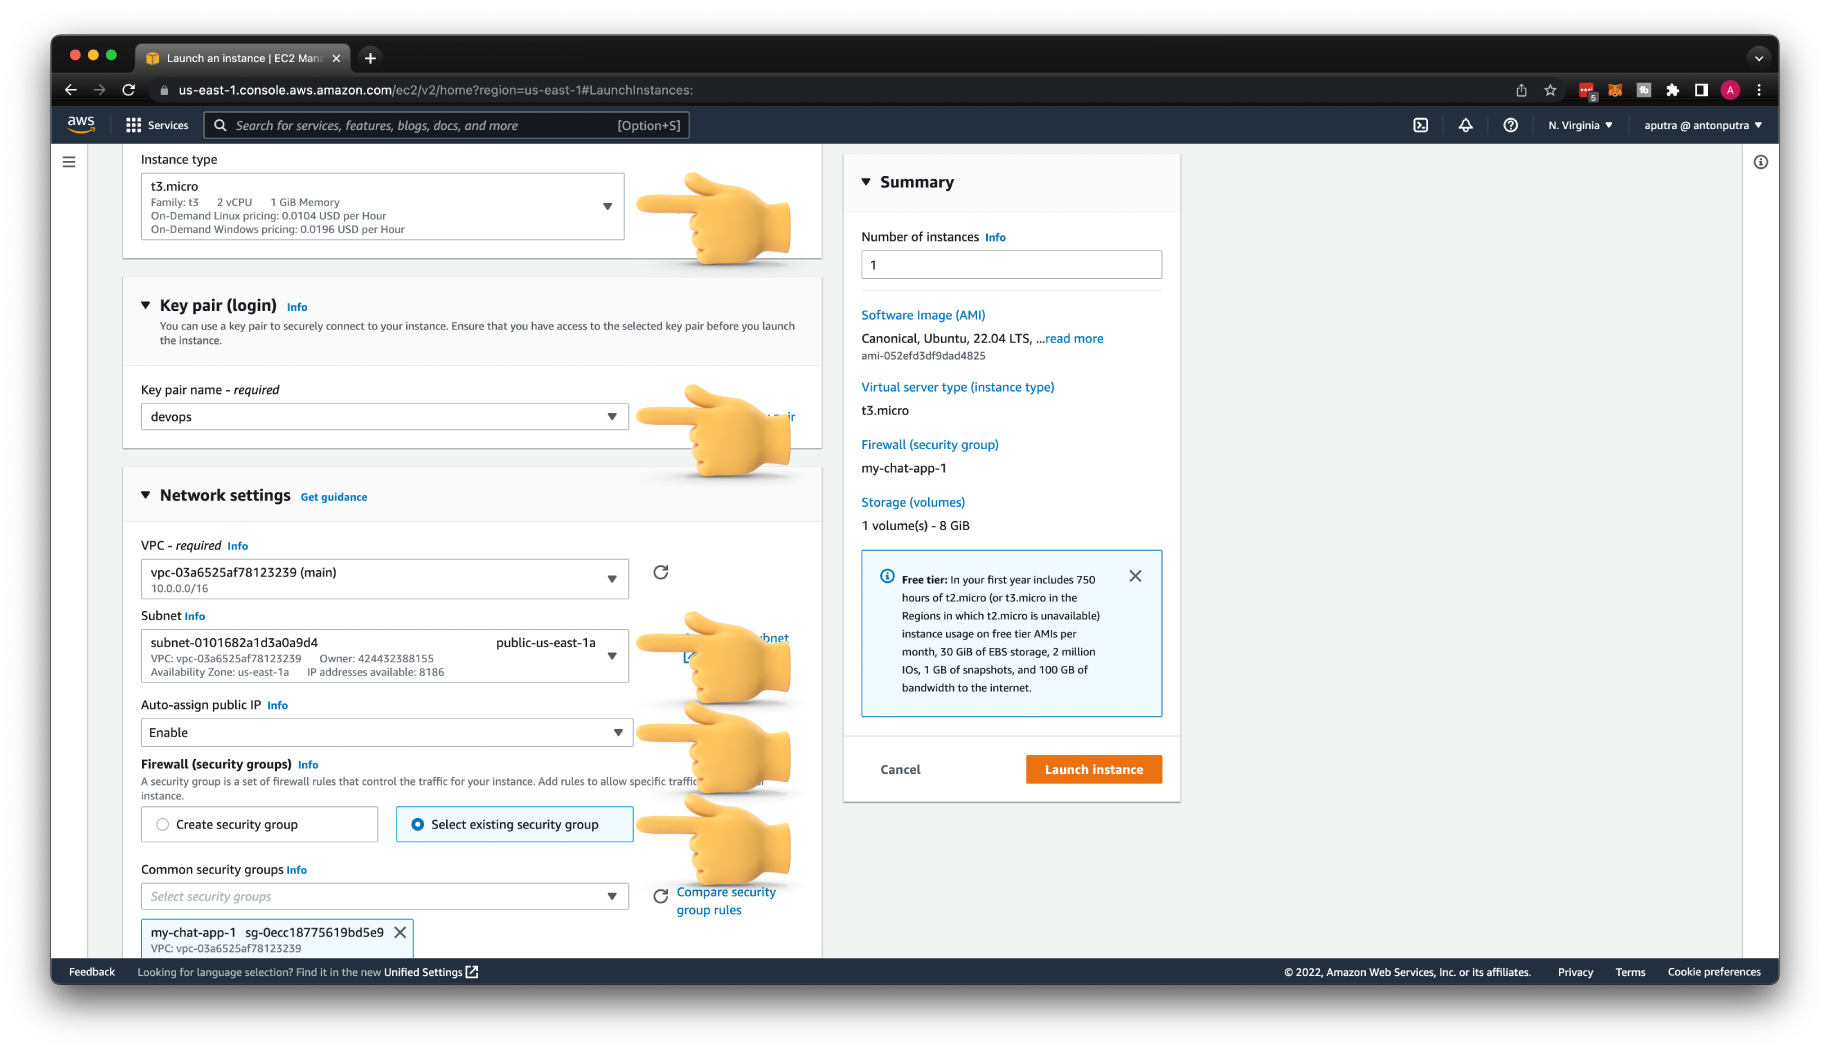
Next, create an AWS EC2 instance. Let's call it my-chat-app-1. Select Ubuntu 22 LTS for your operating system. You can keep the Instance type or change it to something newer such as t3.micro. If you have a Key pair, use the existing one or create a new one with the name devops.
Make sure that you will place your virtual machine to one of your public subnets with a default route to Internet Gateway. Enable Auto-assign public IP and choose the security group that we just created for this app.
Create NodeJS App to Test HTTP Integration
To start, we need to SSH to the EC2 instance using its public IP address. If you have never used this devops key pair before, you also need to restrict access to the private key.
To SSH, grab public IP from the Console and use ubuntu Linux user.
Update Linux package list and install nodejs and npm package manager.
Create a folder for the chat app and update the owner to the current ubuntu user.
Then we need to initialize the NodeJS project and install a few dependencies. Express framework and a body-parser to parse JSON payload in the request.
Let's create a simple REST API based on the express to test HTTP integration.
In this example, we will expose two endpoints: /connect to test build-in connect route and custom route with /joinroom endpoint.
We're going to log that the endpoint is invoked and return the 200 HTTP status code.
To start the app, we're going to use node executable first, and then we will use systemd manager for VPC Link integration.
You can use the EC2 public IP address to test the app.
curl -i http://3.93.14.89:8080/connect
...
HTTP/1.1 200 OK
X-Powered-By: Express
Content-Type: text/plain; charset=utf-8
Content-Length: 2
ETag: W/"2-nOO9QiTIwXgNtWtBJezz8kv3SLc"
Date: Mon, 08 Aug 2022 08:36:37 GMT
Connection: keep-alive
Keep-Alive: timeout=5

OK%
Create HTTP Integrations for $connect and joinroom Routes
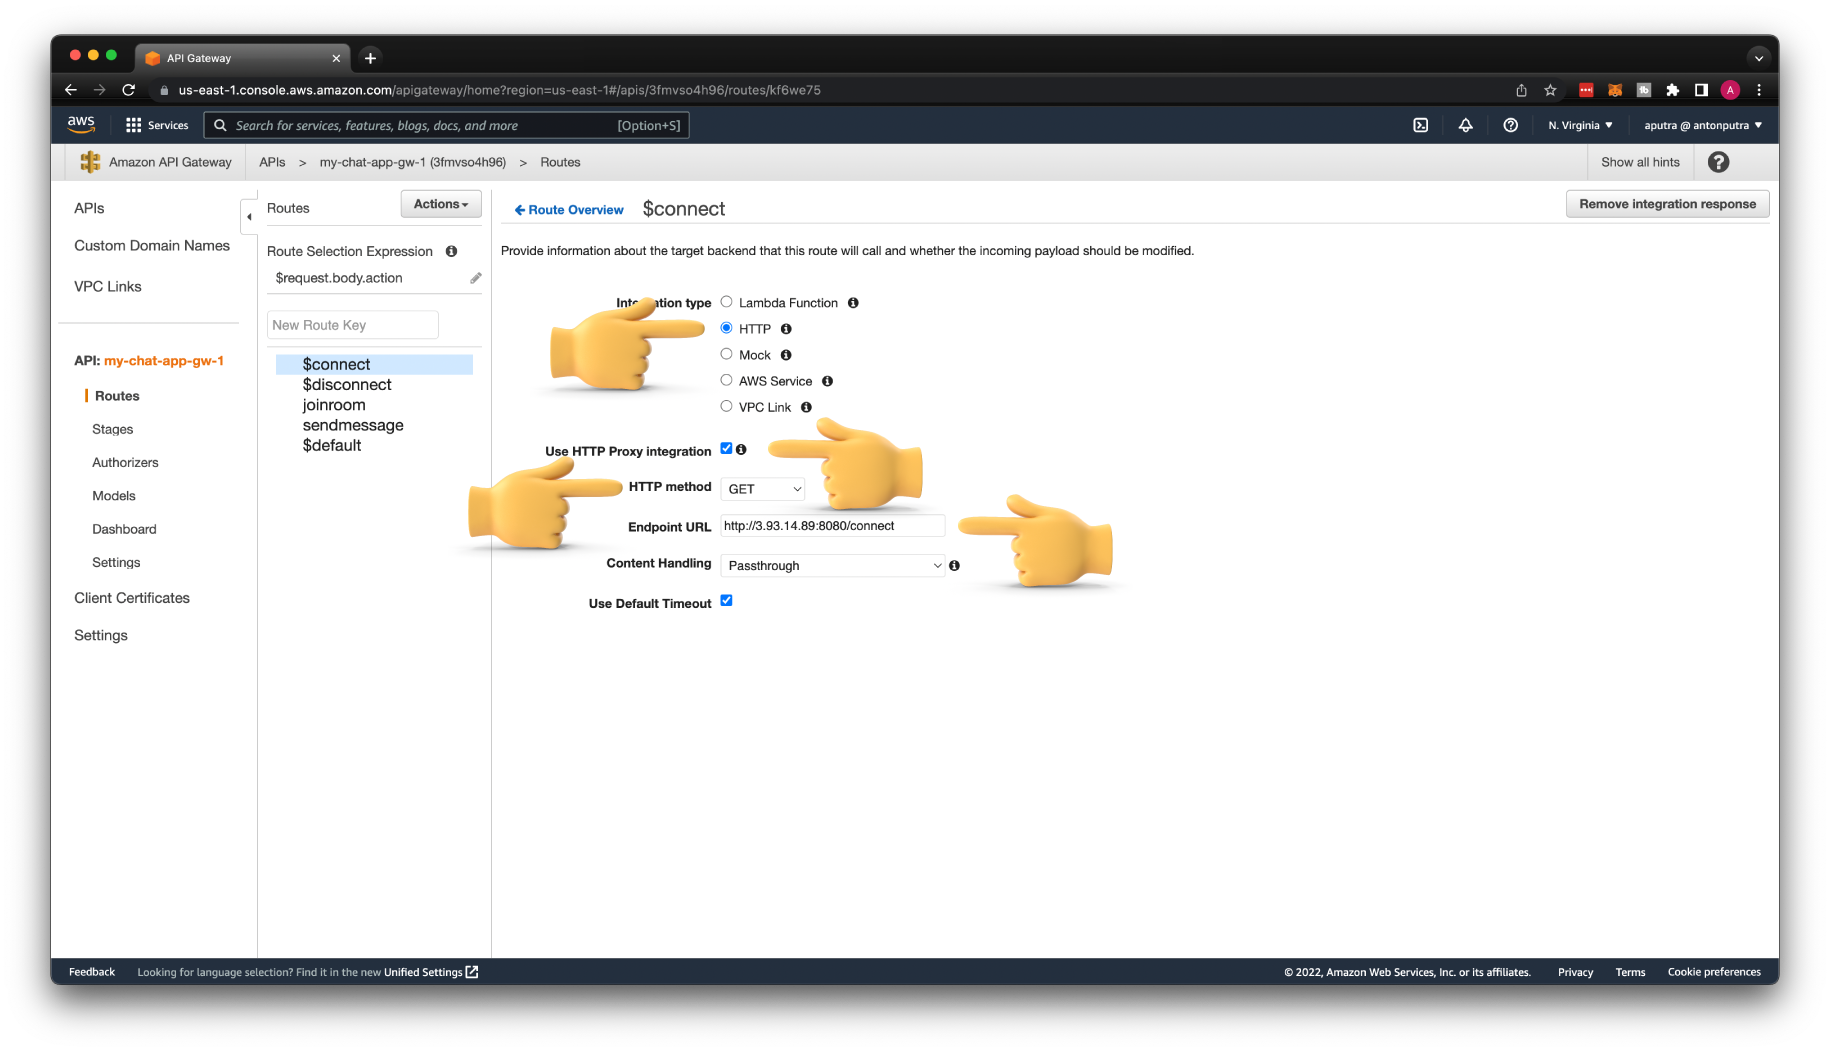
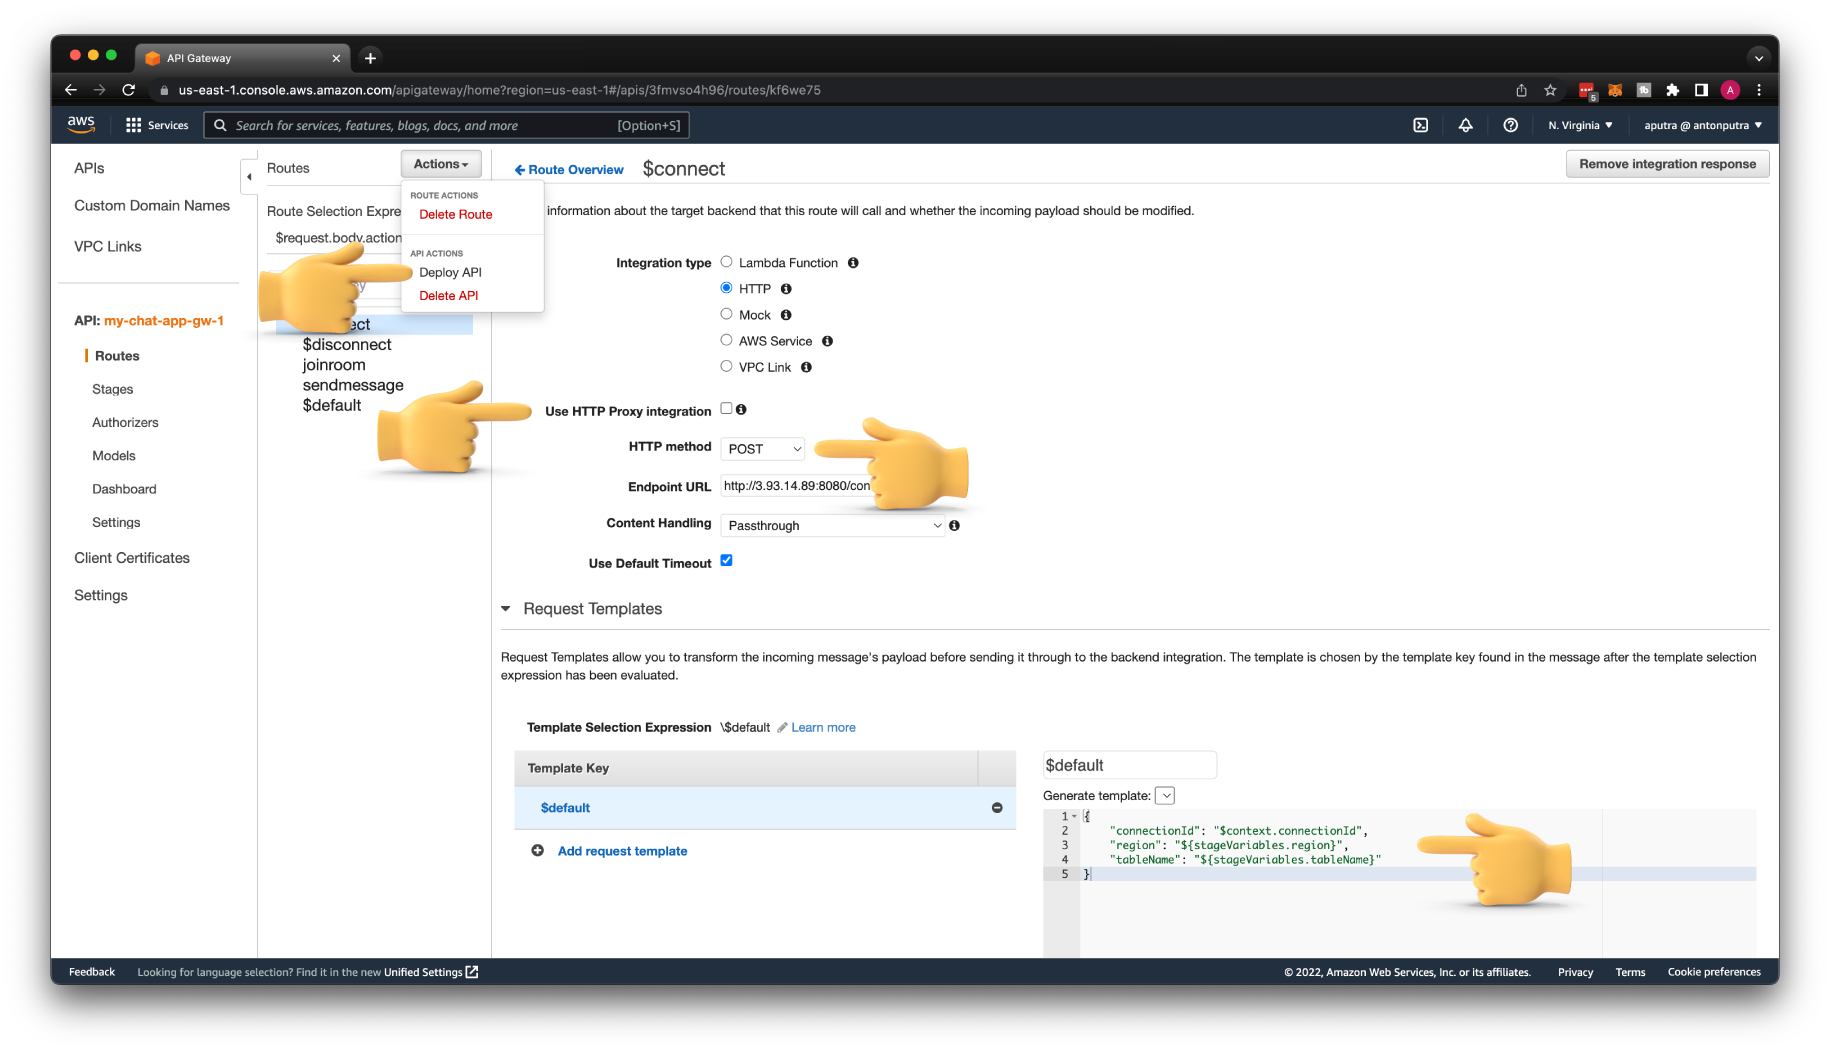
Let's update the Integration type on the $connect route first. Change it to HTTP. Enable Use HTTP Proxy integration; this will remove the request template that we created and automatically return the response from the backend to the client.
Then enter the same endpoint with the EC2 public IP address that we tested earlier with /connect path.
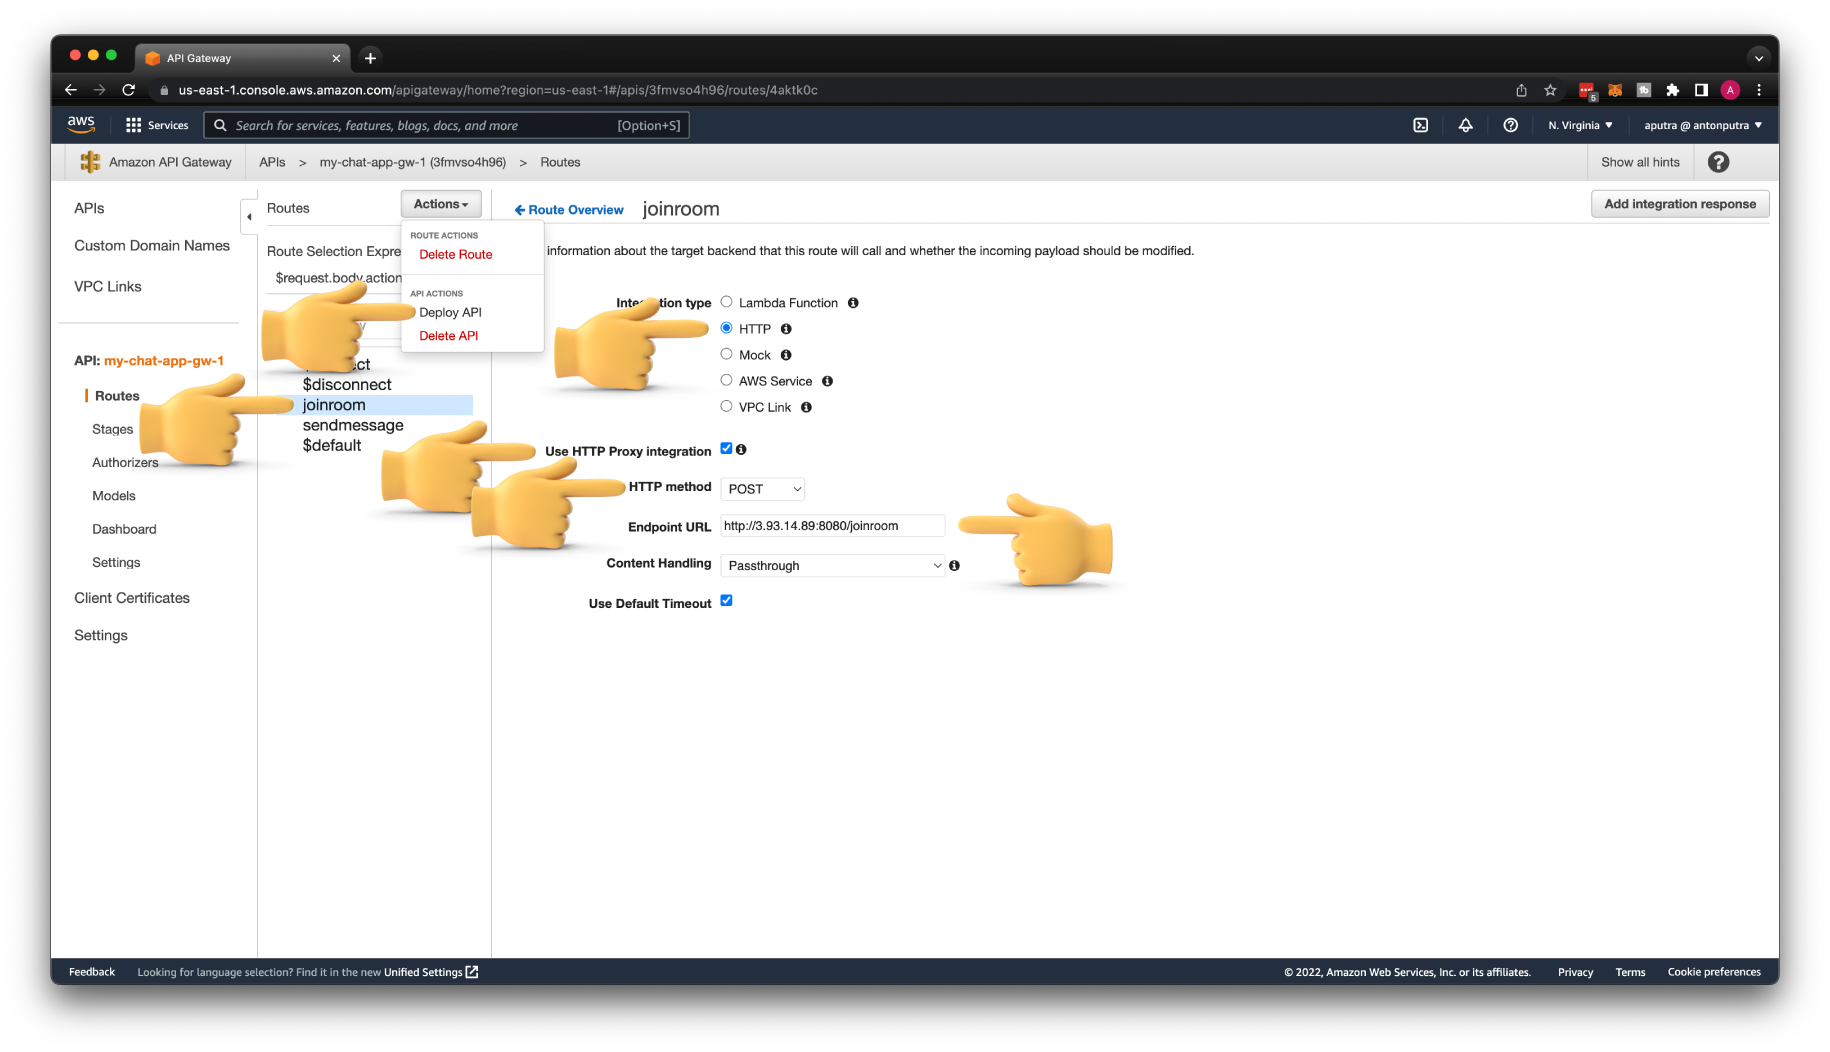
Next is the joinroom custom route. Update it to HTTP integration as well. Make sure that you will change it to the HTTP POST method. Otherwise, you won't get a JSON payload in your backend. Also, enable Use HTTP Proxy integration.
Then for the Endpoint URL, use the EC2 public IP address with /joinroom path. Don't forget to Deploy API at the end.
In addition to logging the endpoint, let's print out the HTTP headers, URL parameters, and JSON payload, which are forwarded from the client to our NodeJS backend.
Start the express app.
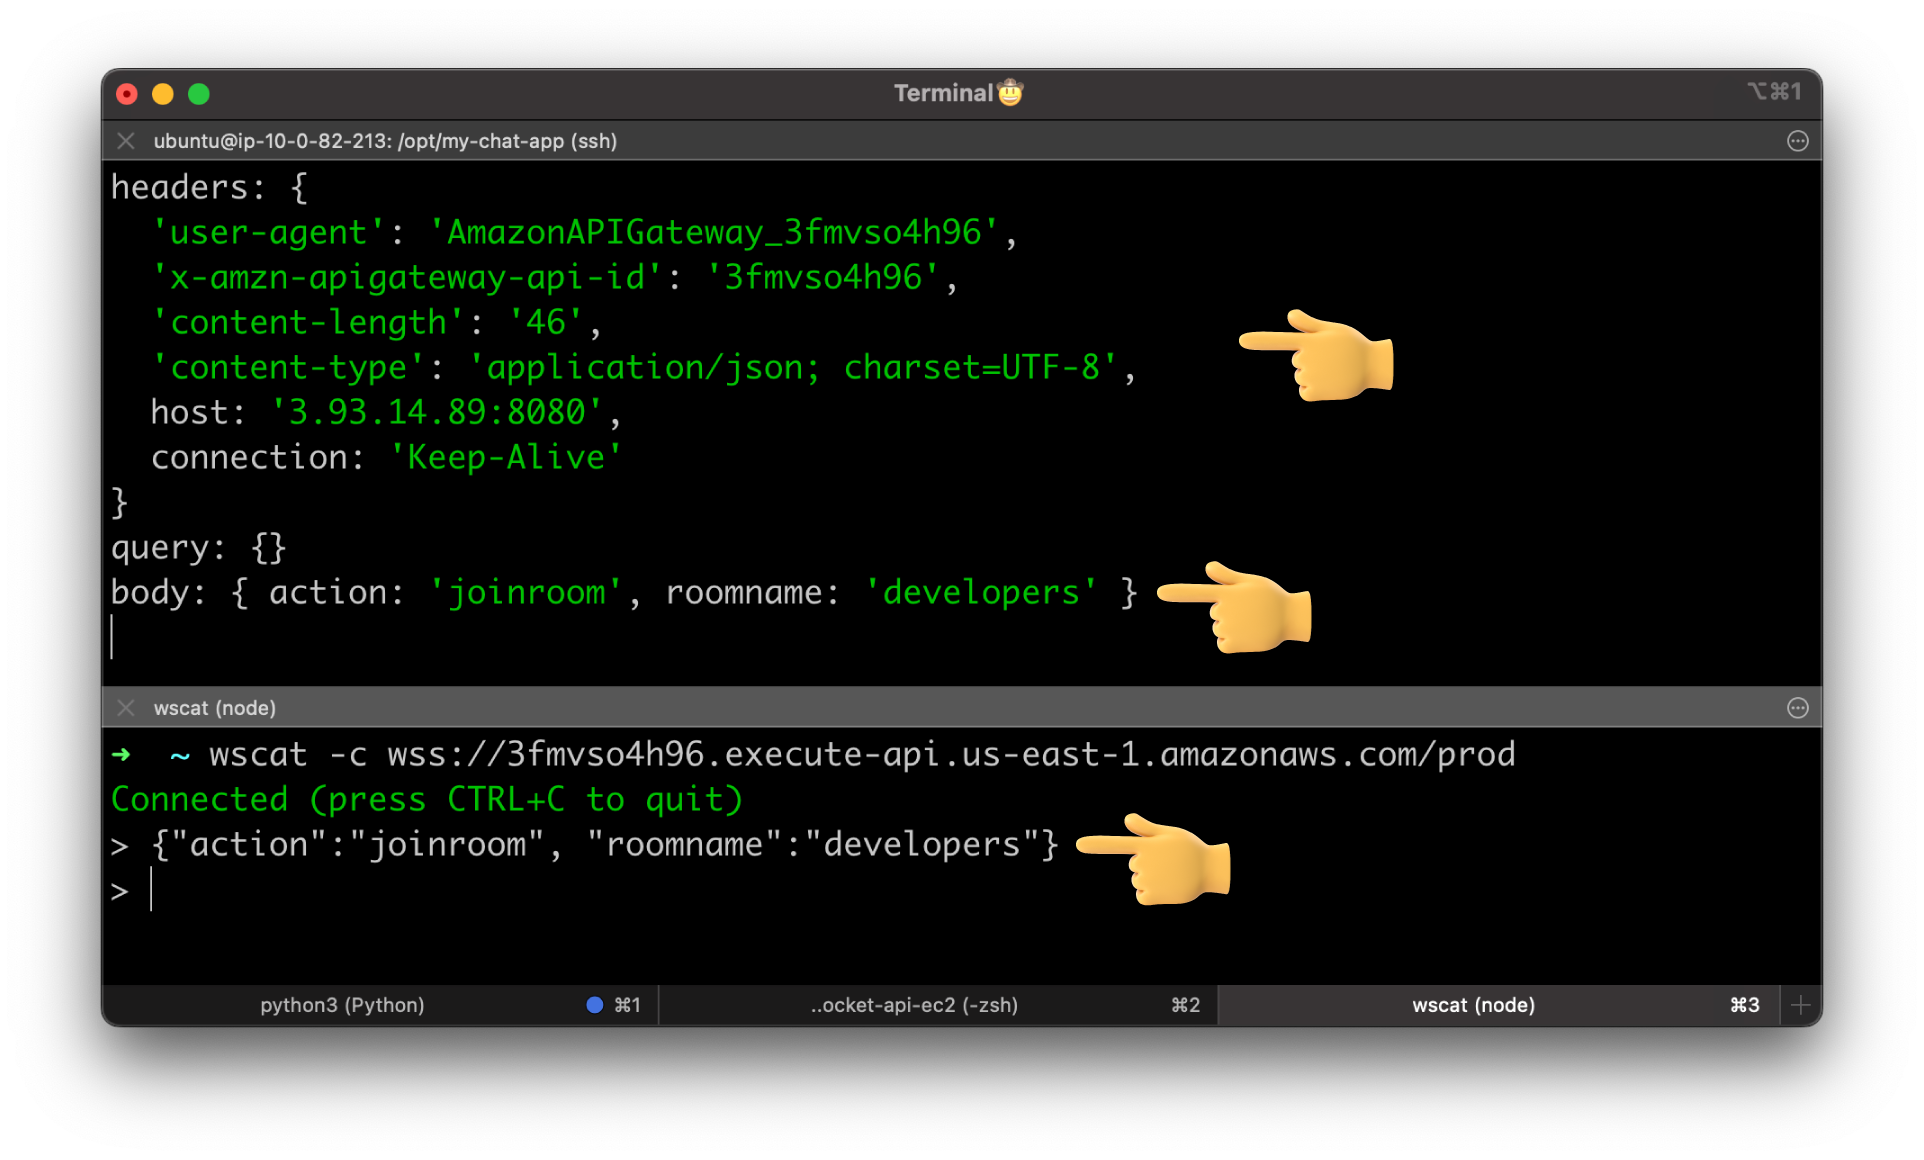
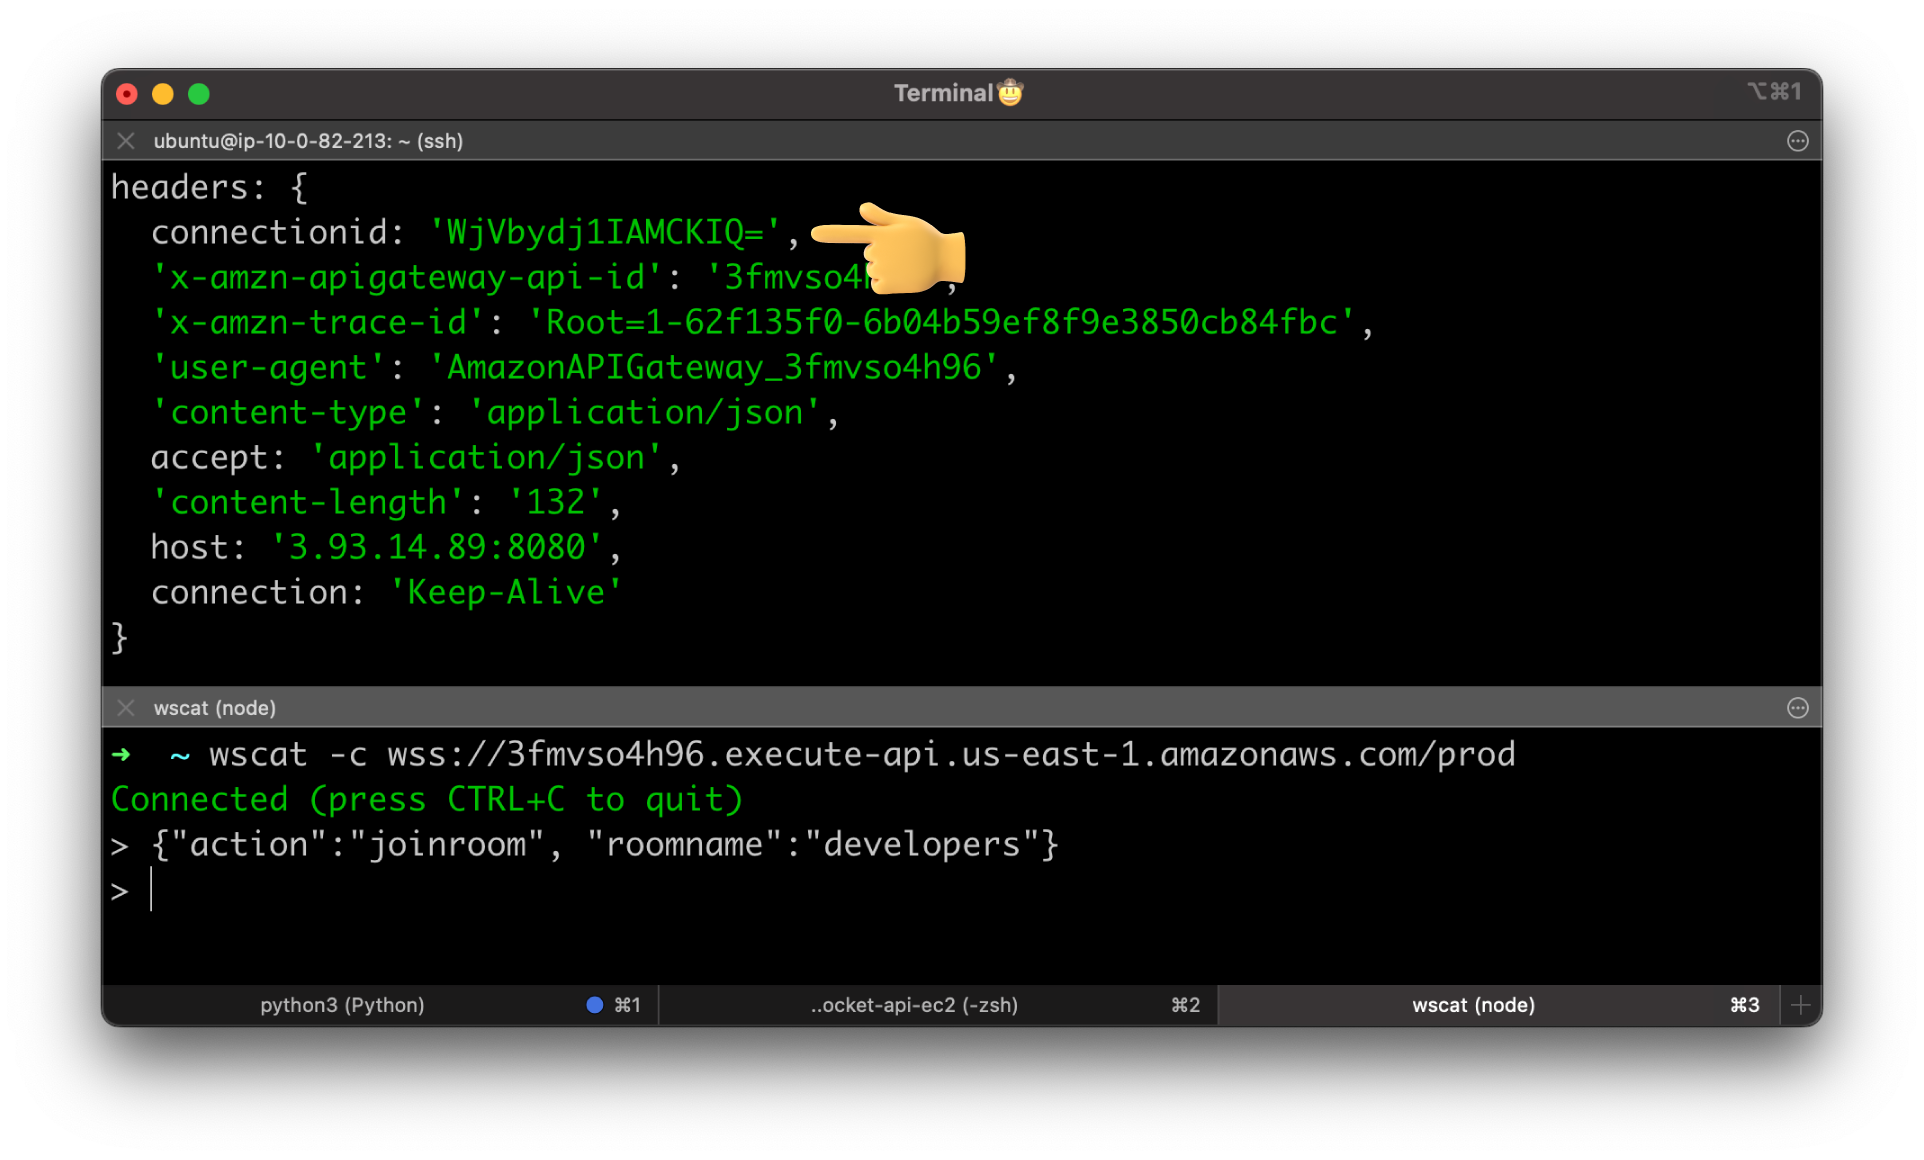
Let's try to test HTTP integration. Connect to the WebSocket API using wscat and enter the JSON object to invoke joinroom route.
We got some additional headers appended by the API Gateway and a full JSON payload forwarded to the backend app.
There is only one problem right now if we want to push something from the server to the client, we need to know the Connection Id. Proxy integration won't work for us when we integrate WebSocket API with EC2 instances.
However, you can still use Proxy with AWS Lambda. WebSocket API Lambda integration will be in the next video.
Get Client Connection Id
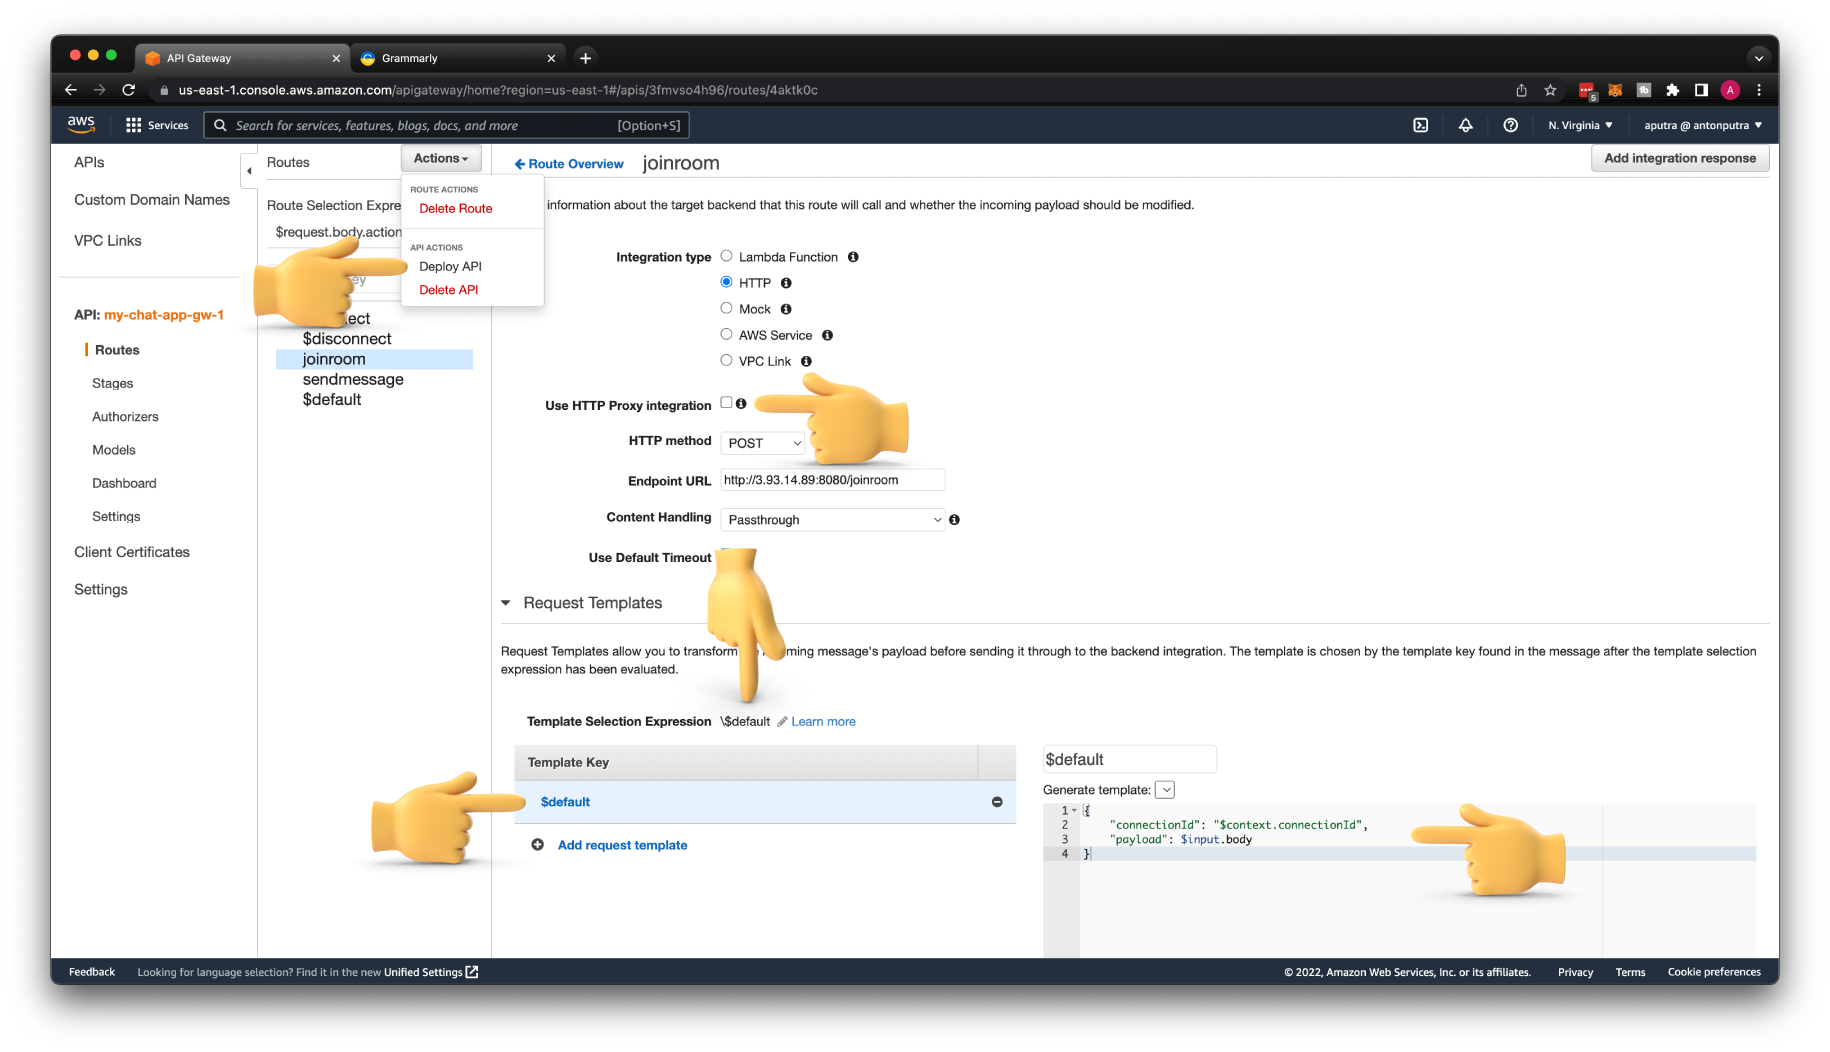
To get the client Connection Id, you need to disable Proxy Integration.
Then create a Request Template. For Template Selection Expression, use \$default. Then for the Template Key, use $default without \.
Now for the template, you can get a bunch of variables from the build-in $context variable. You can get all the variables from the official AWS documentation.
Also, when you create a template, it will remove the body with the JSON message body: { action: 'joinroom', roomname: 'developers' }.
To get it back, let's use another build-in variable $input and access body property.
Important: You need to click two save buttons on that page, one for Integration and one for the template.
Don't forget to Deploy API when you make all the changes.
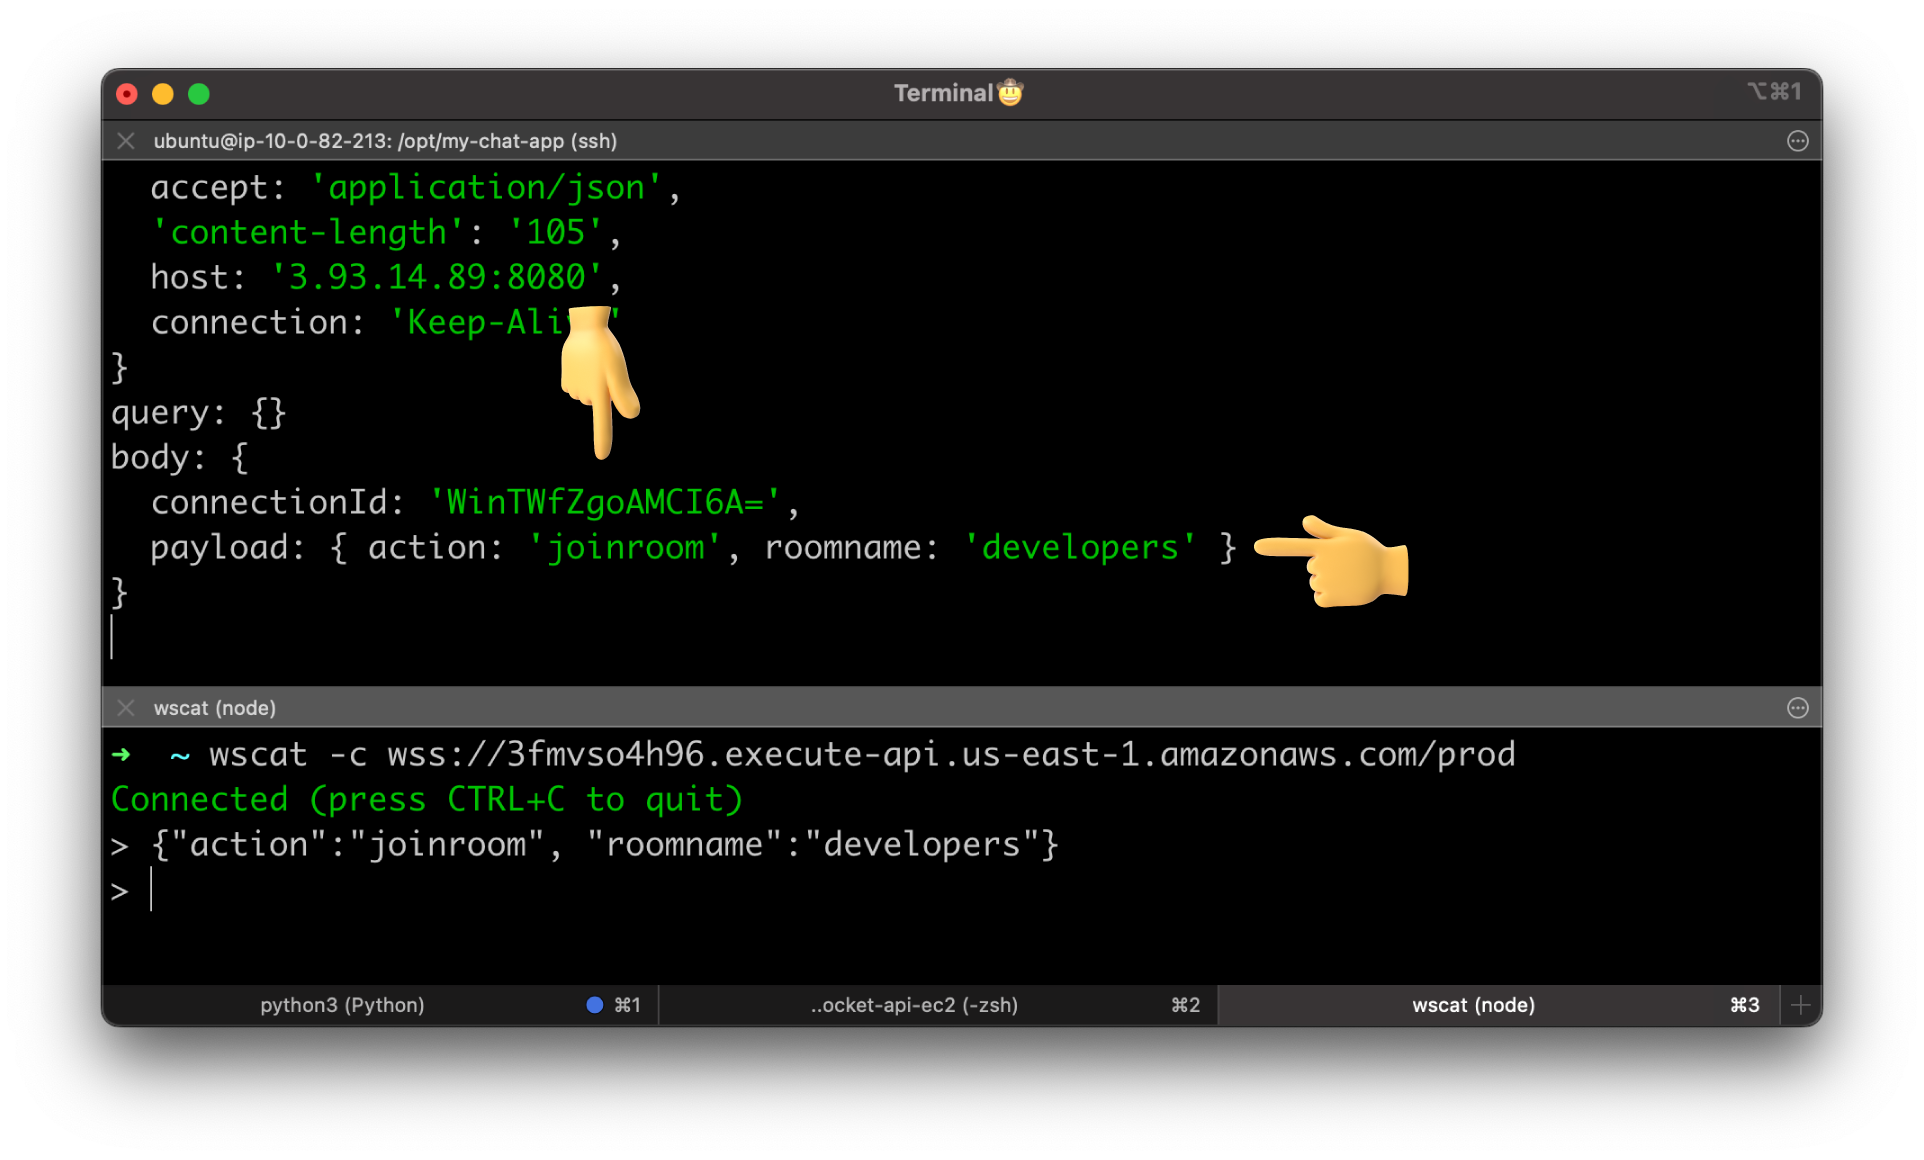
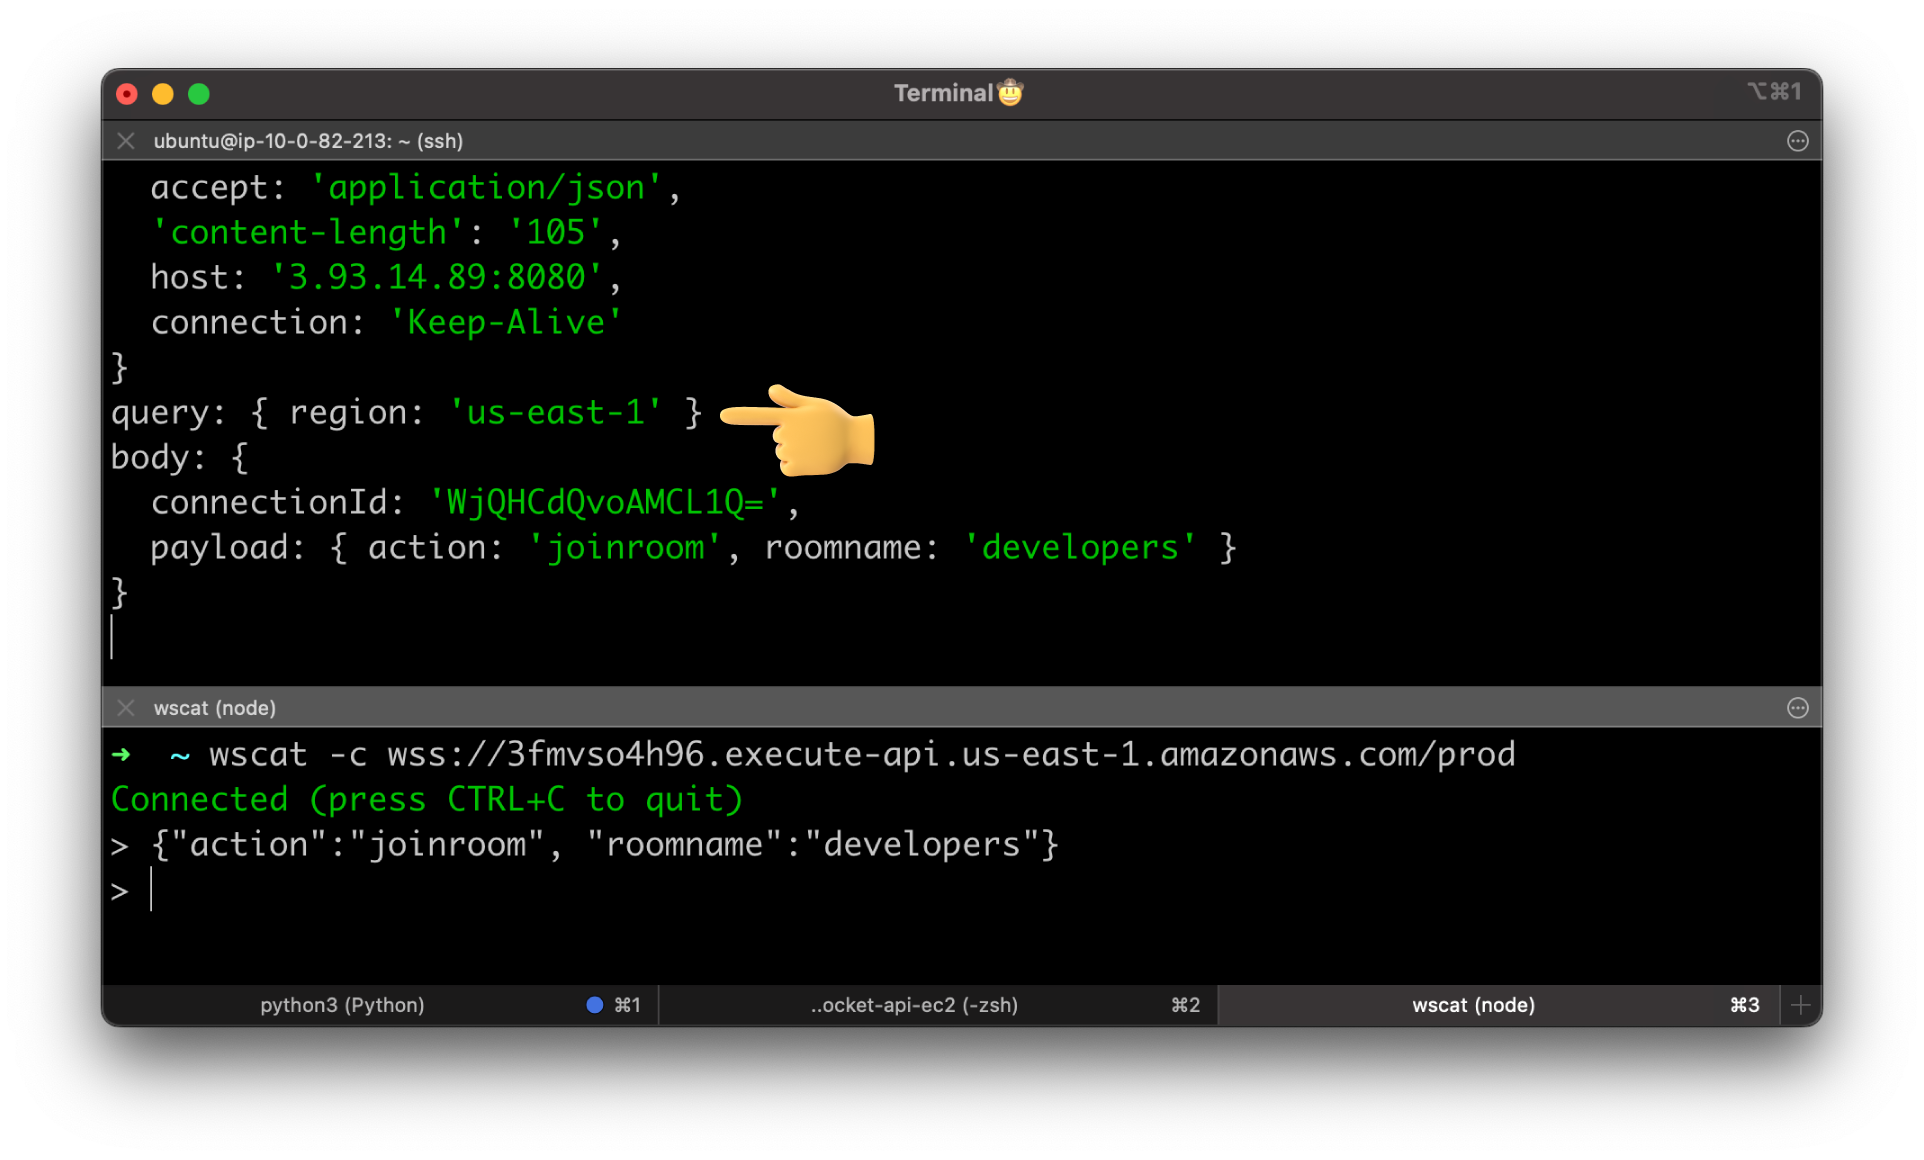
Let's go ahead and test it again with the same payload.
Now we got the connectionId of the client and the same JSON message under the payload property.
How to Use Stage Variables
Let's talk about stage variables. It's equivalent to environment variables. You can parameterize your configuration and use environment-specific values for each of your stages. For example, you can define the database connection strings. In your development stage, you would access a development database, and in a production environment, you would access real data.
Keep in mind stage variables are not suitable for secrets. Use something like AWS KMS Key Management Service instead.
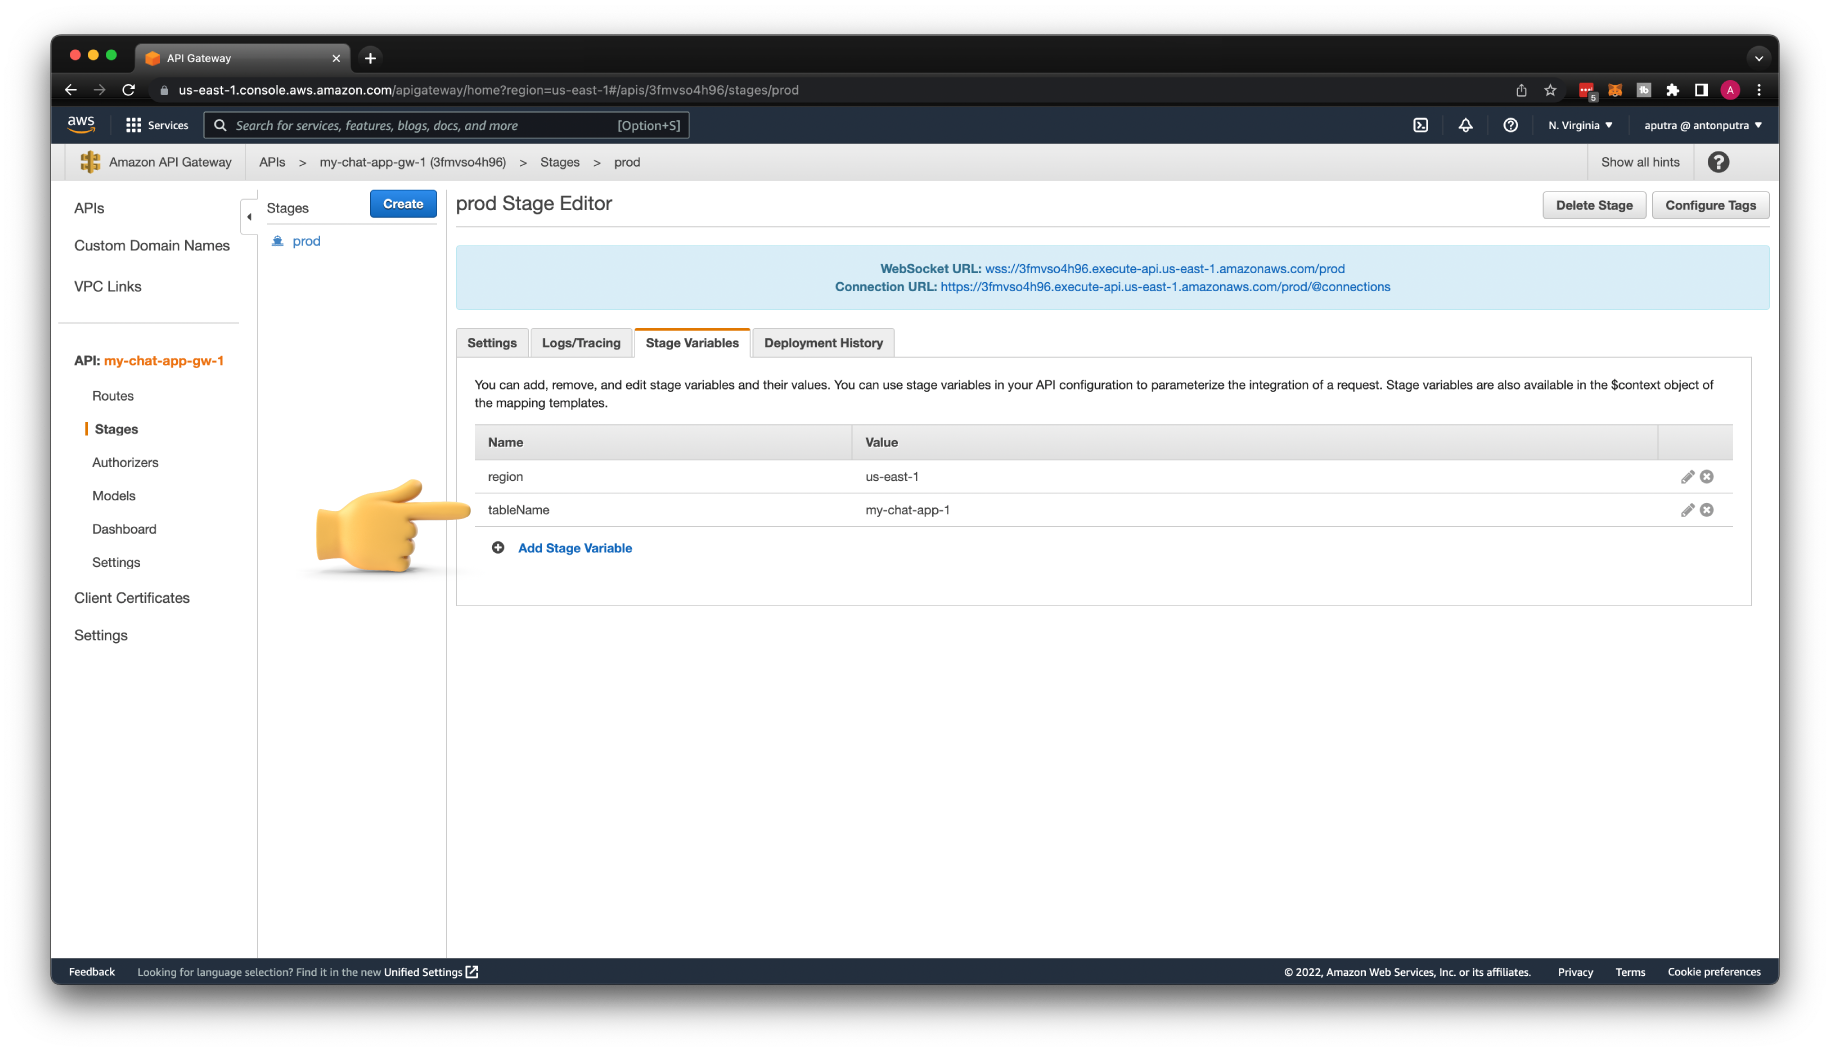
Let's create a region stage variable and give it a value us-east-1. I'll show you multiple ways how you can pass it to your backend service.
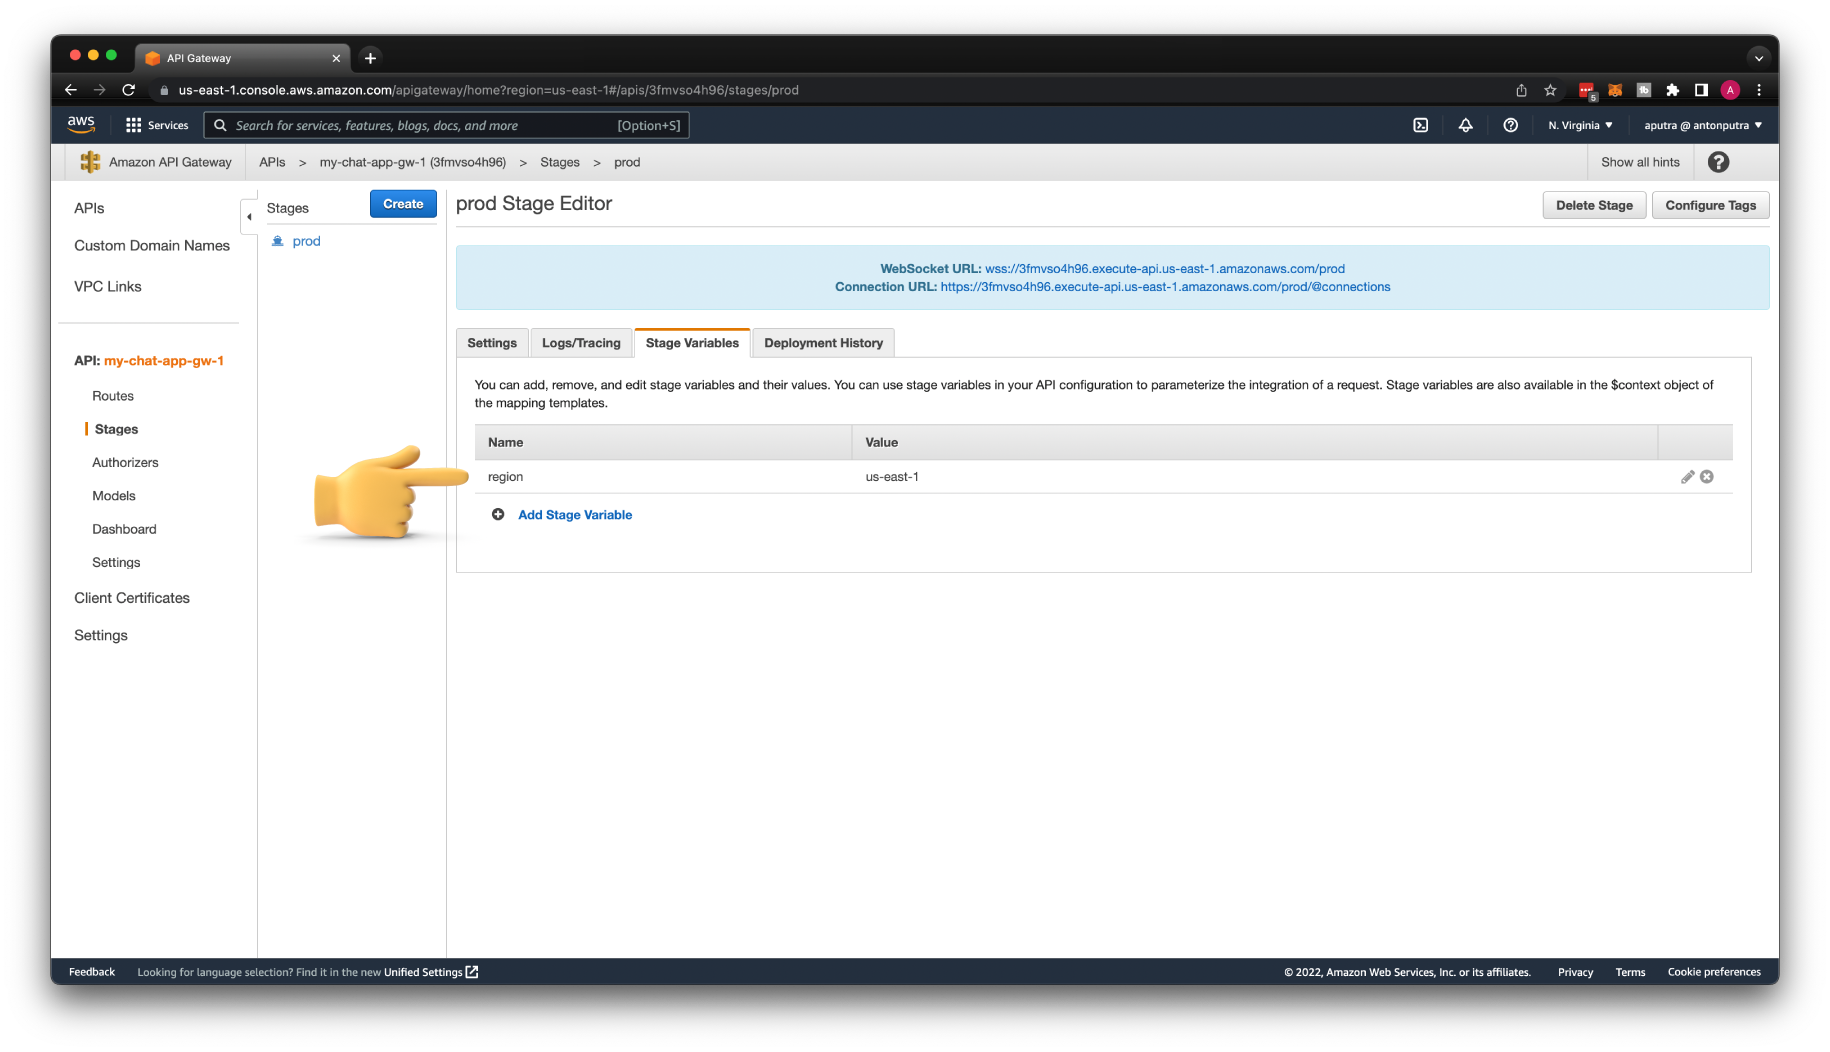
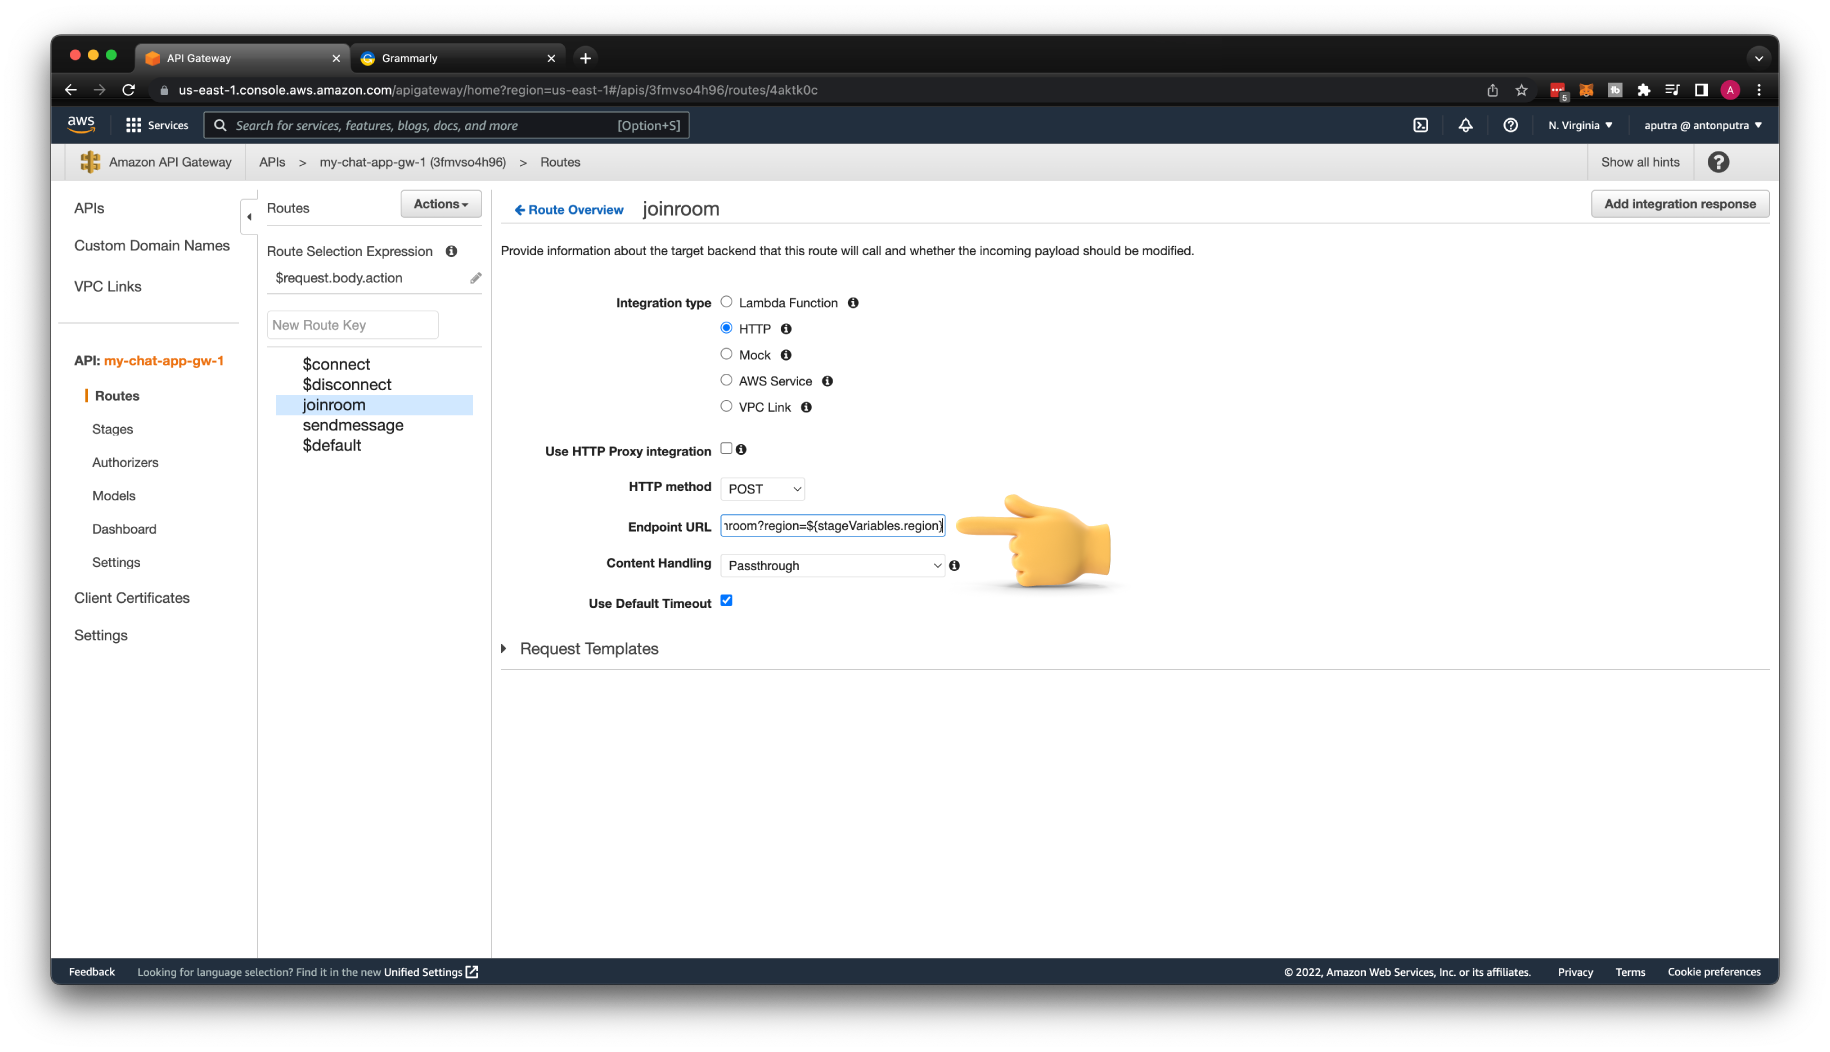
First, let's pass it to our NodeJS app using the URL query parameter. All the stage variables are available under the stageVariables system variable.
Again, don't forget to Save and Deploy API.
Use wscat to test it. Use the same JSON object to invoke joinroom route.
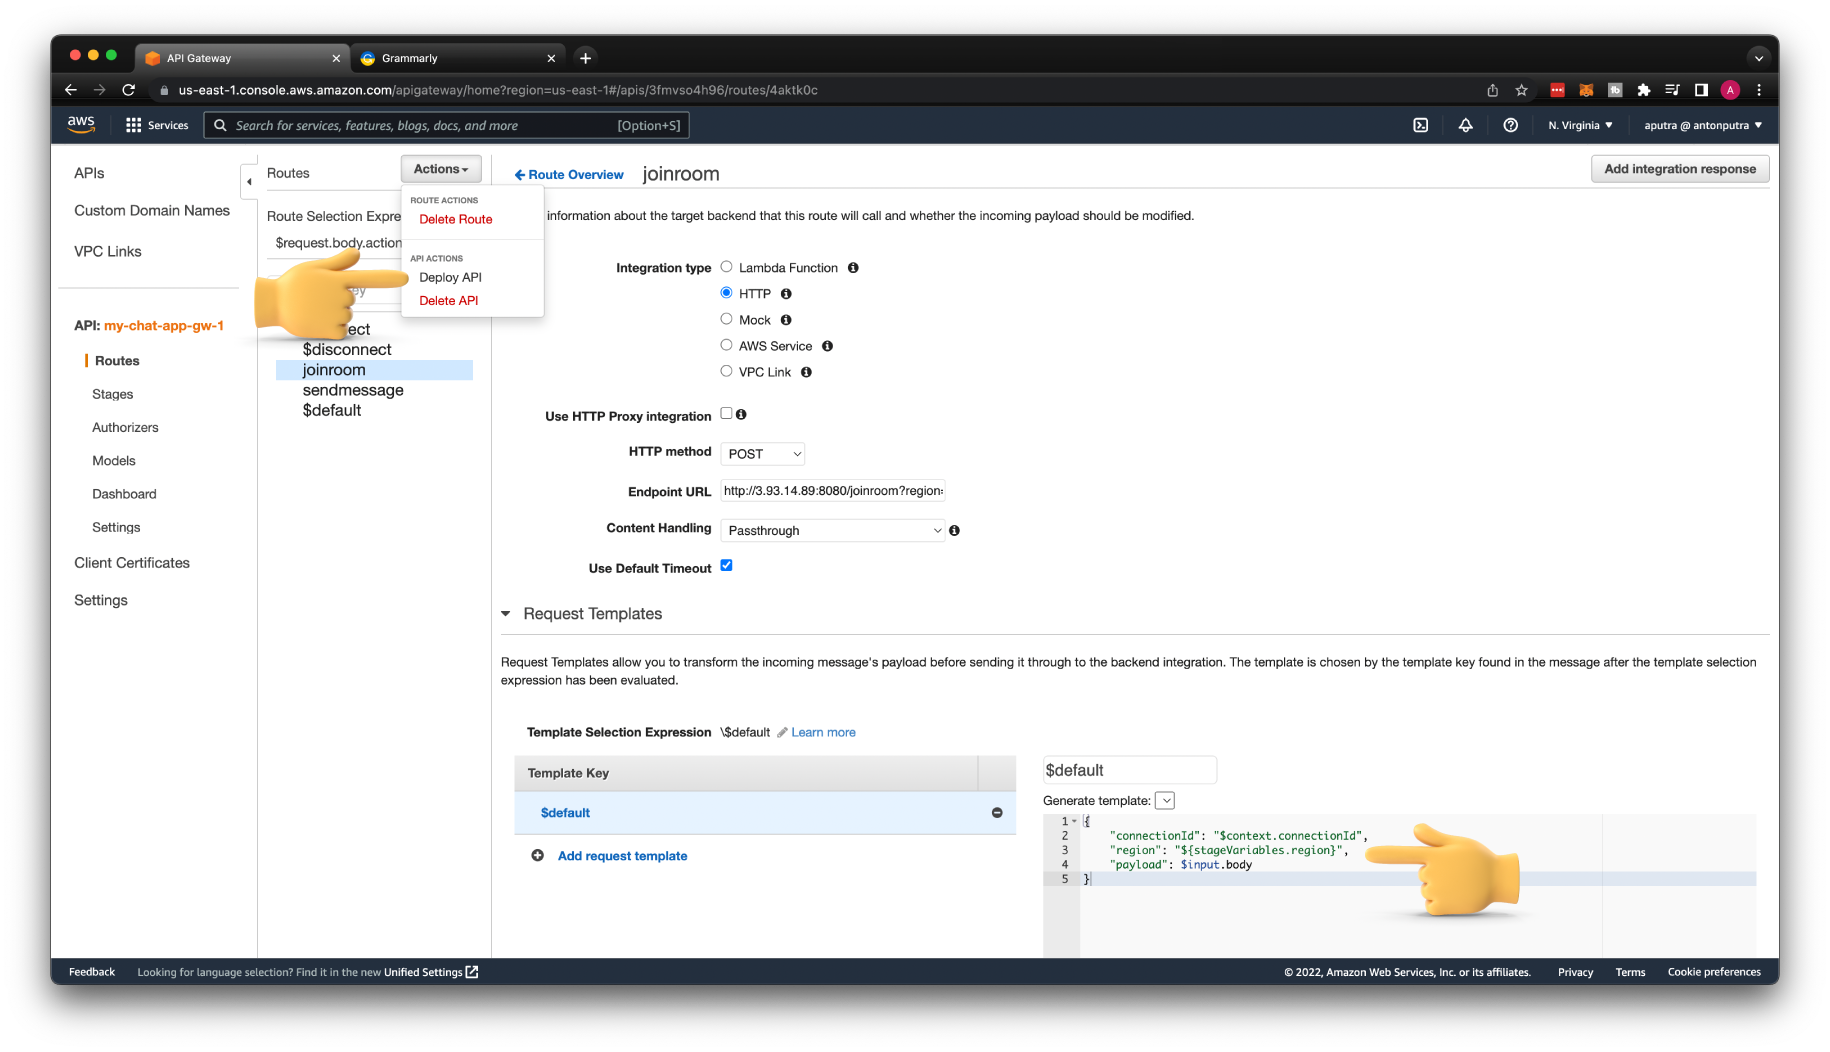
You can also pass the stage variable in the body of the request. For that, you need to update the Request template with the following JSON.
{
    "connectionId": "$context.connectionId",
    "region": "${stageVariables.region}",
    "payload": $input.body
}
Save the template and Deploy API.
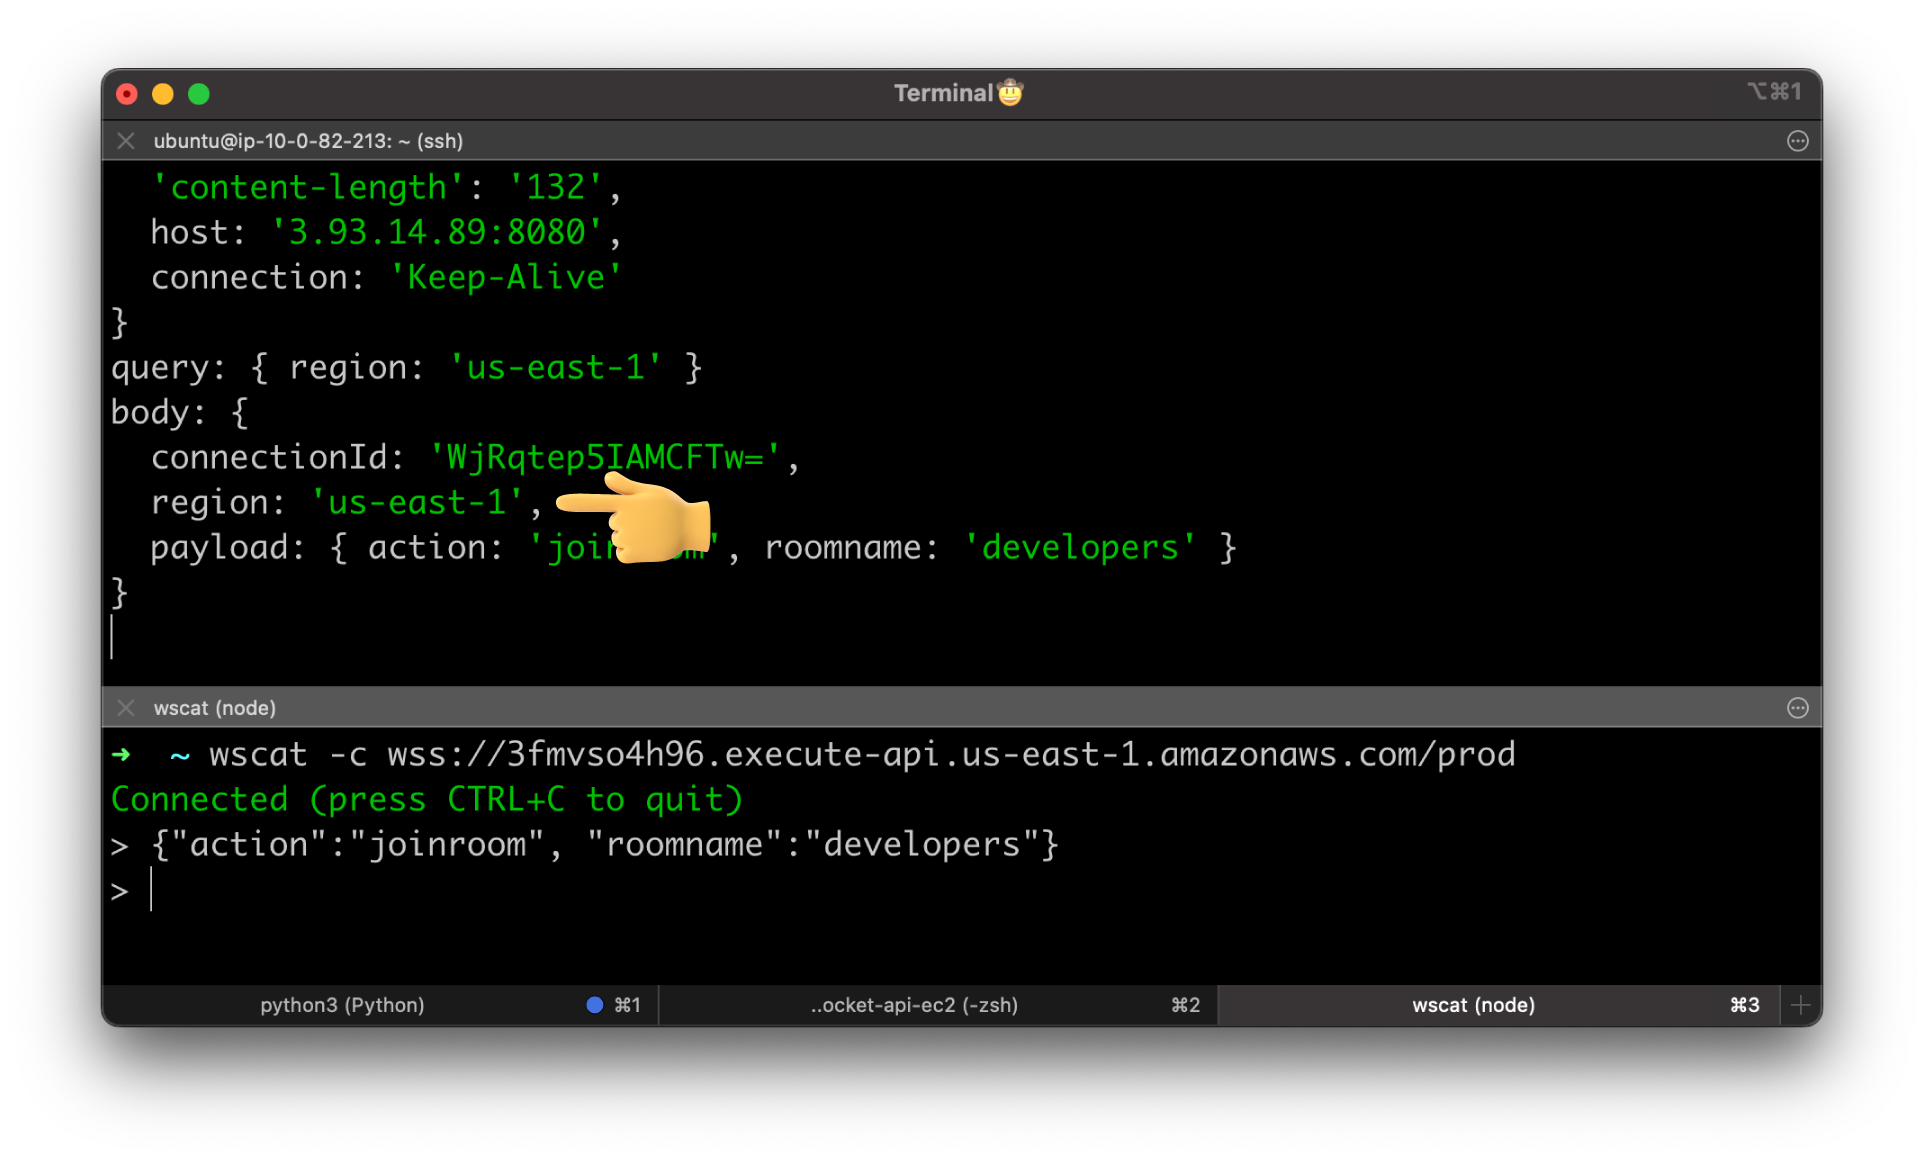
Use wscat to test it. Use the same JSON object to invoke joinroom route.
How to Pass Connection ID in the Header
If you want to keep Proxy integration and only want to pass the Connection Id of the client to the backend. You can use another method to request that API Gateway append connectionId to the new header of the request.
You can do it only from the command line. Grab the API ID from the console.
Use it to get all the integrations for your API.
Then find the joinroom integration ID and update it with the following command:
aws apigatewayv2 update-integration \
--integration-id sw9kdlc \
--api-id 3fmvso4h96 \
--request-parameters 'integration.request.header.connectionid'='context.connectionId'
You also need to Deploy API to apply changes.
Use wscat to test it. Use the same JSON object to invoke joinroom route.
Here is a Connection ID in the header.
Create DynamoDB database
When the client connects to the WebSocket API, we take the Connection ID of the client and save it in DynamoDB. When the client disconnects, we remove its Connection Id from the database.
For that, we need to create a DynamoDB table. Give it a name my-chat-app-1, and for the Partition key, use connectionId of type String.

Configure $connect Route to Save Connection ID to DynamoDB
Let's configure the $connect route to save the Connection ID of the client when it connects to the WebSocket API to the DynamoDB table.
To access AWS services from the EC2 instance, we need to install aws-sdk node module.
Update the /connect endpoint. You need to change the HTTP GET method to POST. Then add logic to connect to DynamoDB table and save connectionId.
We also need to create another stage variable tableName with the value my-chat-app-1, which represents the DynamoDB table.
Let's update $connect route. Disable Use HTTP Proxy Integration. Then change the HTTP method to POST since our NodeJS app accepts only POST requests on this route. Then create a Template Selection Expression with \$default key. For Template Key, use $default and paste the template for the request.
{
    "connectionId": "$context.connectionId",
    "region": "${stageVariables.region}",
    "tableName": "${stageVariables.tableName}"
}
Don't forget to Save it and Deploy API.
Create IAM Role for EC2 Instance
To grant access to the NodeJS app to save items in the DynamoDB table, we need to create IAM Policy and IAM Role and attach it to the instance.
First, let's create IAM Policy. Replace my-chat-app-1 with your DynamoDB table name. Also, instead of stars, you can use your region and account number.
Give it a name MyChatAppDynamoDBAccess1.
{
    "Version": "2012-10-17",
    "Statement": [
        {
            "Action": [
                "dynamodb:GetItem",
                "dynamodb:DeleteItem",
                "dynamodb:PutItem",
                "dynamodb:Scan",
                "dynamodb:Query",
                "dynamodb:UpdateItem",
                "dynamodb:BatchWriteItem",
                "dynamodb:BatchGetItem",
                "dynamodb:DescribeTable",
                "dynamodb:ConditionCheckItem"
            ],
            "Resource": "arn:aws:dynamodb:*:*:table/my-chat-app-1",
            "Effect": "Allow"
        }
    ]
}
Then we need to create an IAM role for the EC2 instance. You can select EC2 from Common use cases. Then choose the IAM Policy that we just created, MyChatAppDynamoDBAccess1.
Give it a name my-chat-app-access-1.
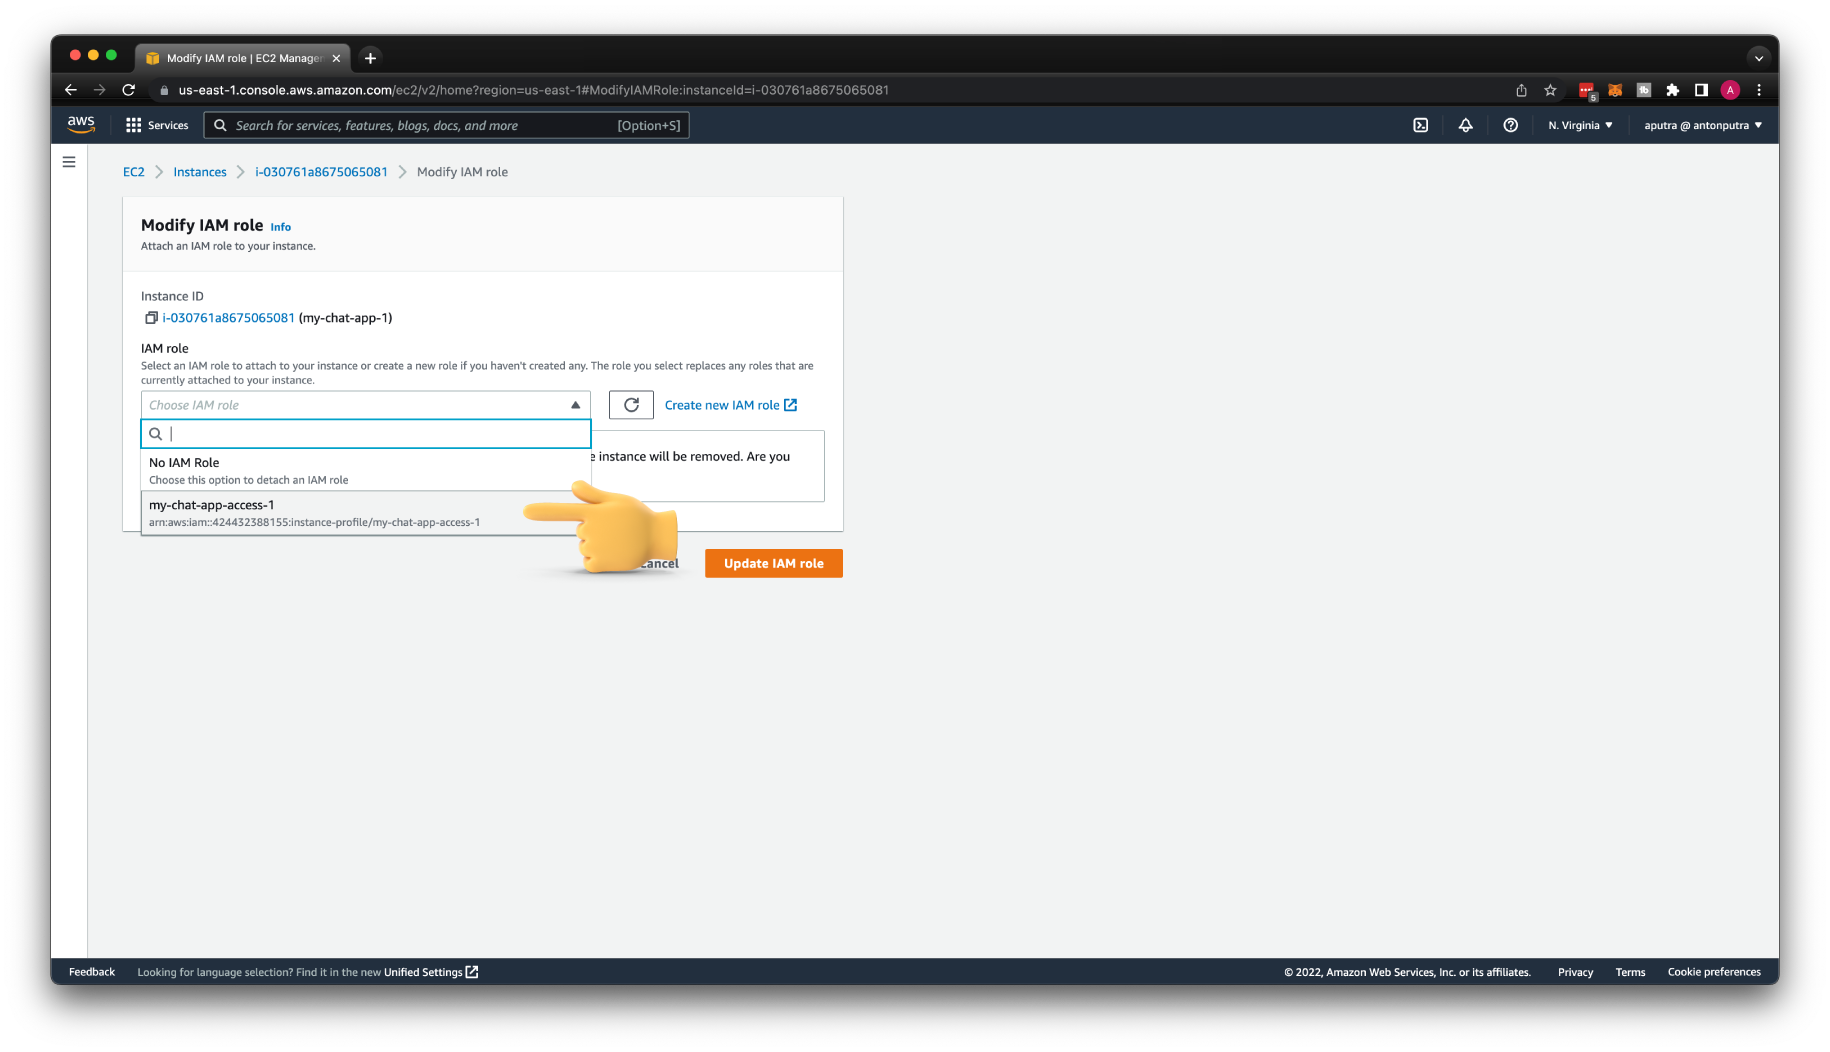
To attach the IAM role from the AWS console. Go to Instances, select your app and click Modify IAM role.
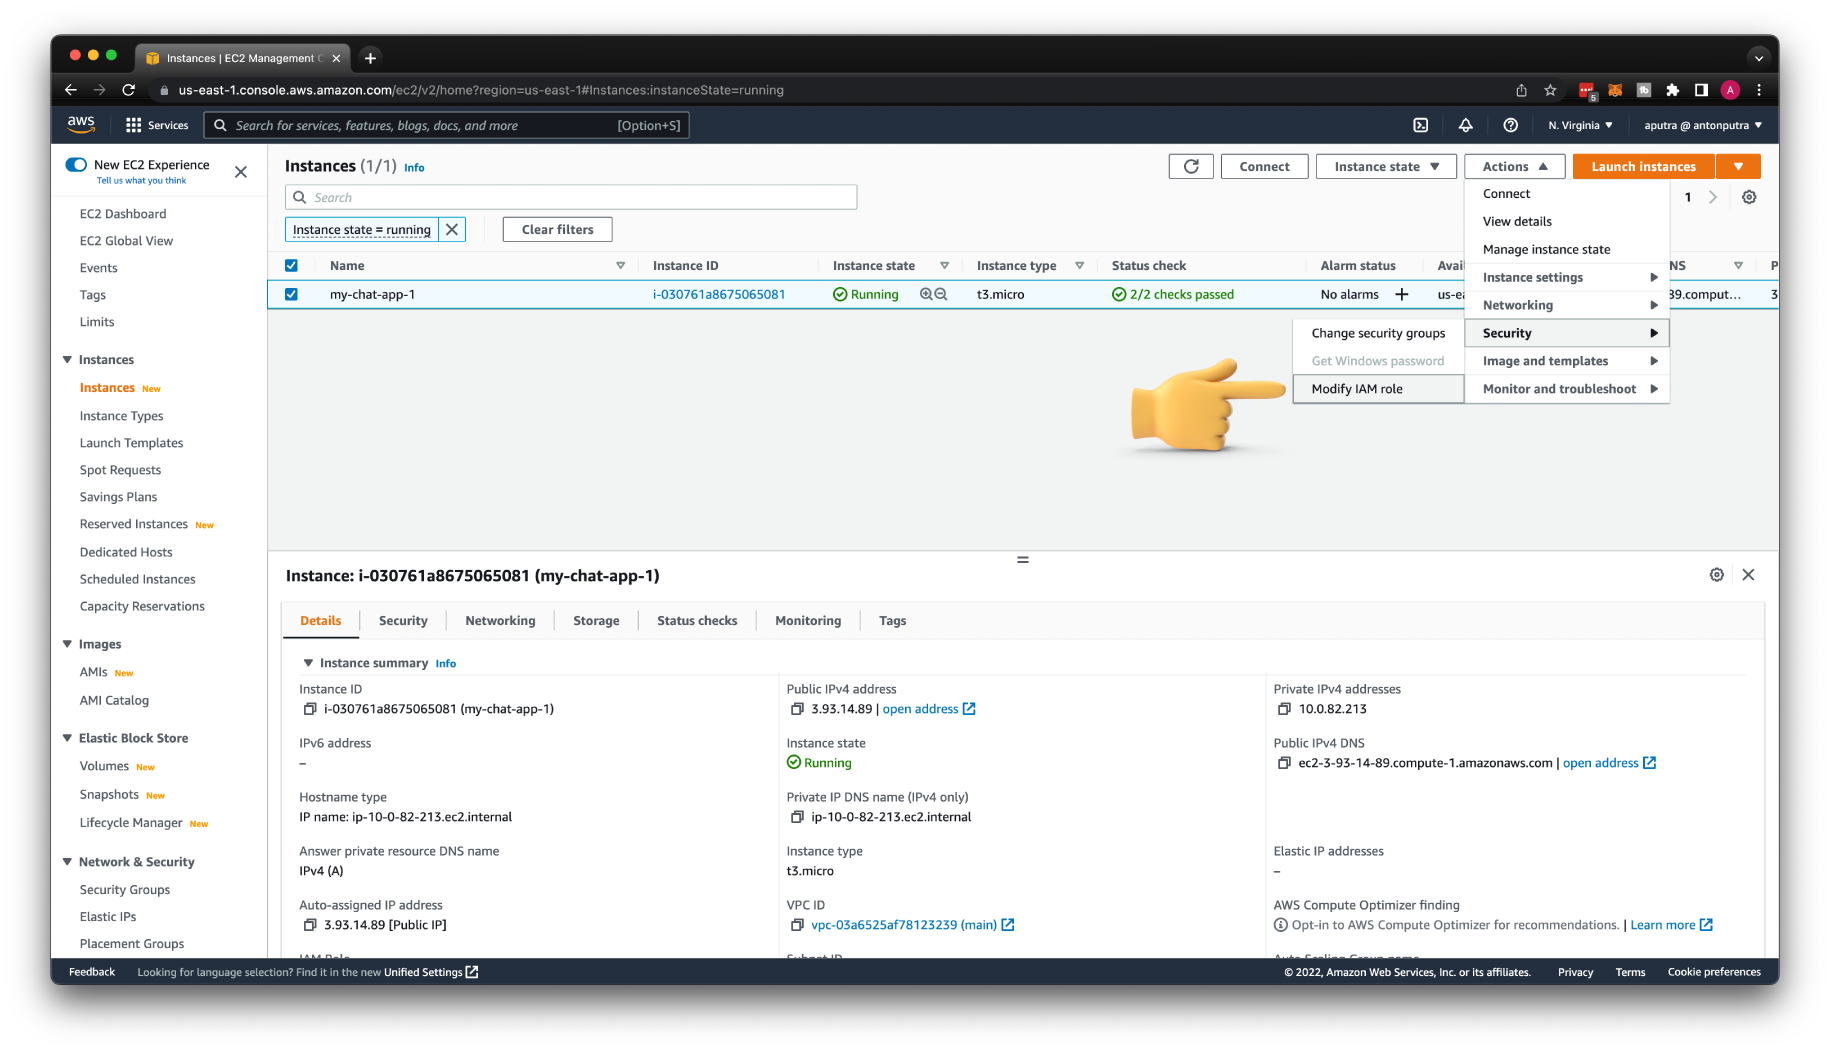
Then you can find your IAM Role; in my case, my-chat-app-access-1 and click Update IAM role. All these updates are not instant; you may want to wait a minute or so to try to test IAM permissions.
Try to connect to the API Gateway.
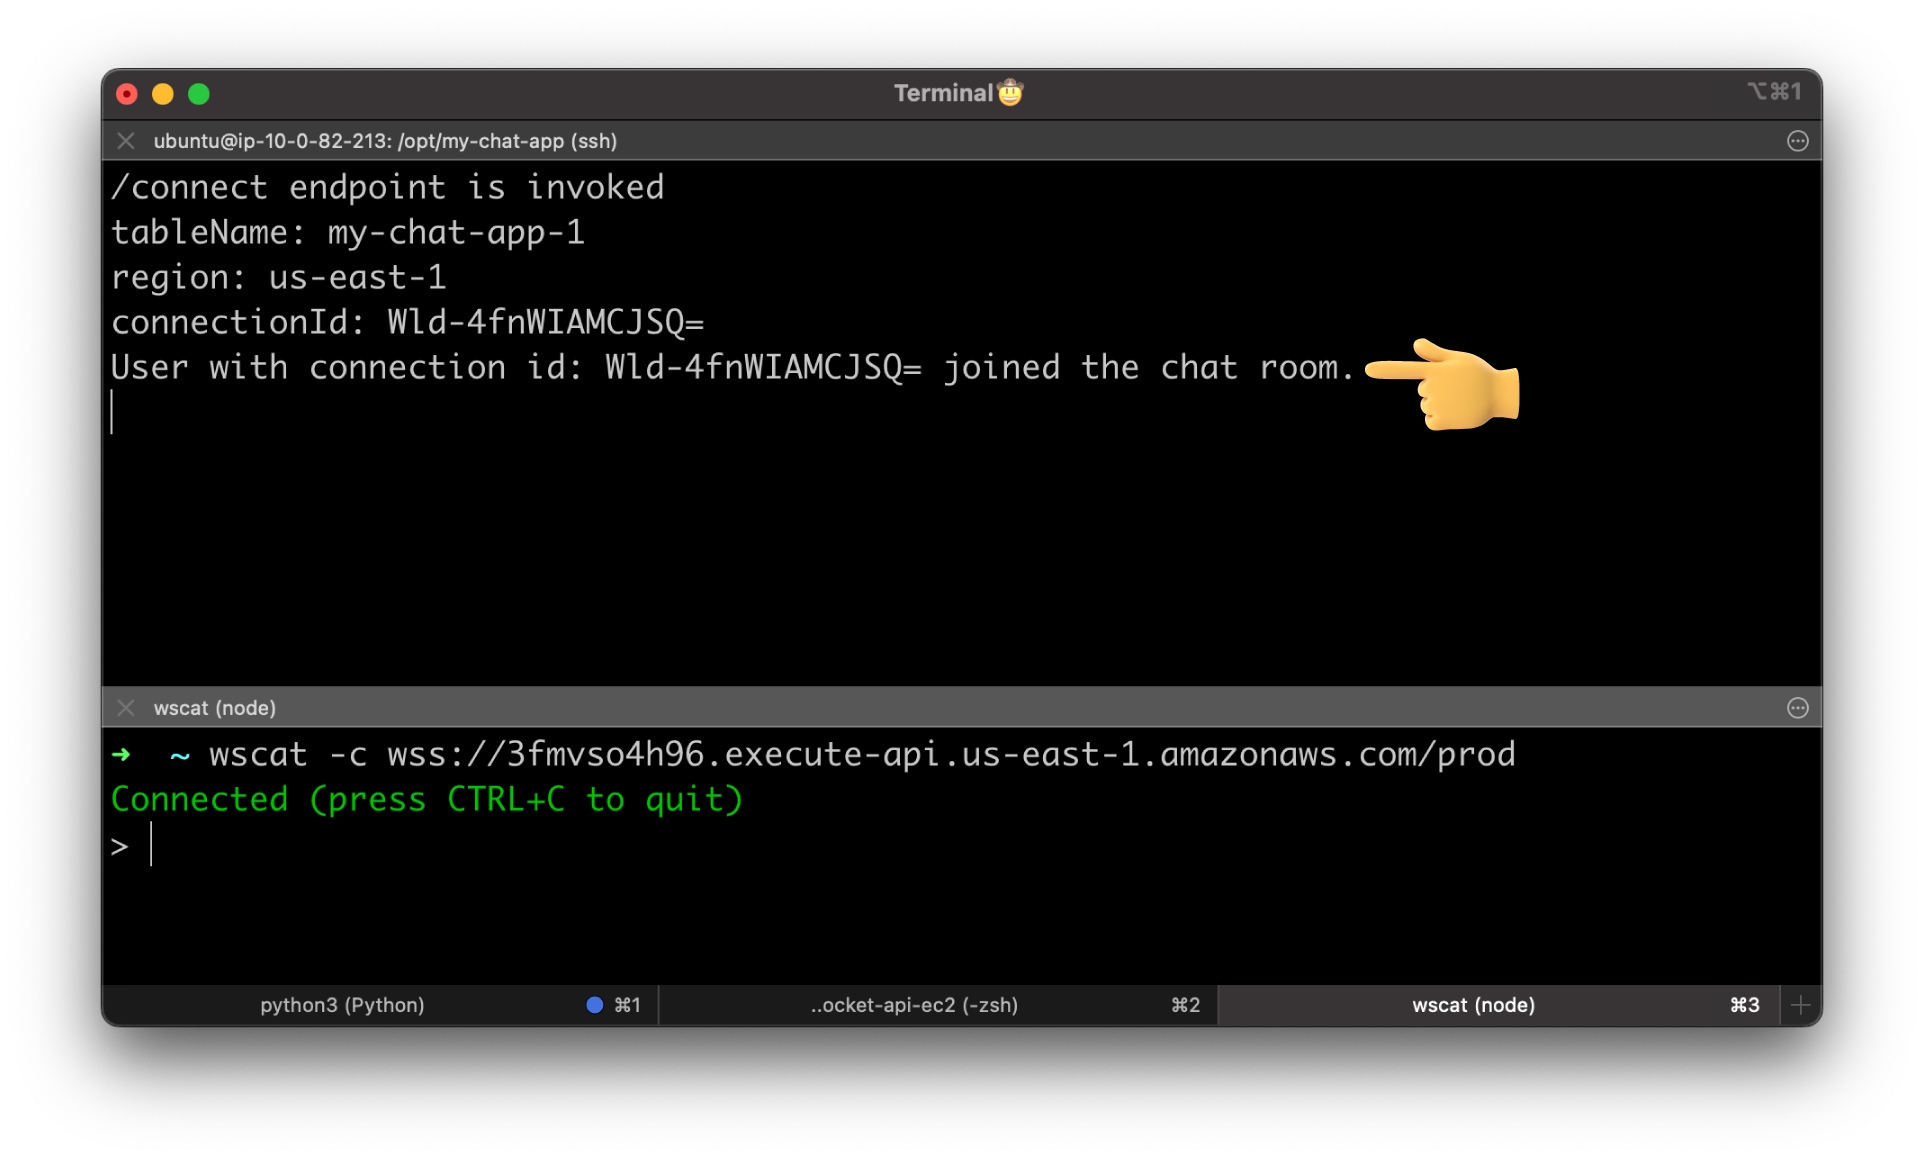
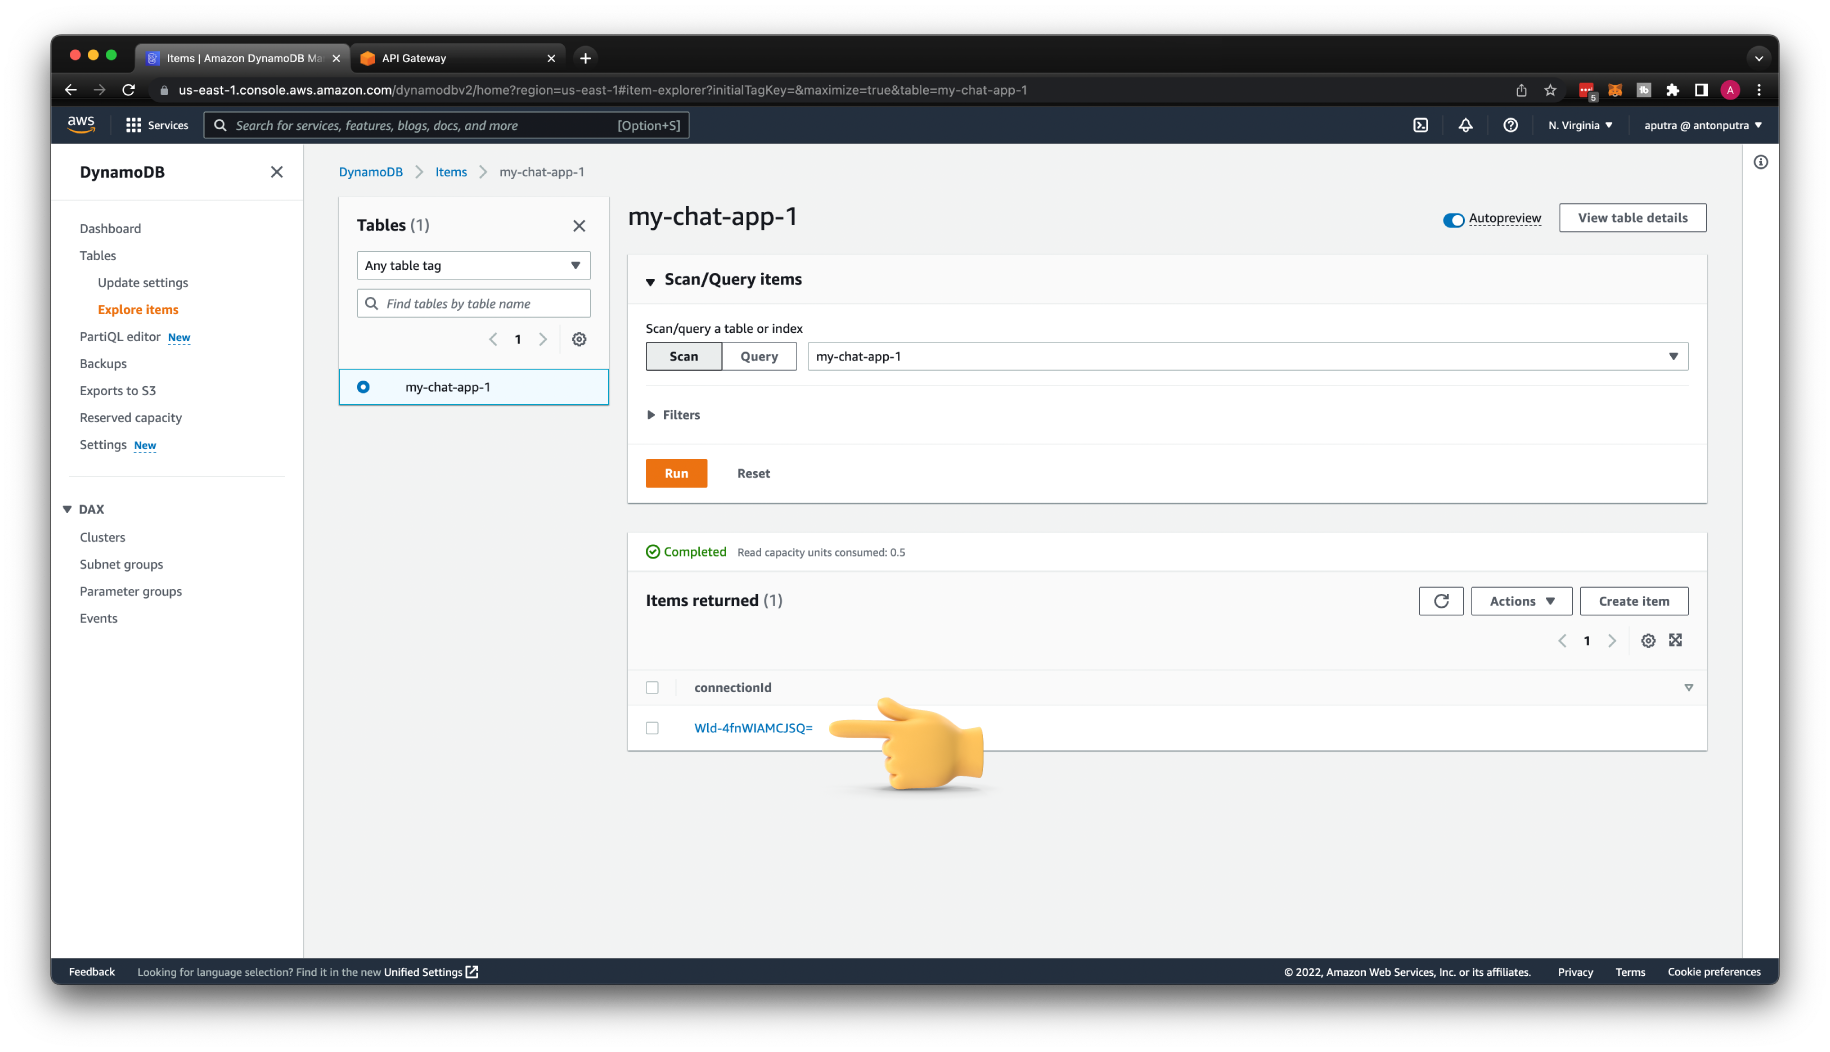
You should see that the user with the Connection ID has joined the chat room. Also, if you check the DynamoDB table, you can find the same Connection ID.
Configure $disconnect Route to Delete Connection ID from DynamoDB
When the client disconnects and leaves the chat room, let's remove its Connection ID from the database.
Add /disconnect endpoint with DELETE HTTP method.
Now API Gateway $disconnect integration. Uncheck Use HTTP Proxy Integration. For the HTTP method, select DELETE. Enter the /disconnect endpoint, and you also need to modify the Request template to pass all required variables to the backend.
{
    "connectionId": "$context.connectionId",
    "region": "${stageVariables.region}",
    "tableName": "${stageVariables.tableName}"
}
Save in both places and Deploy API.

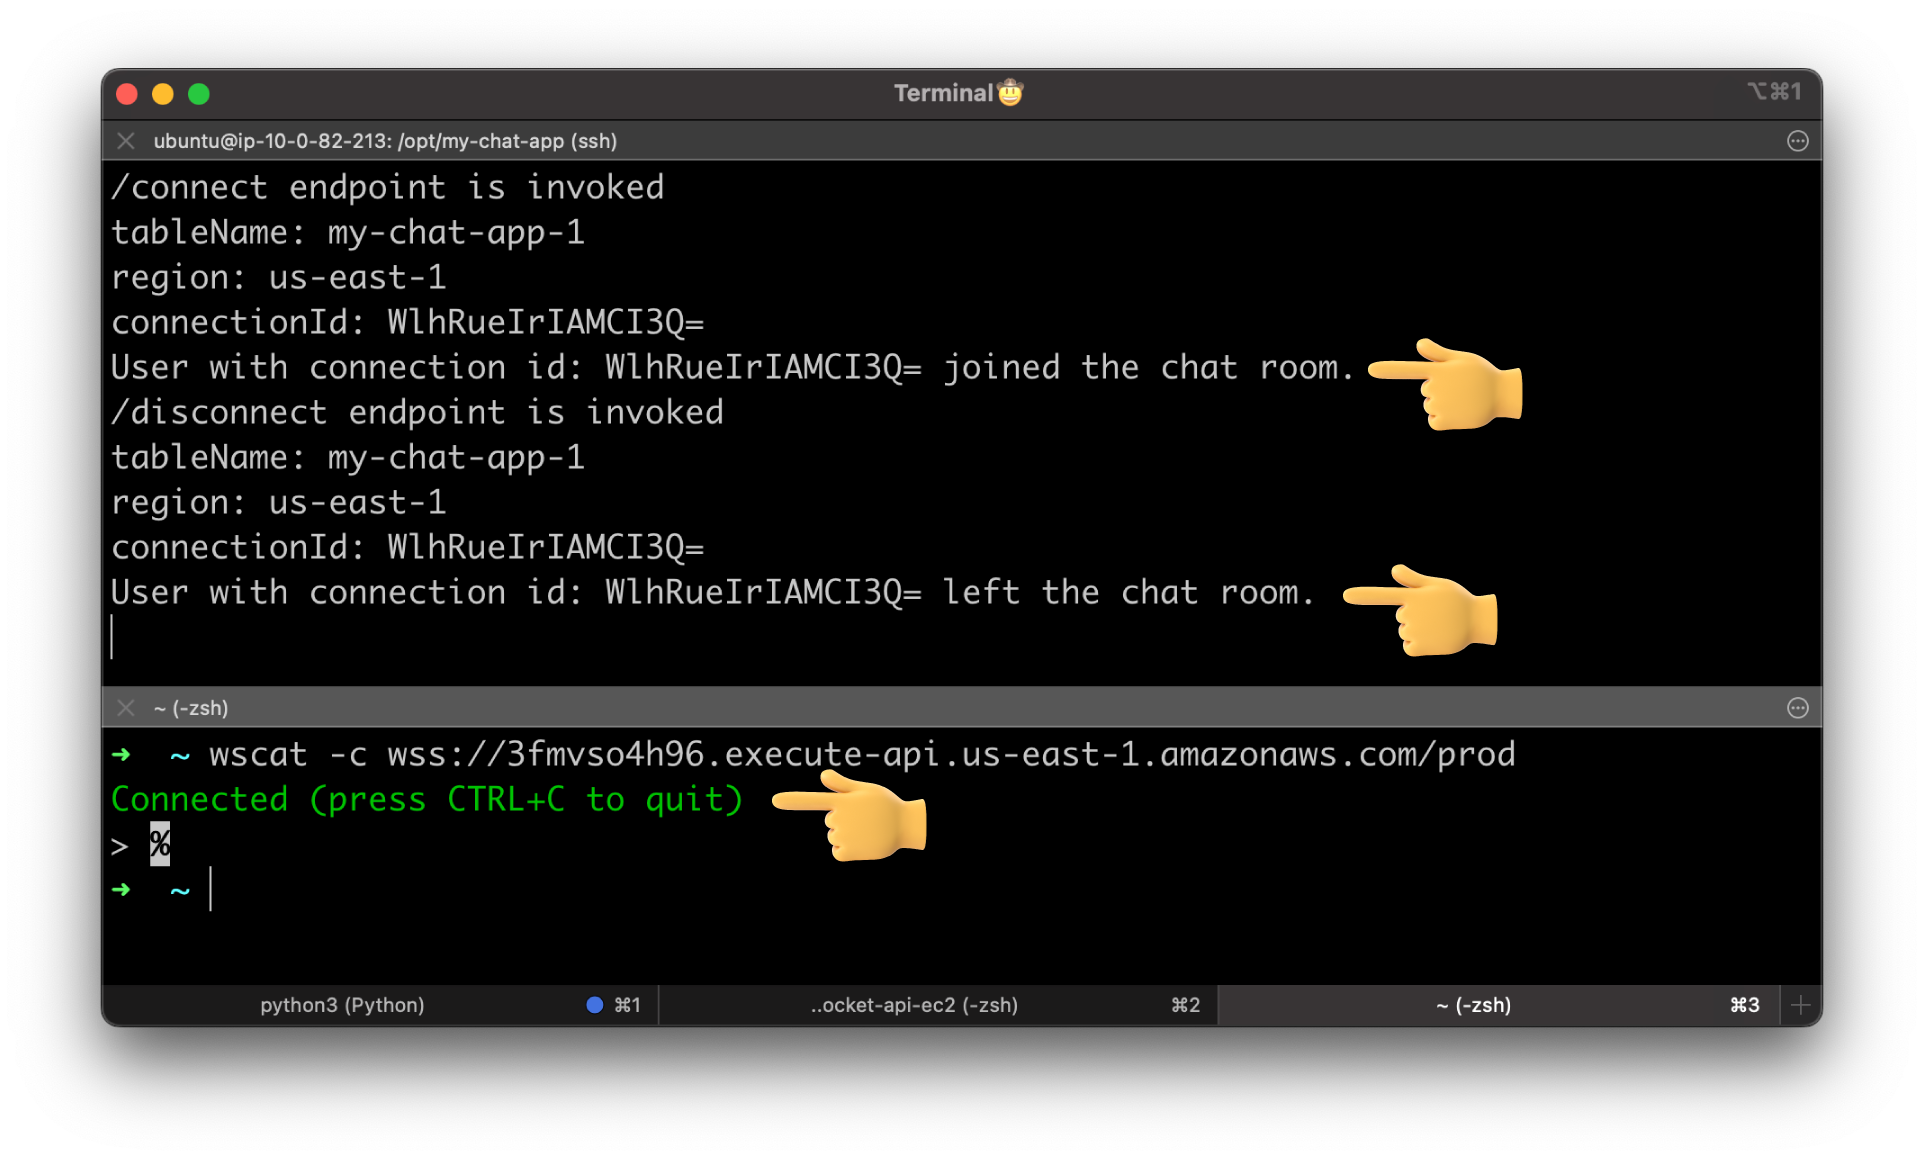
If you test again, connect and disconnect to the API. Your backend should save the Connection ID and then remove it when the client disconnects.
Configure sendmessage Route to Push Messages from the Server to the Client using Connection ID
In the sendmessage route, I want to demonstrate how you can push messages from the server to the client using Connection ID without a direct request.
Let's go ahead and implement /sendmessage endpoint on the NodeJS app.
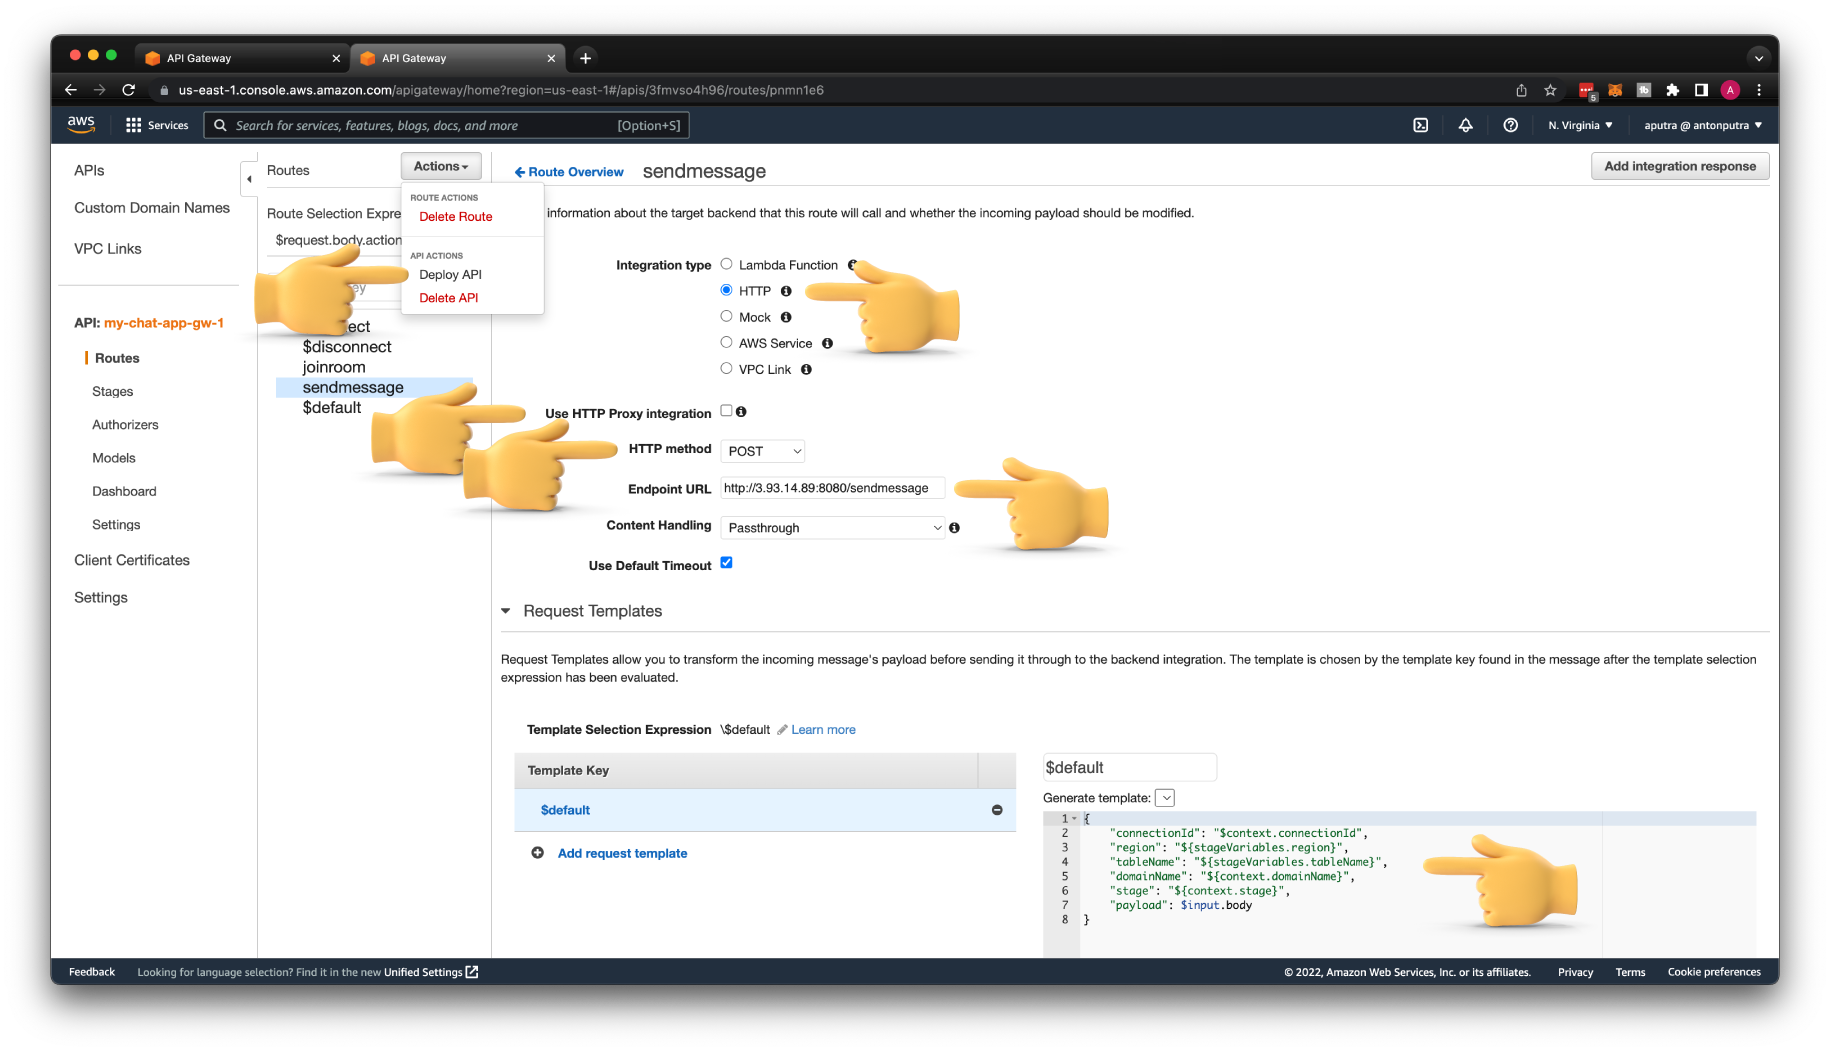
The last HTTP integration for this tutorial. Change the HTTP method to POST and enter the URL endpoint for the sendmessage route.
We also need to pass additional variables that we can get from the build-in $context variable, such as the domain name of the API Gateway and a stage.
{
    "connectionId": "$context.connectionId",
    "region": "${stageVariables.region}",
    "tableName": "${stageVariables.tableName}",
    "domainName": "${context.domainName}",
    "stage": "${context.stage}",
    "payload": $input.body
}
We're going to use them to push messages back to the client. Save and Deploy.
We also need to grant additional permissions to the EC2 instance to be able to send messages to the API Gateway. Let's create a MyChatAppAPIGatewayAccess1 IAM policy and attach it to the existing my-chat-app-access-1 IAM role that the NodeJS app already uses.
You need to update API Gateway ID 3fmvso4h96 to yours.
{
    "Version": "2012-10-17",
    "Statement": [
        {
            "Action": [
                "execute-api:ManageConnections"
            ],
            "Resource": [
                "arn:aws:execute-api:*:*:3fmvso4h96/*"
            ],
            "Effect": "Allow"
        }
    ]
}
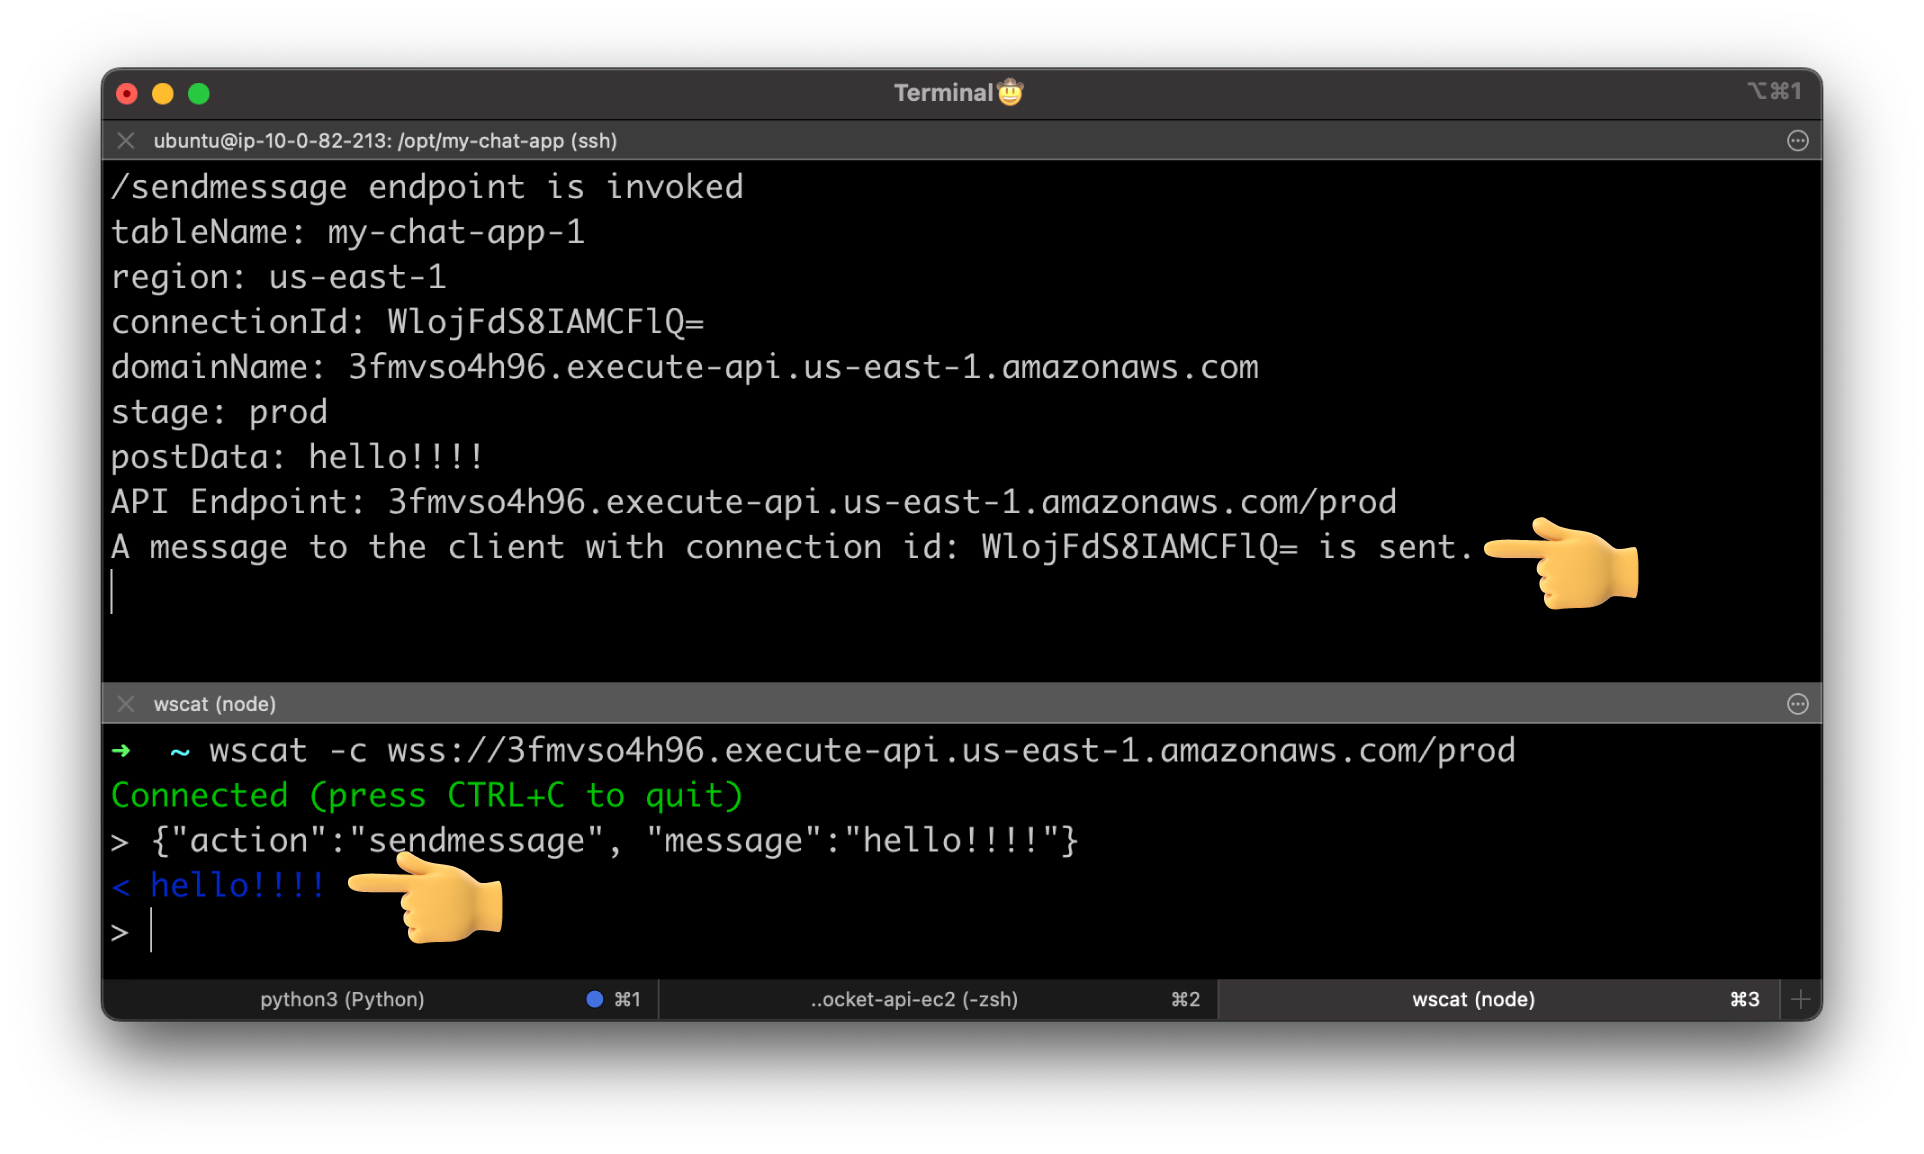
Alright, let's try to connect and send a message.
We got back hello!!!!, the integration works as expected.
Create VPC Link Private Integration
It's time to convert HTTP public integrations to VPC Link. This will allow us to use only private IP addresses and limit only API Gateway to access our backend service, in our case NodeJS app.
Create systemd Service Unit
For production deployment, you should use one of the process management tools such as build-in to Linux systemd. It will manage the life cycle of the app and can start it when the virtual machine boots up and restart if it crashes for some reason.
You want to update the ExecStart directive to point to your application, and if you use NodeJS, you want to set the NODE_ENV environment variable to production. In the end, you can find restart configurations.
To start the NodeJS app, we don't need to do it manually anymore; we can use systemd for that.
Then enable the service to start our app when the virtual machine boots up.
Check the status of the app.
If it fails to start, you can use journalctl to check the logs.
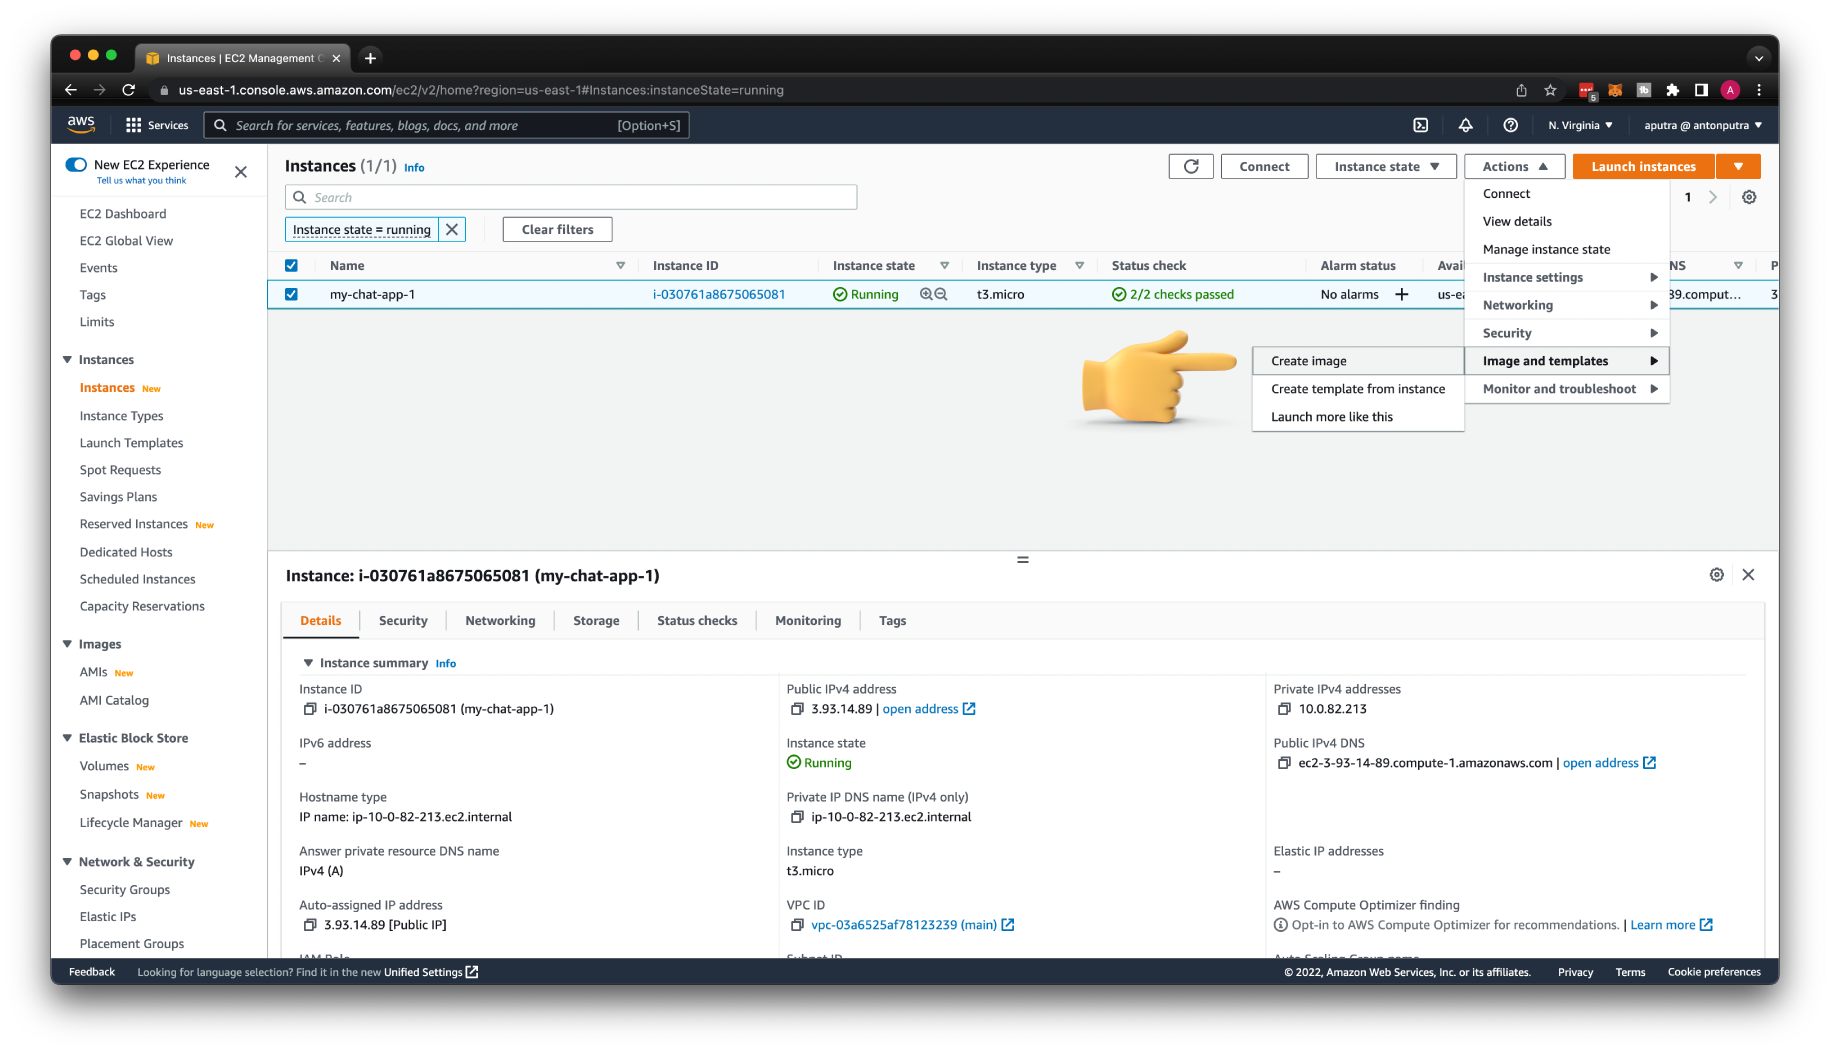
Create AMI Image for Chat App
For the private integration, we need to create a Launch Template with an AMI image of the app if we want to use it with Auto Scaling Group.
Let's create an image and give it a name my-chat-app-v1. We could add targets manually to the target group, but if you want to be able dynamically scale your app based on the load, you need Auto Scaling Group.
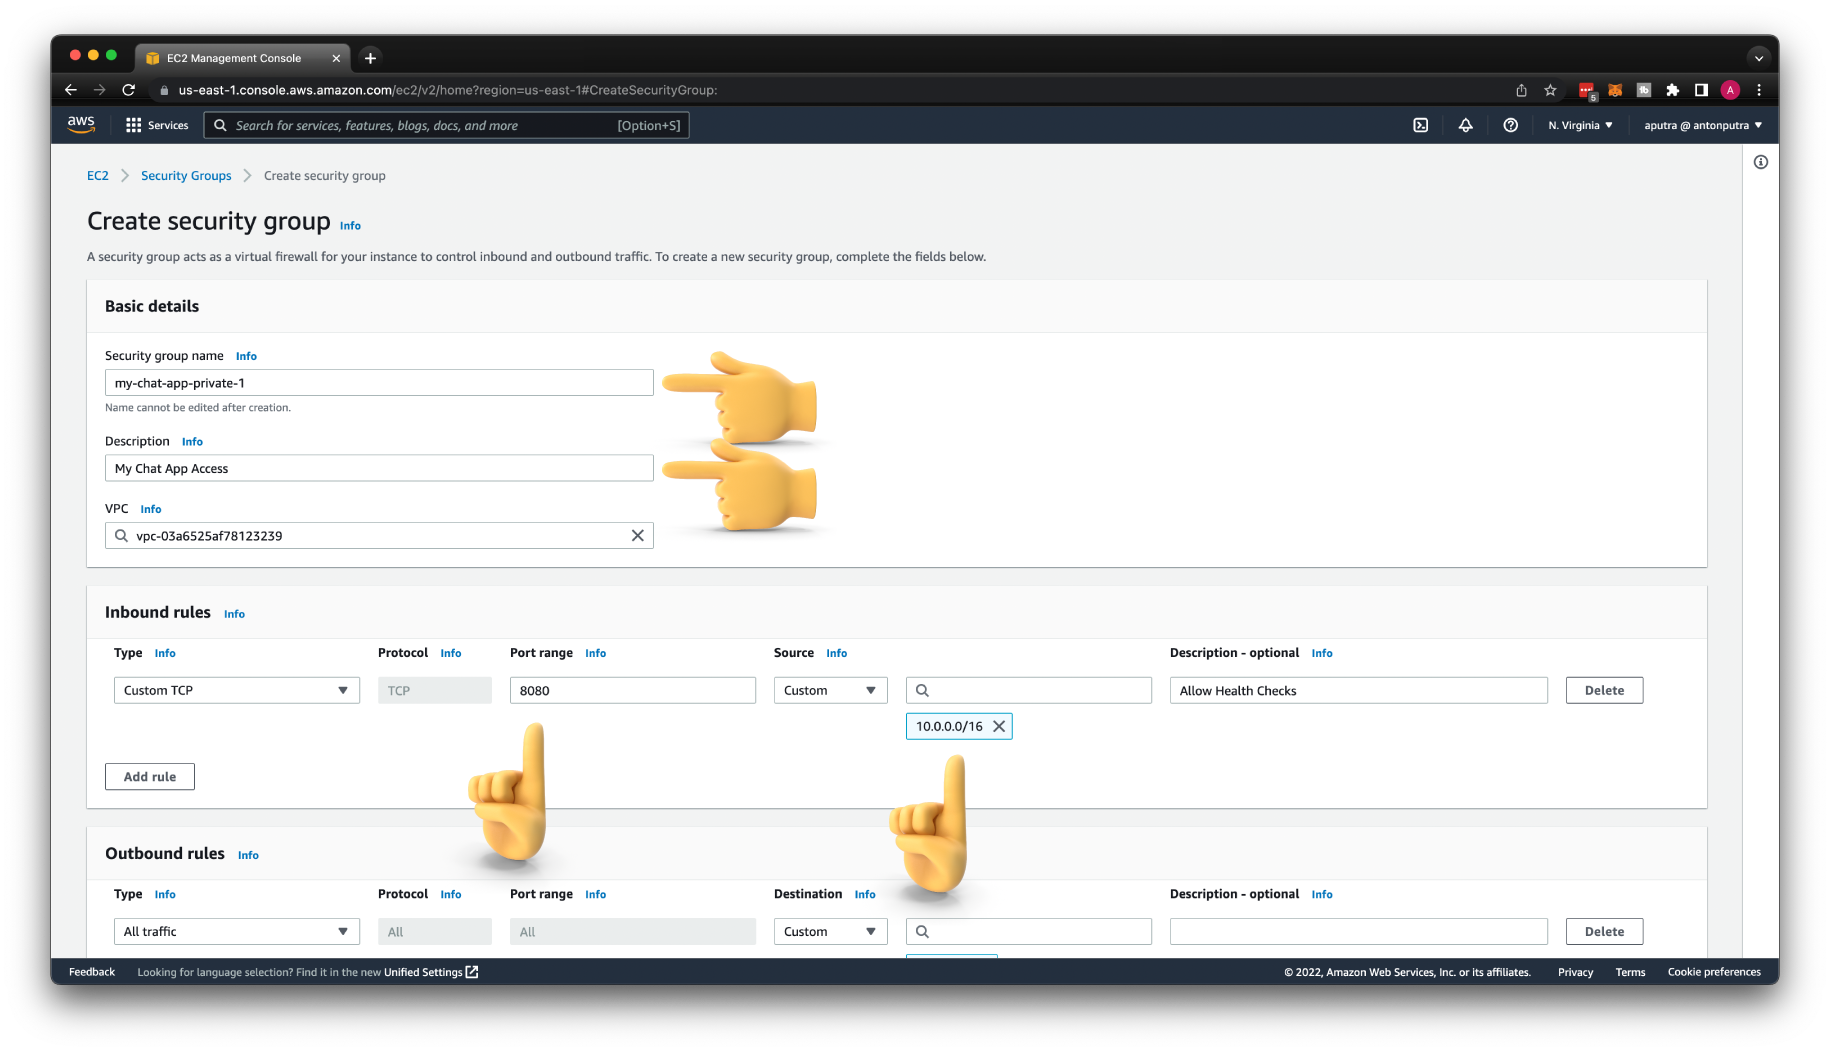
Create AWS Security Group
Let's create a Security Group for the next private integration. Give it a name my-chat-app-private-1 and a description of My Chat App Access.
Since we're going to deploy this EC2 to the private subnet, there is no reason to open port 22. We don't have a bastion host or a VPN. If you need to debug your application, you can use AWS Session Manager to SSH to the private instance.
Let's also open port 8080 for the health checks that will come from the Network Load Balancer. For the source, we need to specify VPC CIDR.
Create AWS Launch Template
To create AWS Auto Scaling Group, we must first define the Launch Template. Give it a name, for example, my-chat-app-1. Then select the AMI image of your application. This image should include at least a systemd service file that automatically starts the app when AWS launches an EC2 instance from this template.

Select the security group.
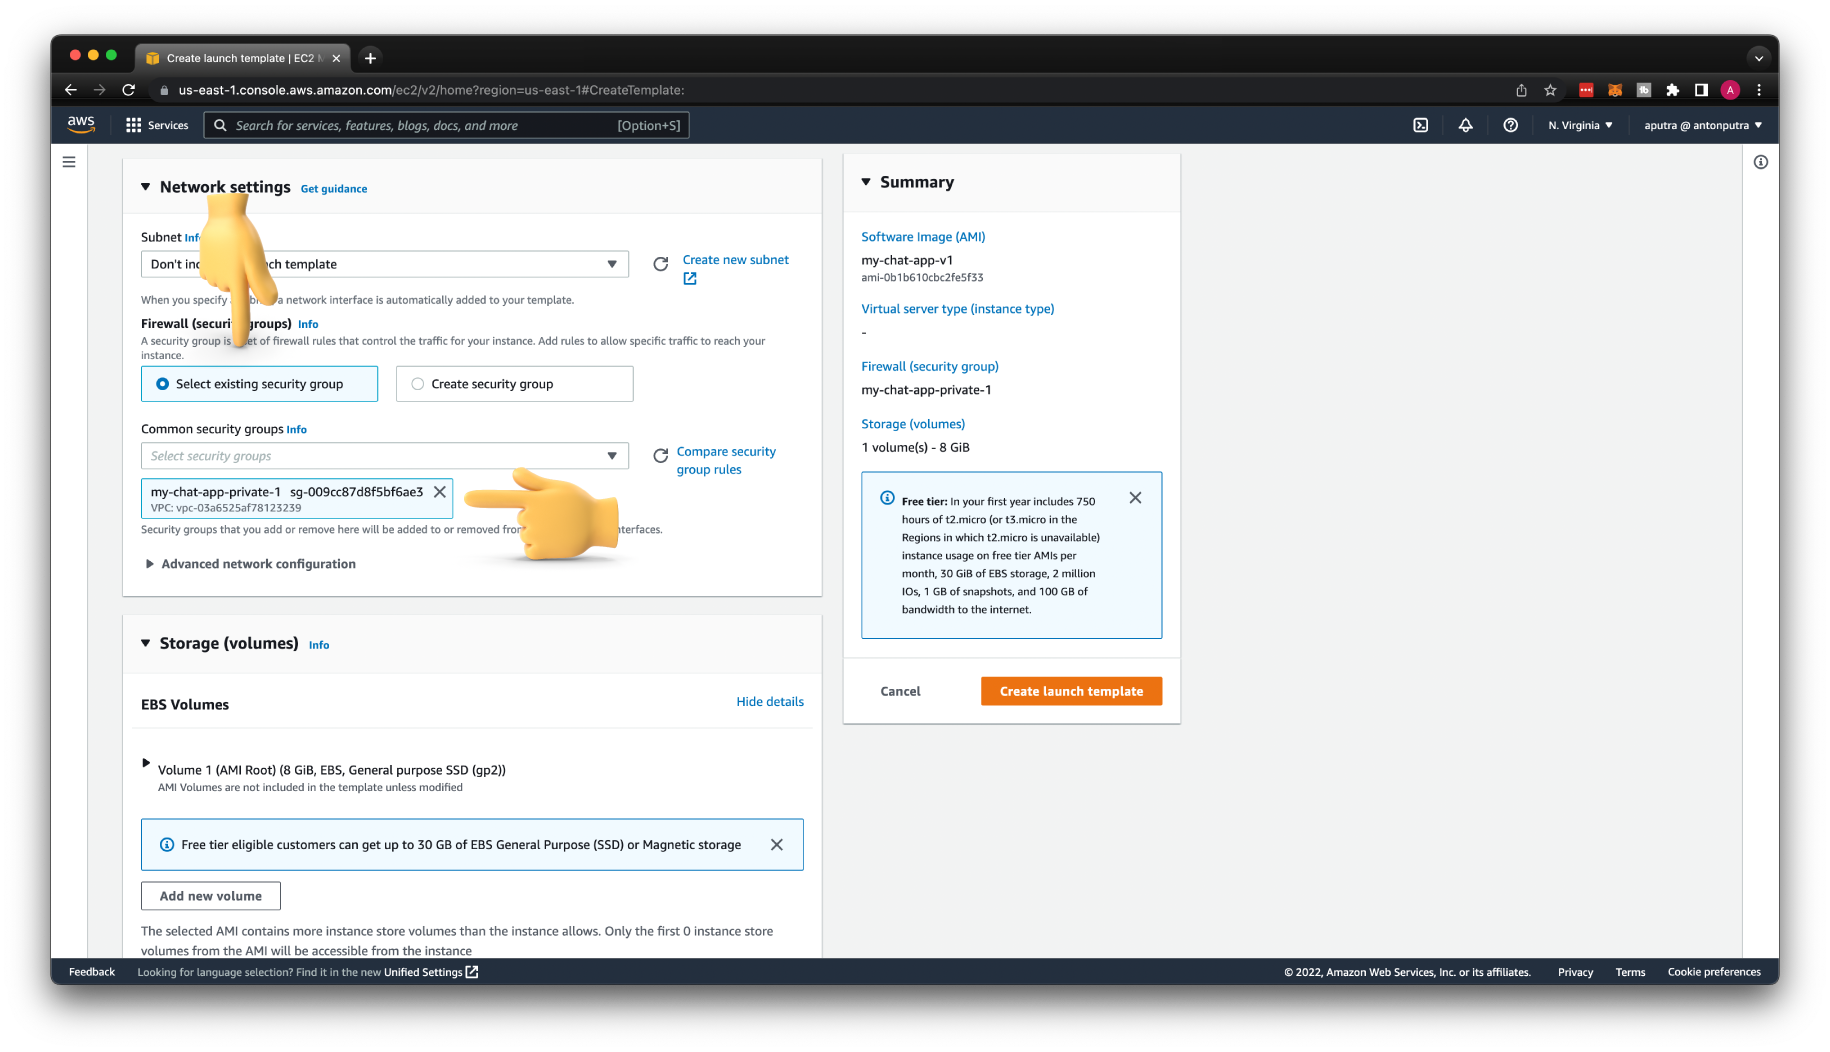
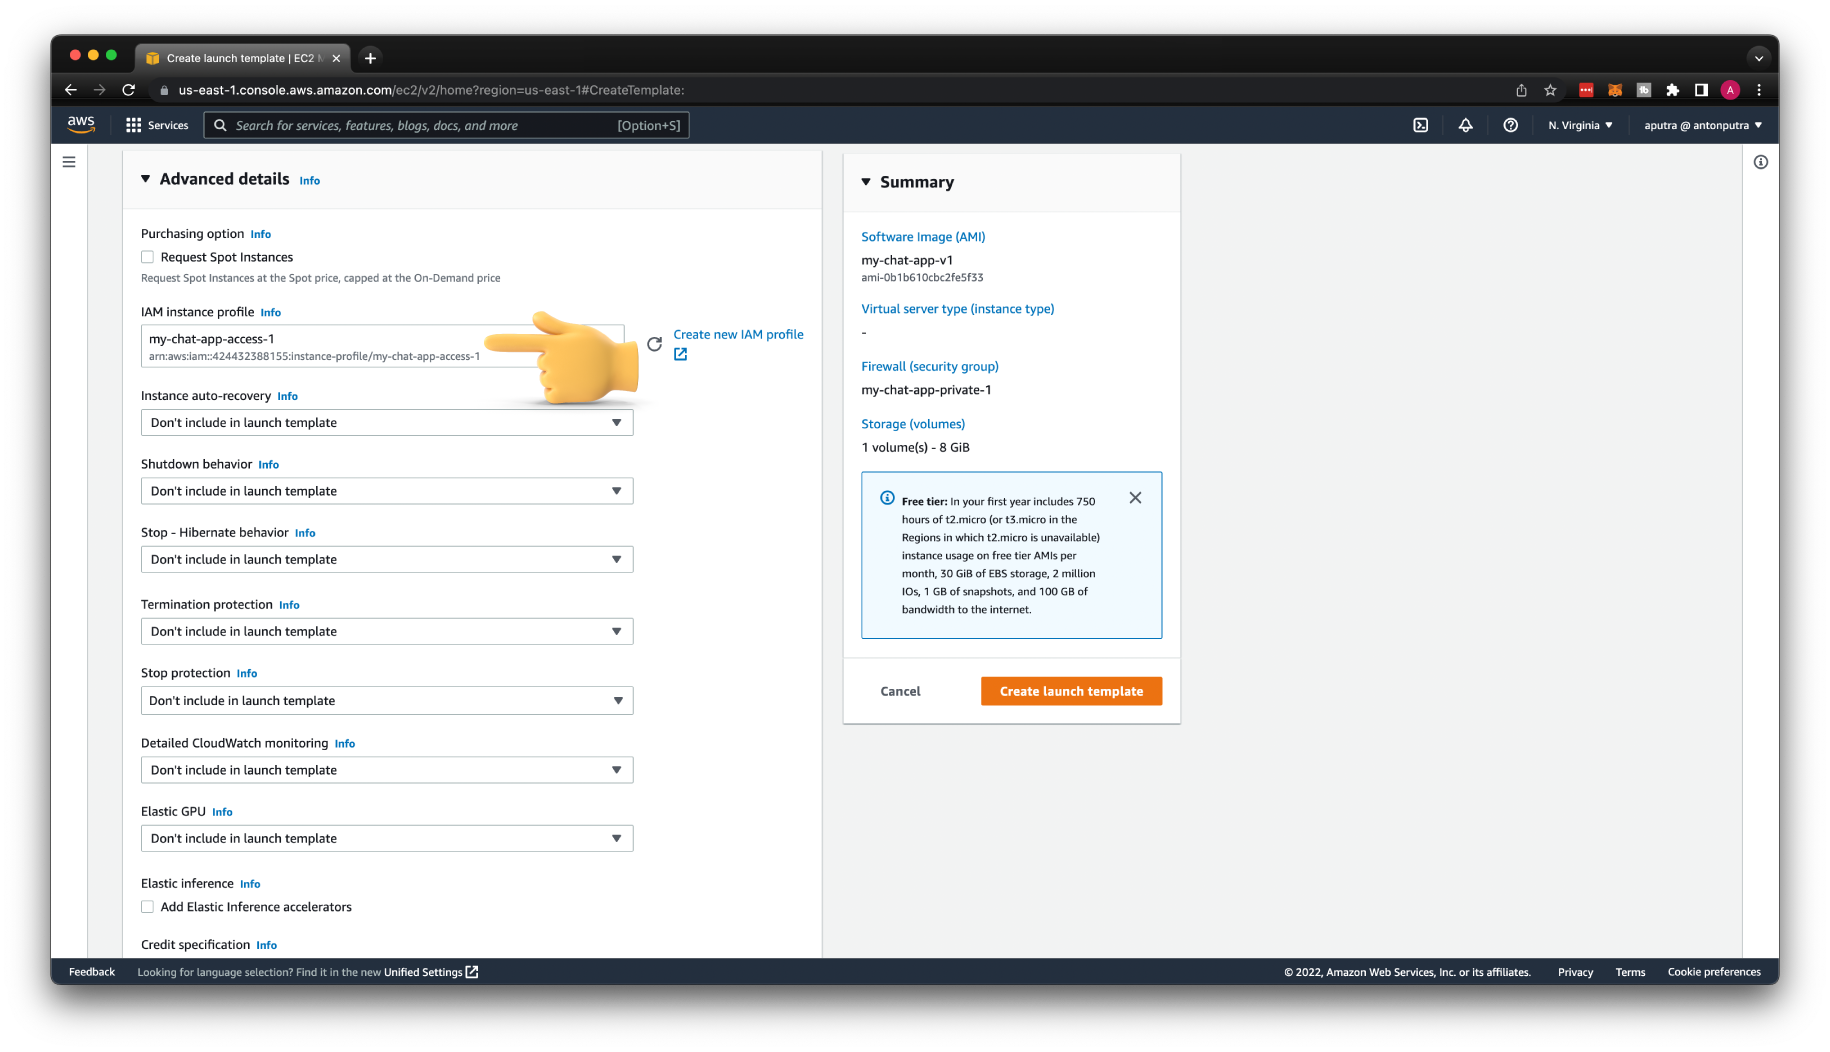
Don't forget to include the IAM role in the launch template to grant NodeJS permissions to access the DynamoDB database and API Gateway.
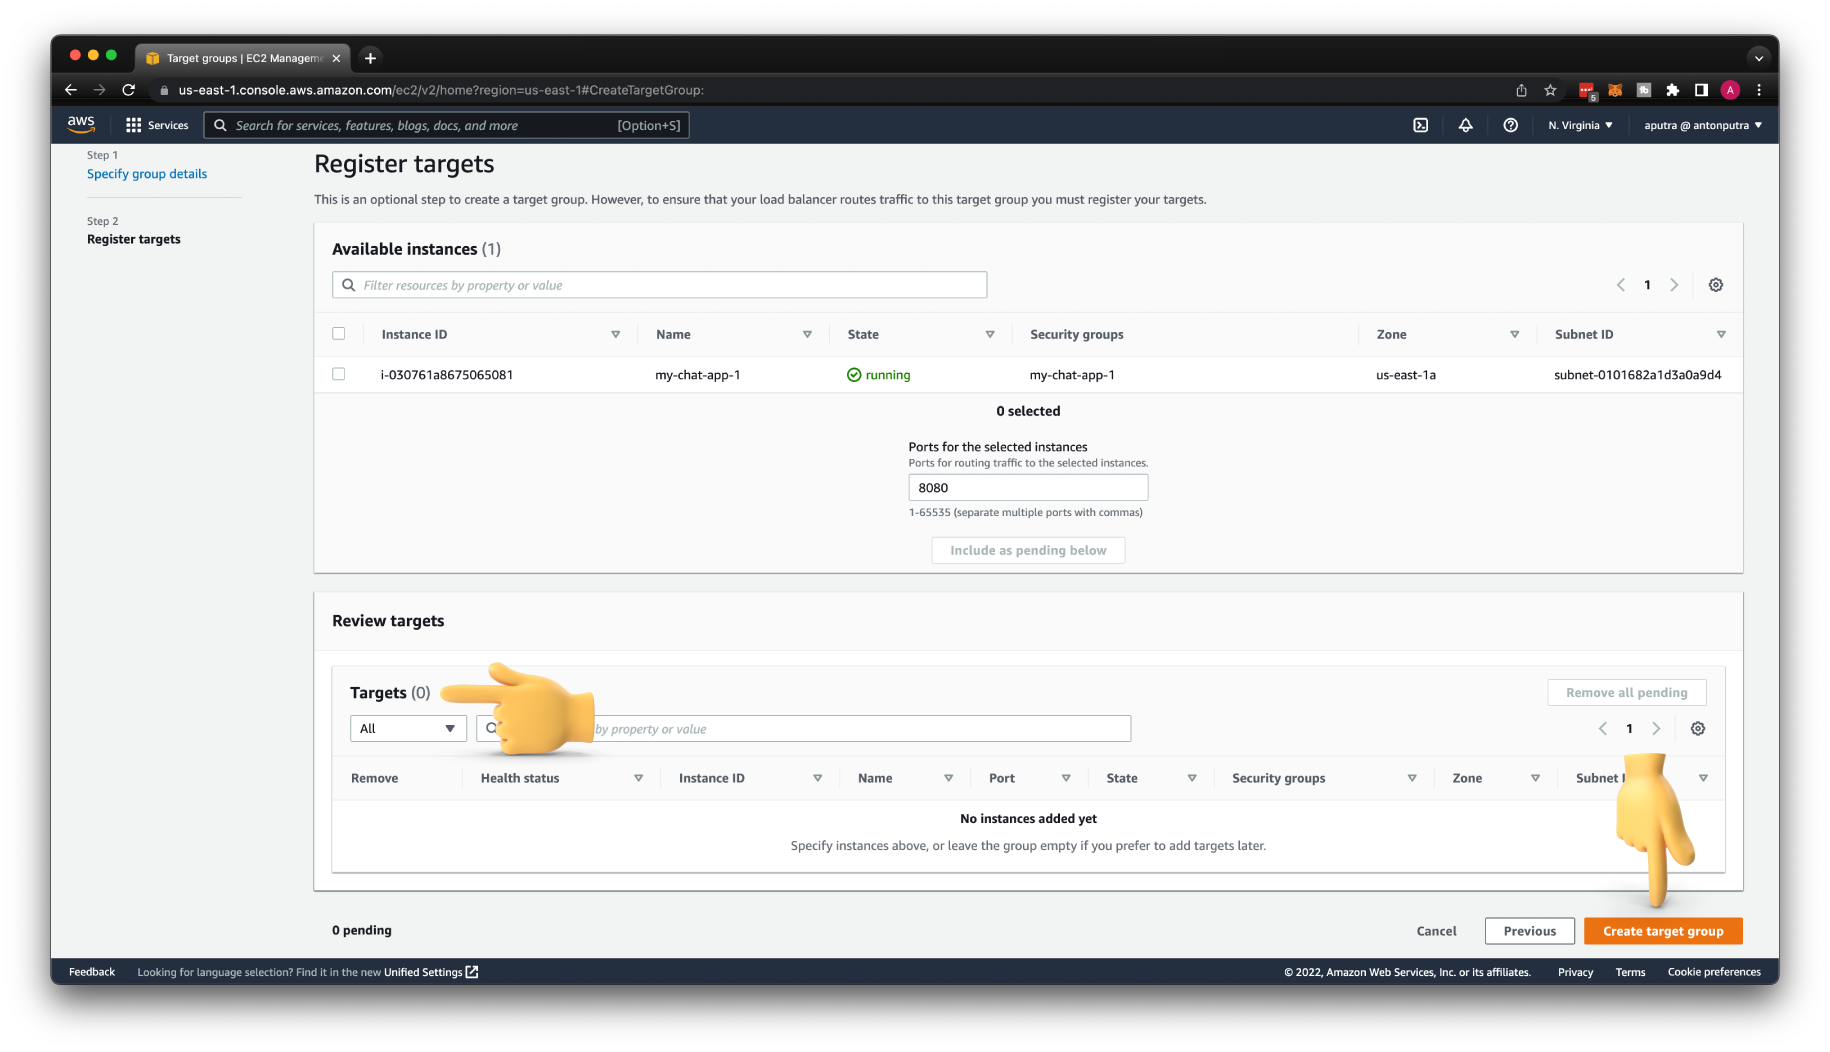
Create AWS Target Group
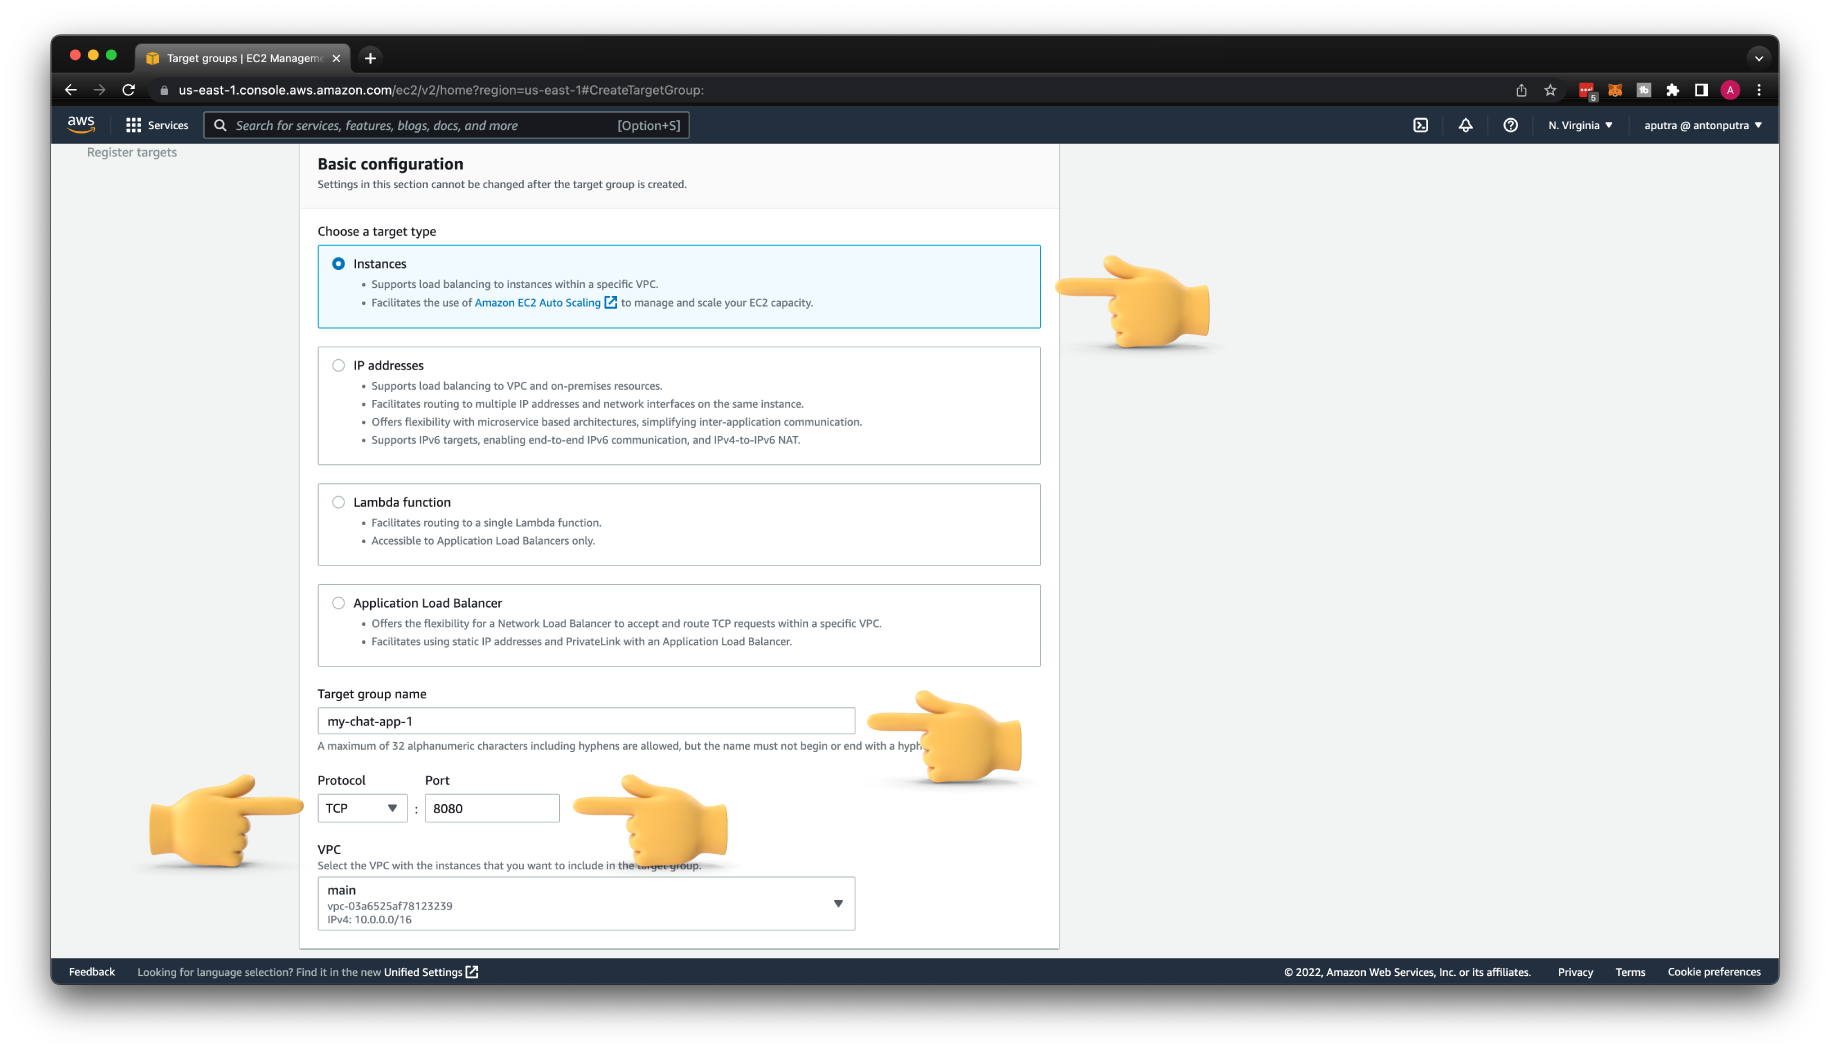
Next, we need to create an AWS Tagrhet Group that the load balancer will use to distribute requests from the API Gateway. Let's call it my-chat-app-1 and keep the target type as Instances.
Since we are going to use this target group with Network Load Balancer, we must switch HTTP protocol to TCP and update the port to 8080.
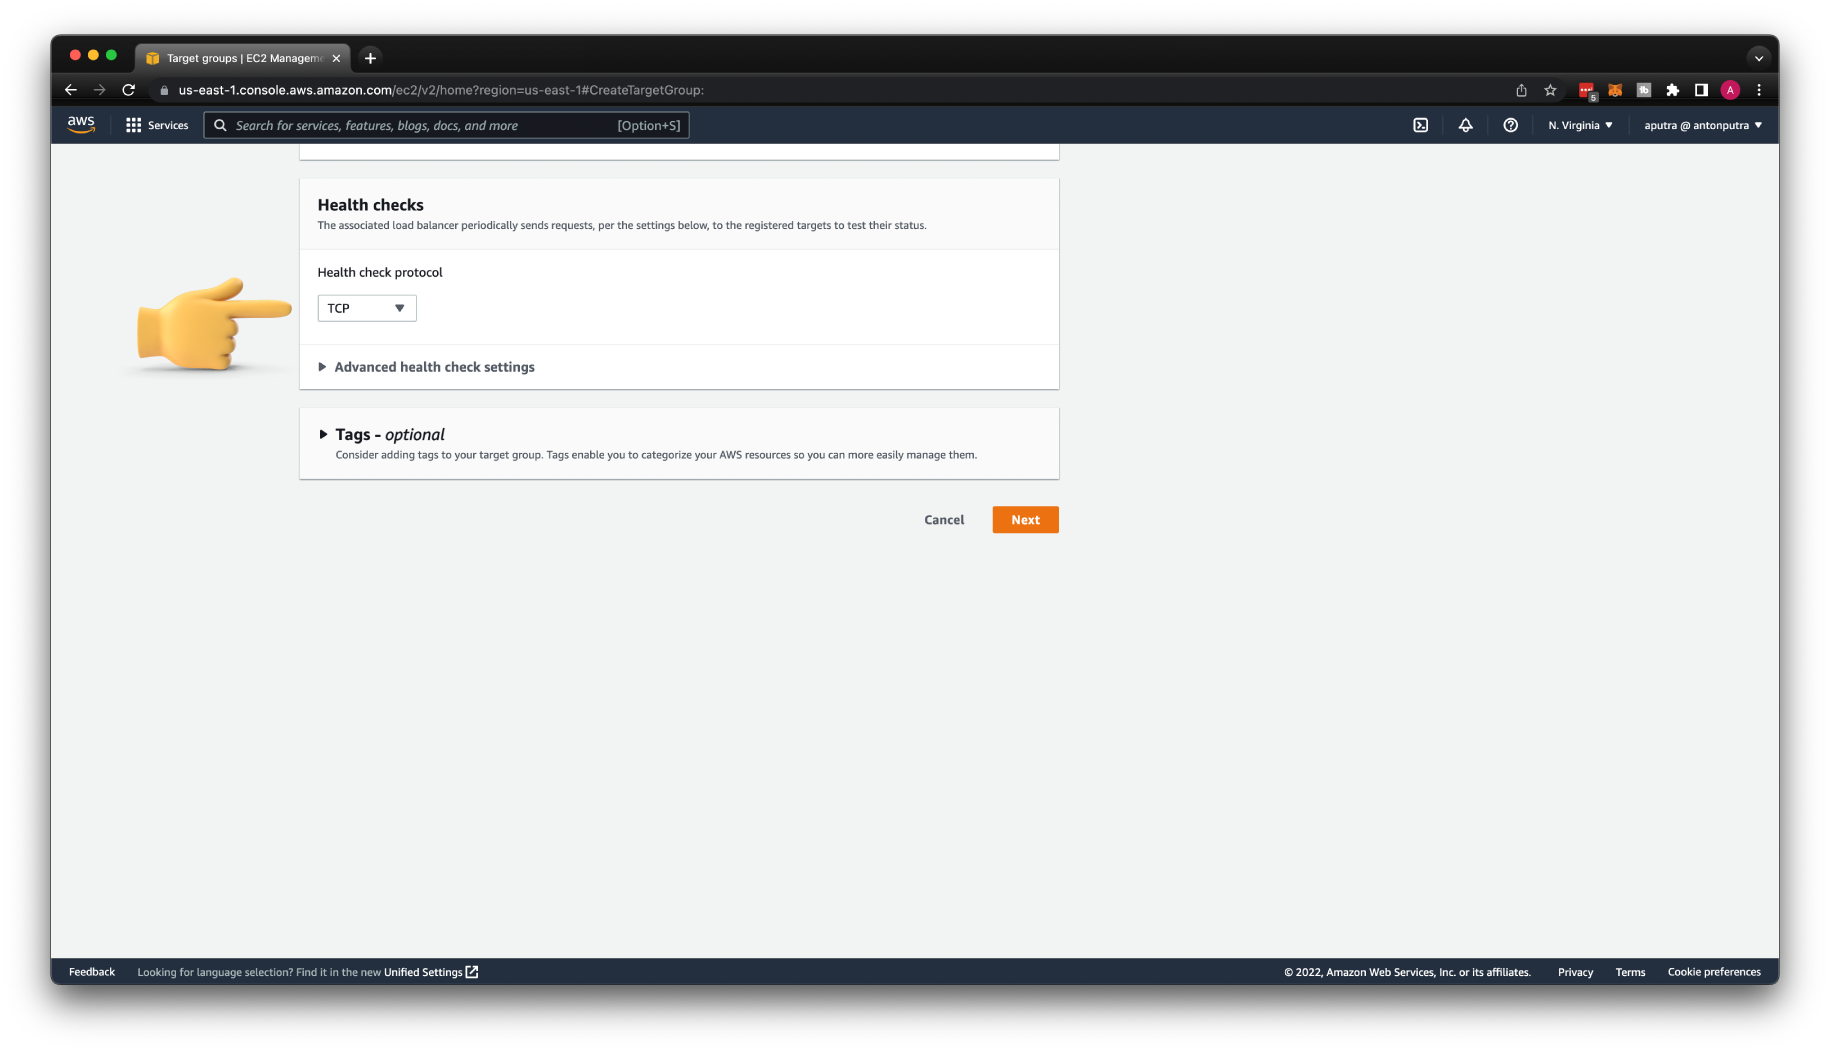
However, if you have an endpoint dedicated to the health check, you can still use the HTTP protocol. But since I don't have it, let me just use a plain TCP check. Basically, this health check verifies that port 8080 is open and marks that EC2 instance as healthy.
We're not going to register any EC2 instances manually. We will let Auto Scaling Group to perform that job. Just click Create target group.
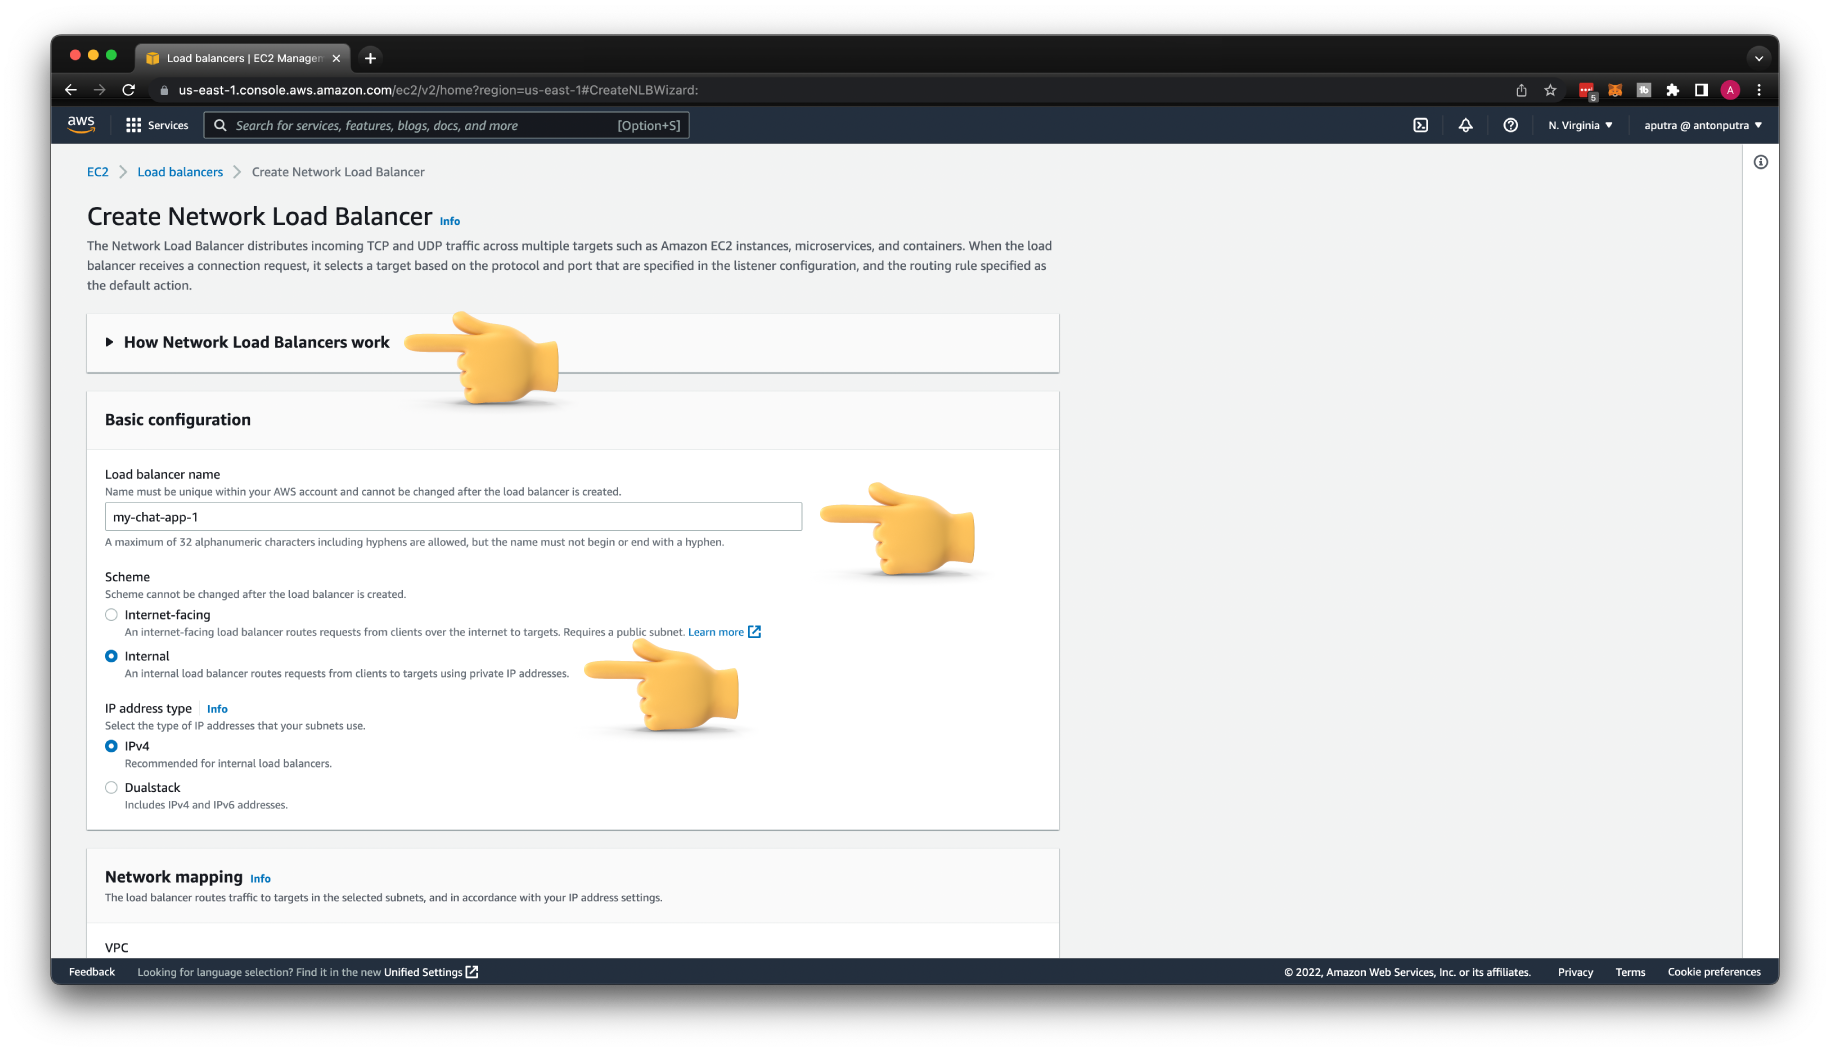
Create AWS Network Load Balancer
Let's go ahead and create Network Load Balancer. Let's call it my-chat-app-1. Then select the Internal Scheme. This will force AWS to create this load balancer in the private subnets with only private IP addresses. It will be accessible only within your VPC.
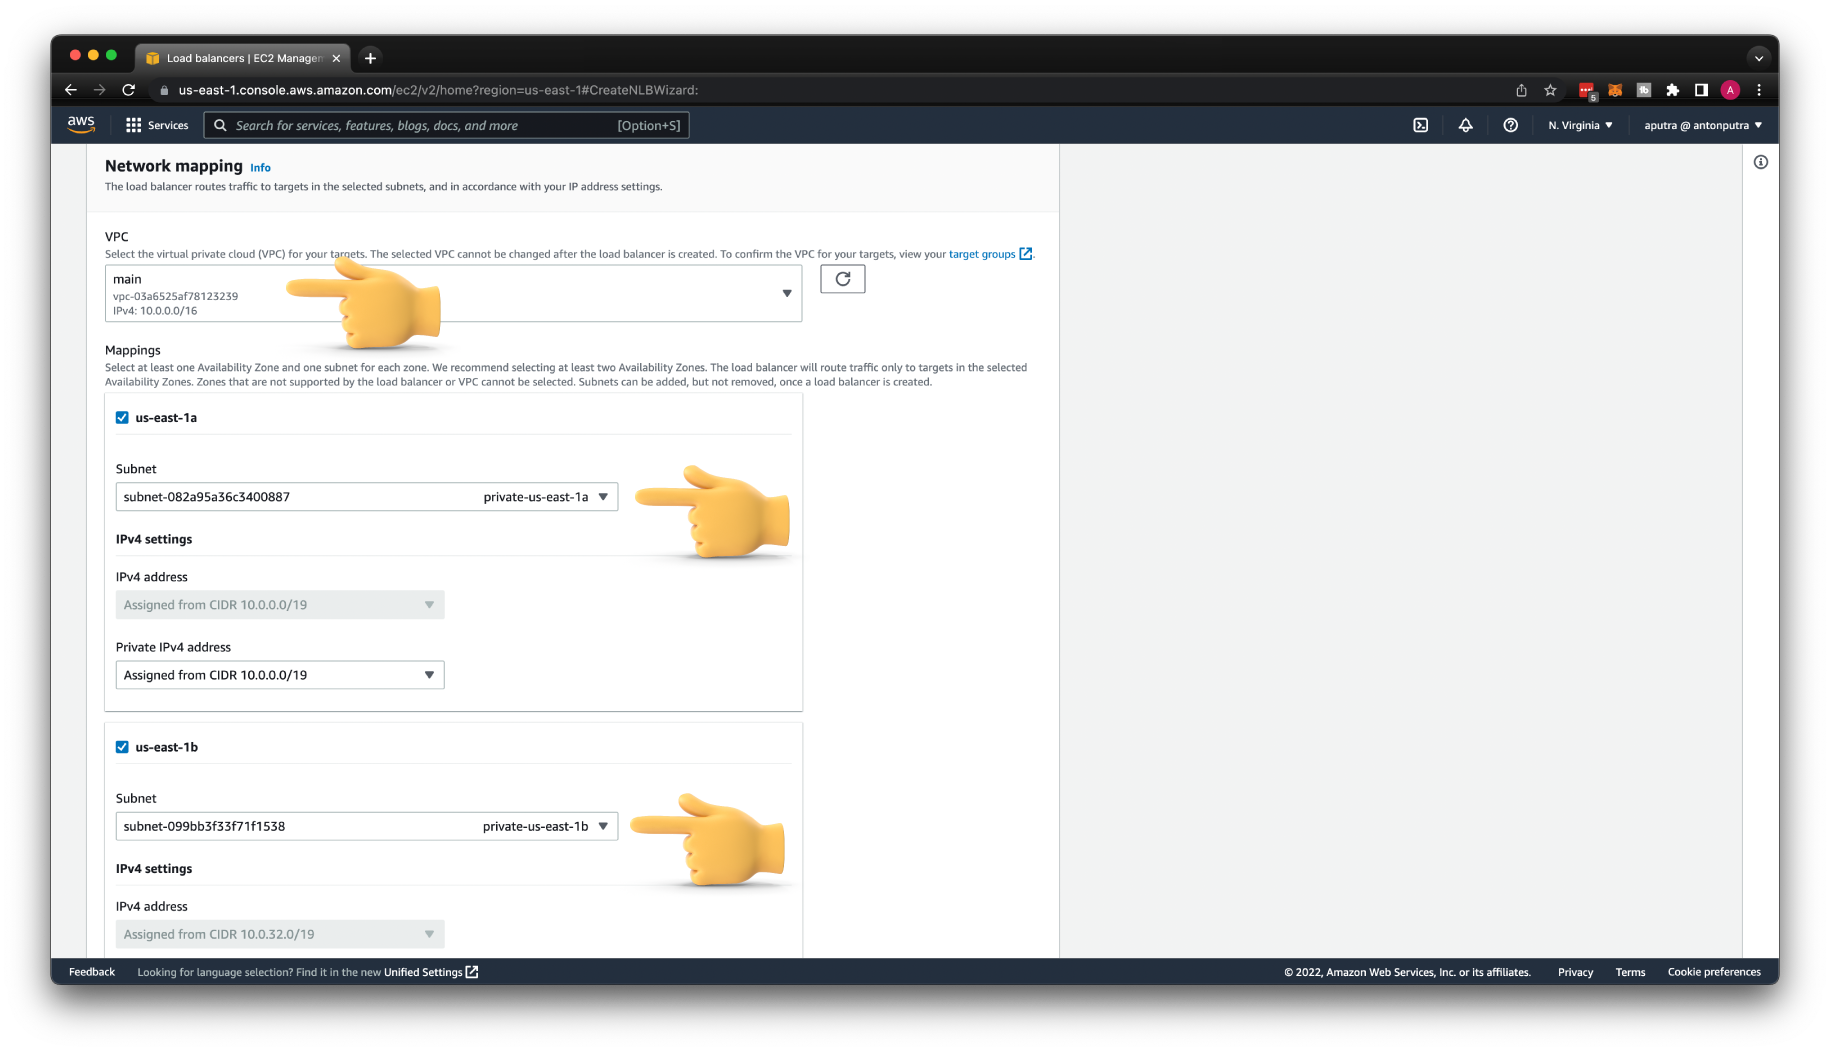
Select your VPC; in my case, it's main. I have only one in my current AWS account. Then select two availability zones and choose a private subnet in each of them.
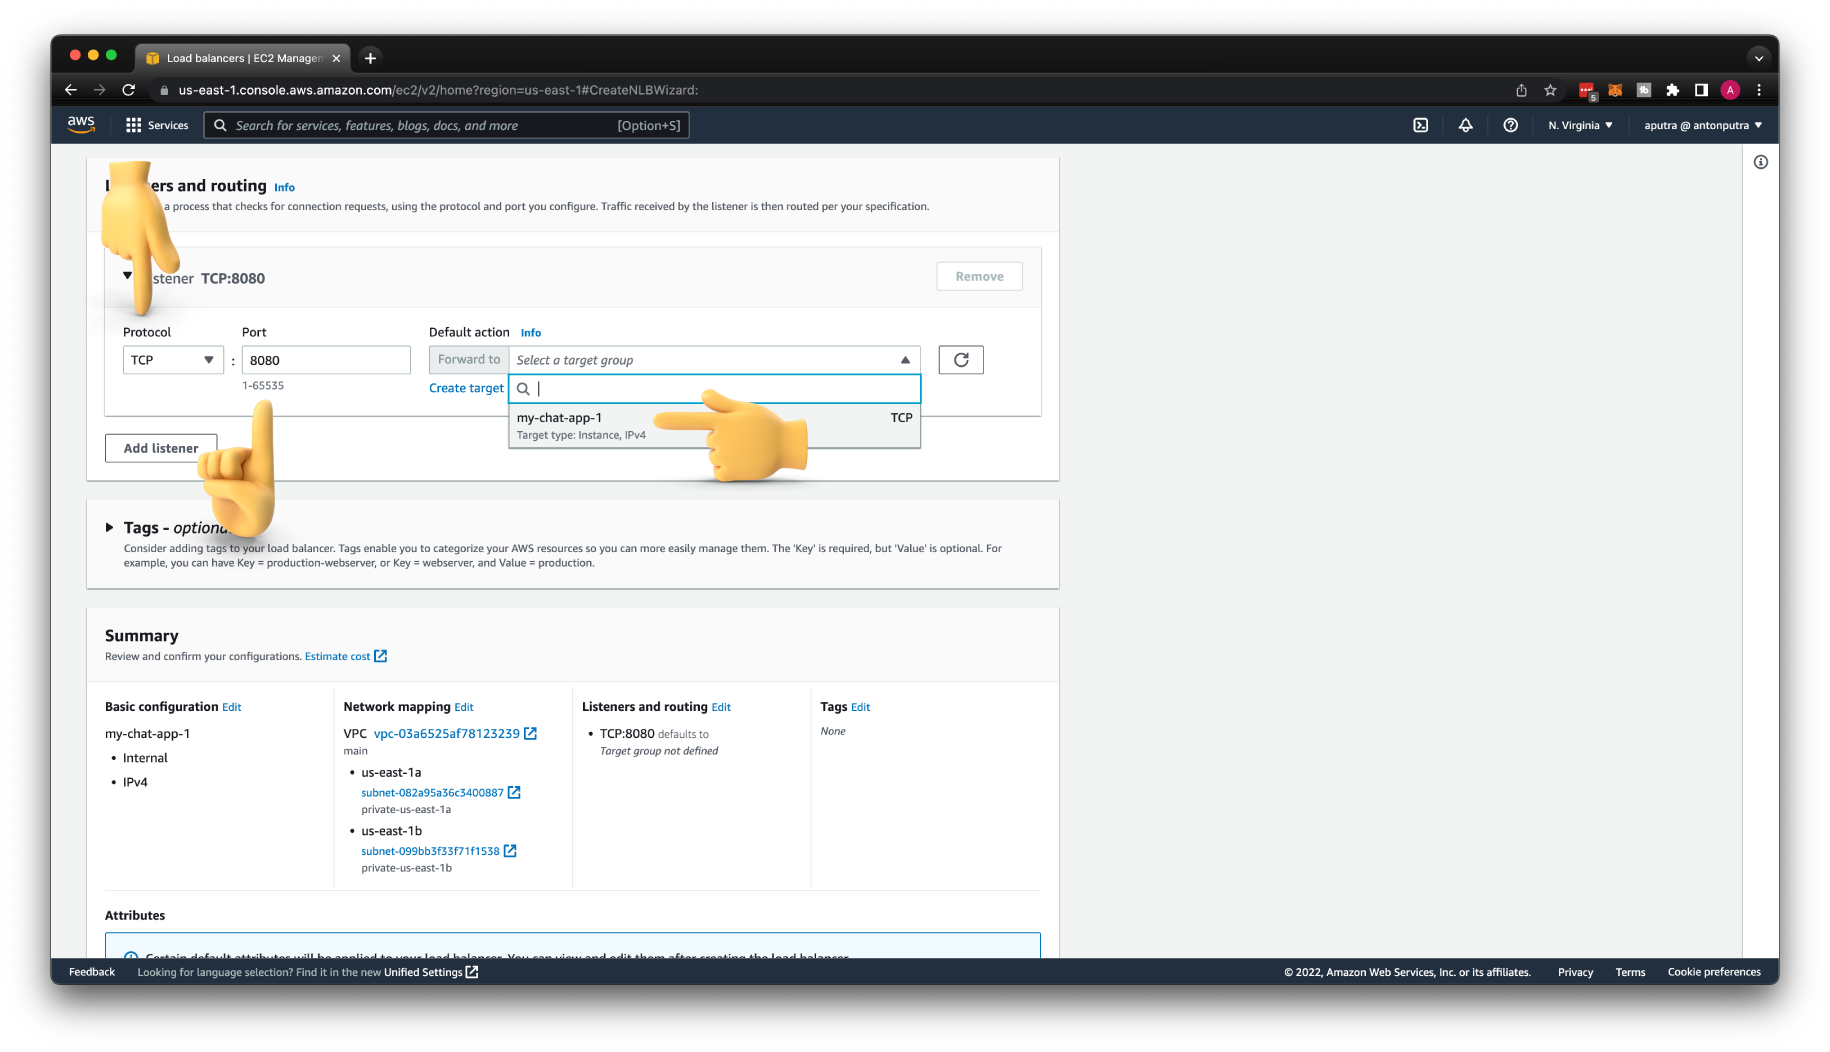
For the listener, keep the TCP protocol. Update to port 8080 and select your target group. If it is not showing up, check if you selected in the target group TCP protocol and not HTTP.
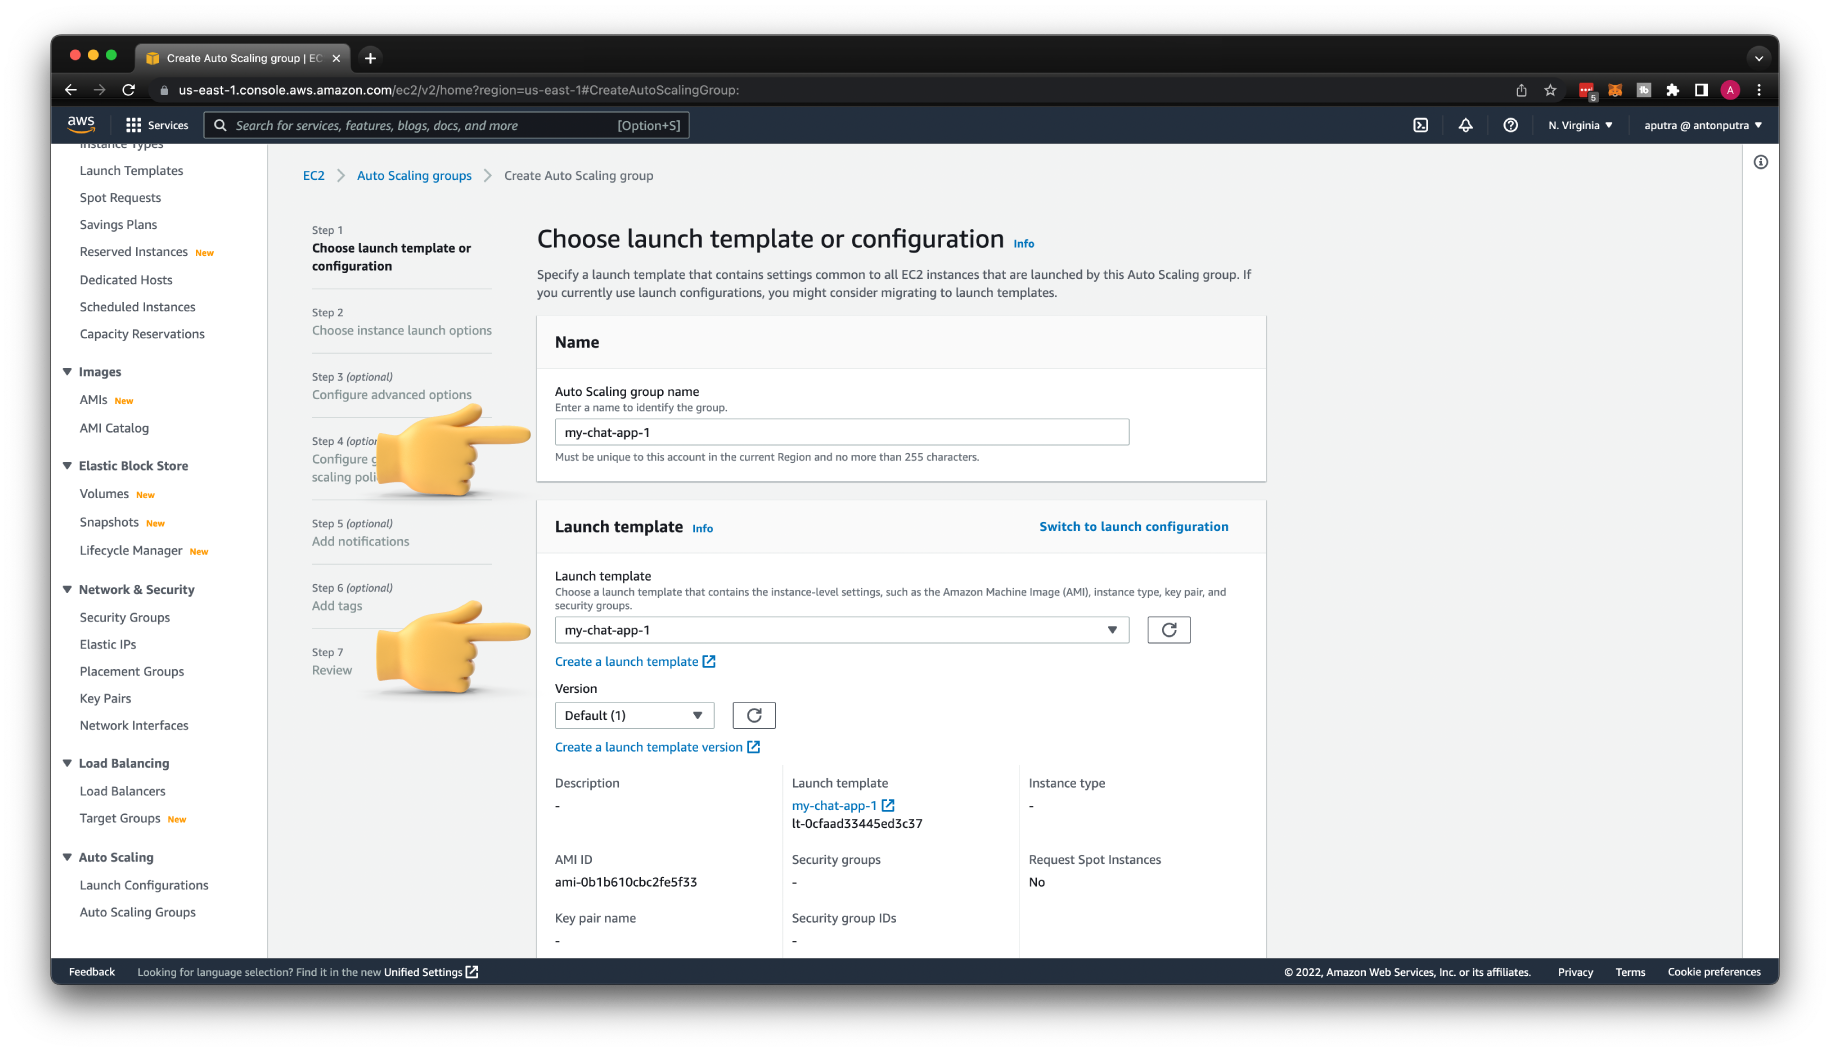
Create AWS Auto Scaling Group
Finally, the Auto Scaling Group. Give a name my-chat-app-1 and select the Launch Template that we created with the AMI image of the chat app.
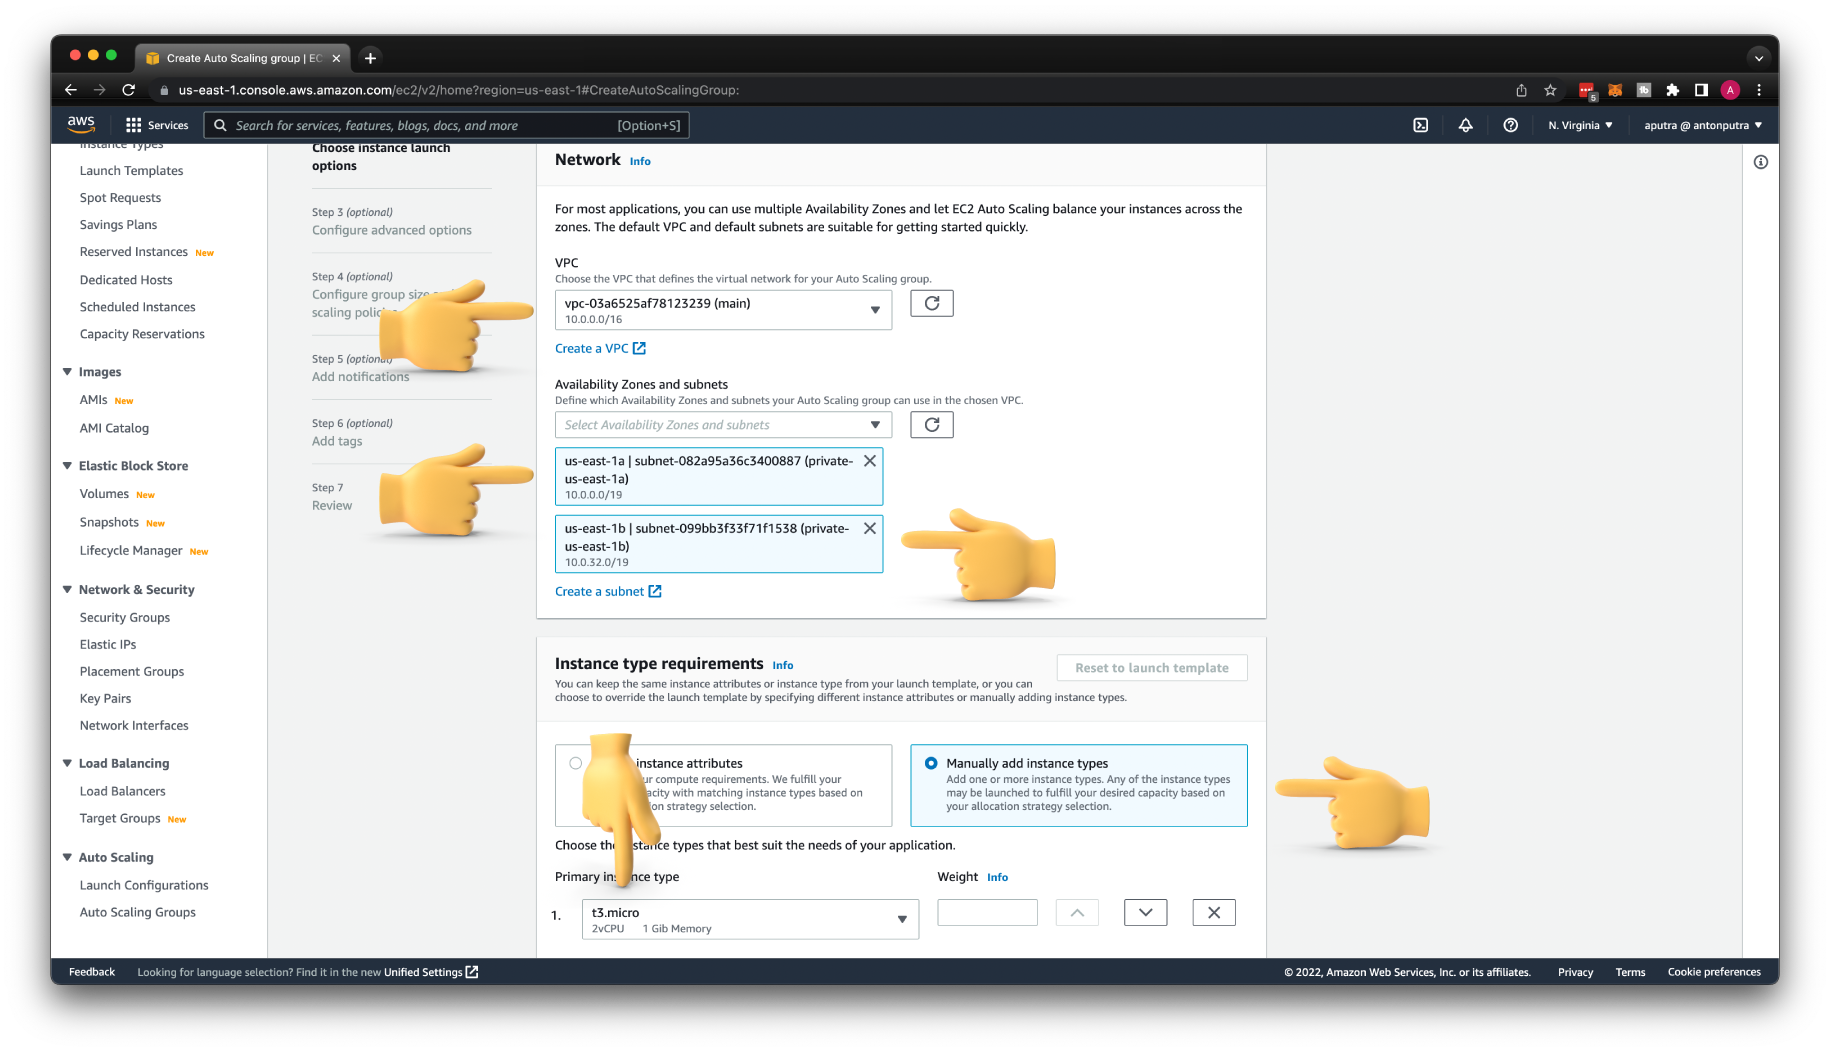
For the network, you need to choose where to place the EC2 instances. Since we create private integration, let's select two private subnets.
For the Instance type, you can define CPU and memory or choose the instance family type, for example, t3.micro.
Then you need to attach this Auto Scaling Group to the target group that we created earlier. Each EC2 instance created by this Auto Scaling Group will be automatically registered with the Network Load Balancer.

If you want to dynamically scale the number of virtual machines in your Auto Scaling Group, choose a maximum capacity that would be higher than the minimum.
To scale based on CPU load, you can use the Average CPU utilization auto-scaling policy. If the average CPU across all your EC2 instances exceeds 50% in this case, Auto Scaling Group will spin up an additional instance.

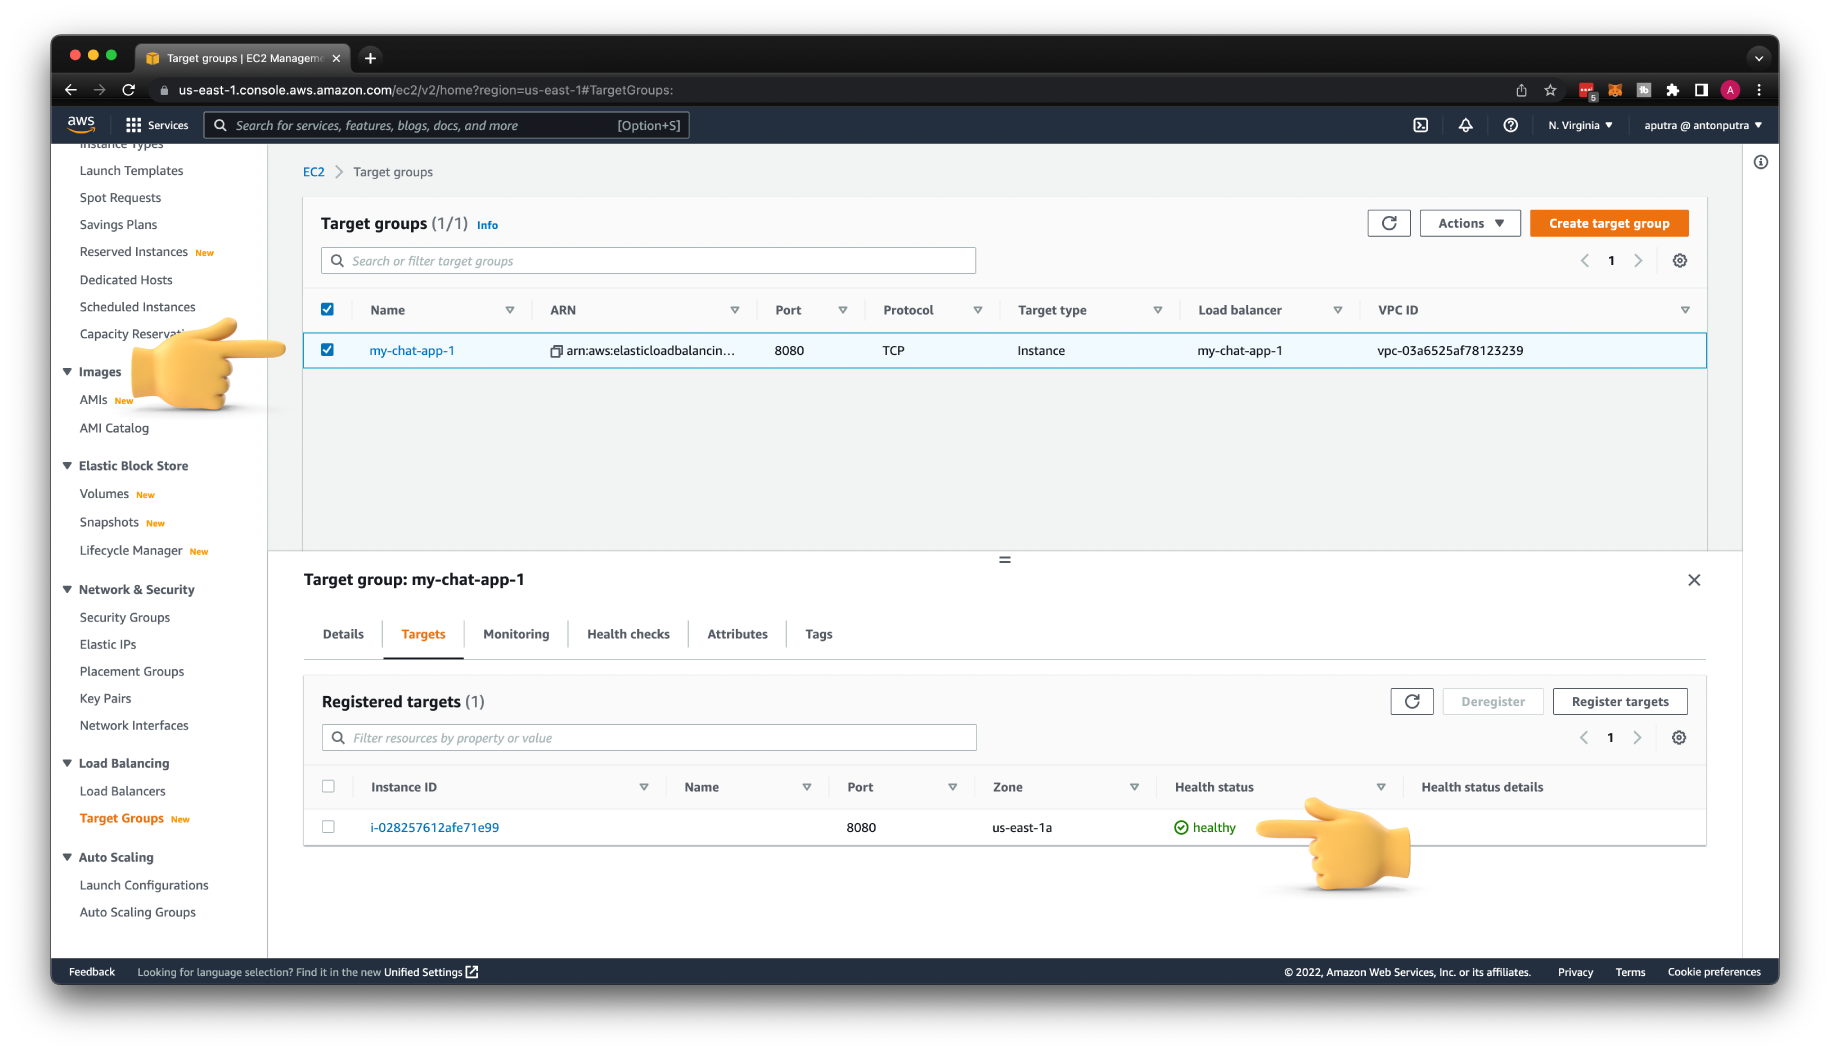
After you create the Auto Scaling Group, make sure that at least one instance in the target group is healthy to accept incoming requests from API Gateway.
Create AWS VPC Link for WebSocket API
Before we can update WebSocket API integration from HTTP to VPC Link, we need to create that VPC Link. For WebSocket API, you need to choose the VPC link for REST APIs. Then give it a name my-chat-app-1 and select the Network Load Balancer as a target.

Update All Routes to VPC Link Integration
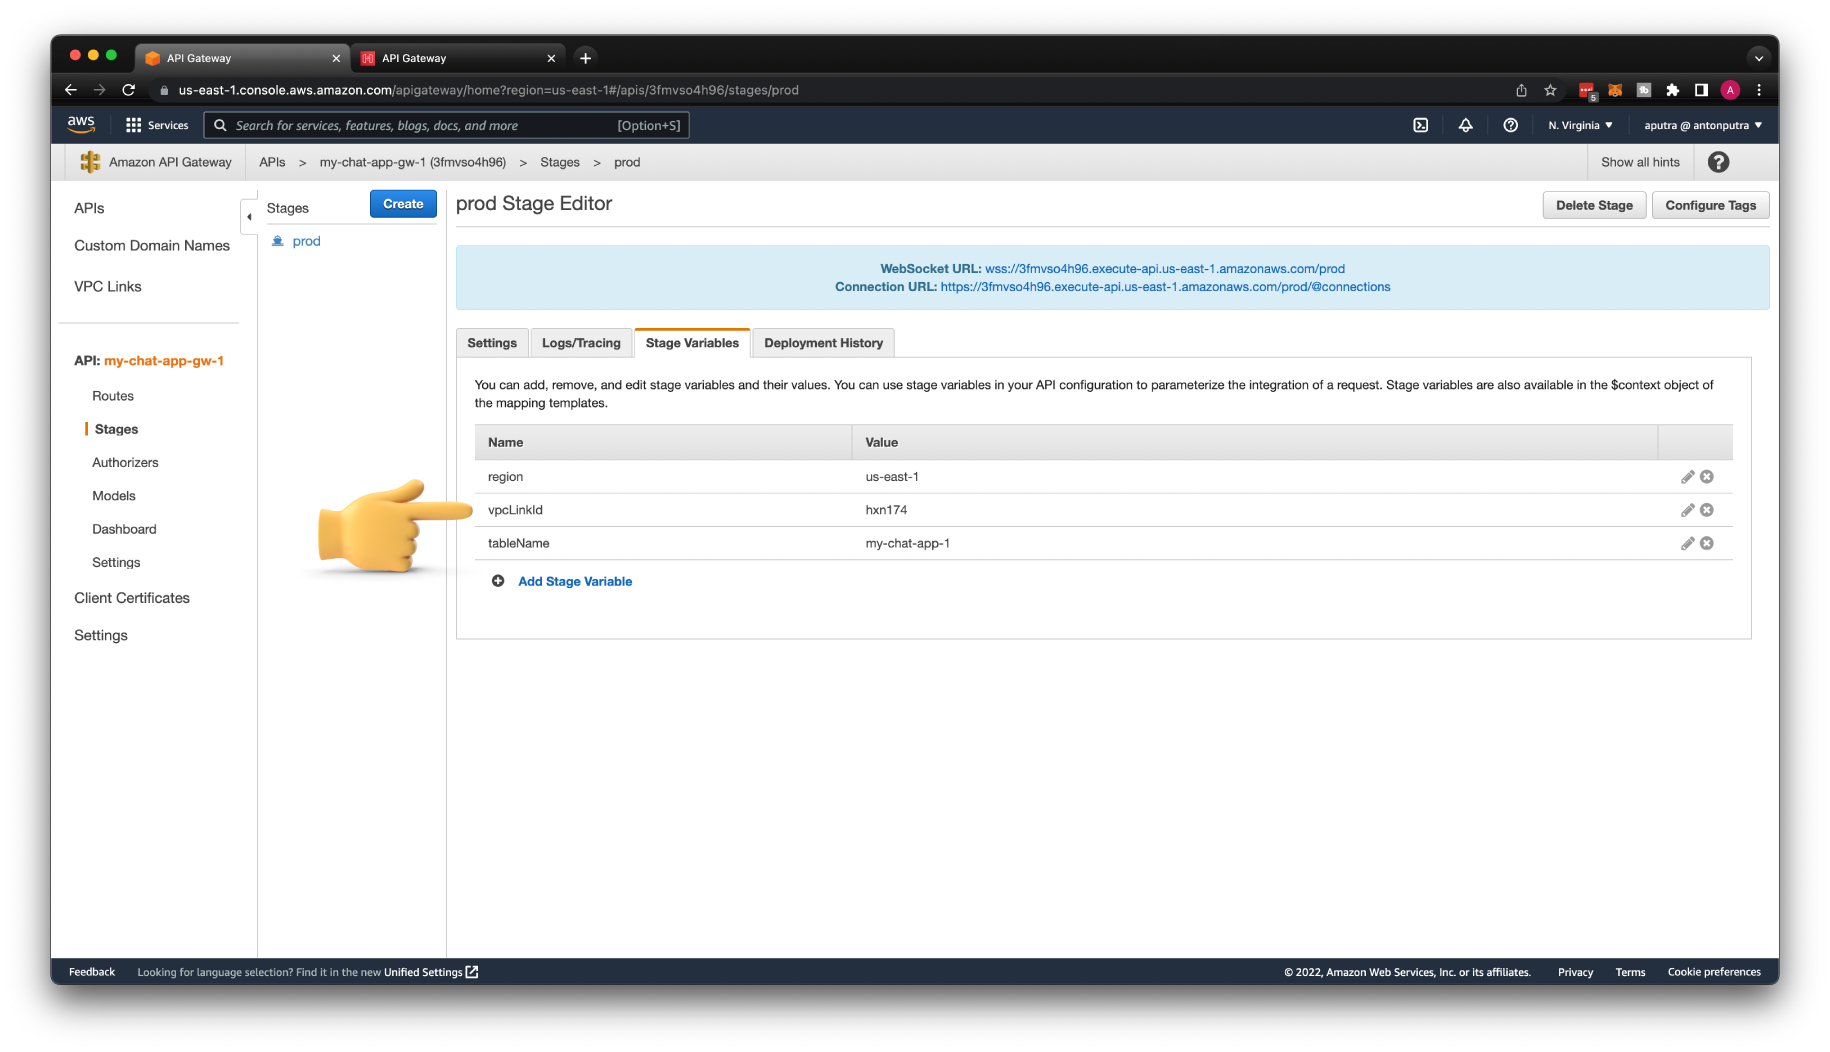
To reference VPC Link, we must create the vpcLinkId stage variable first. Use the VPC Link ID as a value.
Update $connect Route Integration to VPC Link
Choose VPC Link over HTTP Integration type. Then use the stage variable to reference VPC Link.
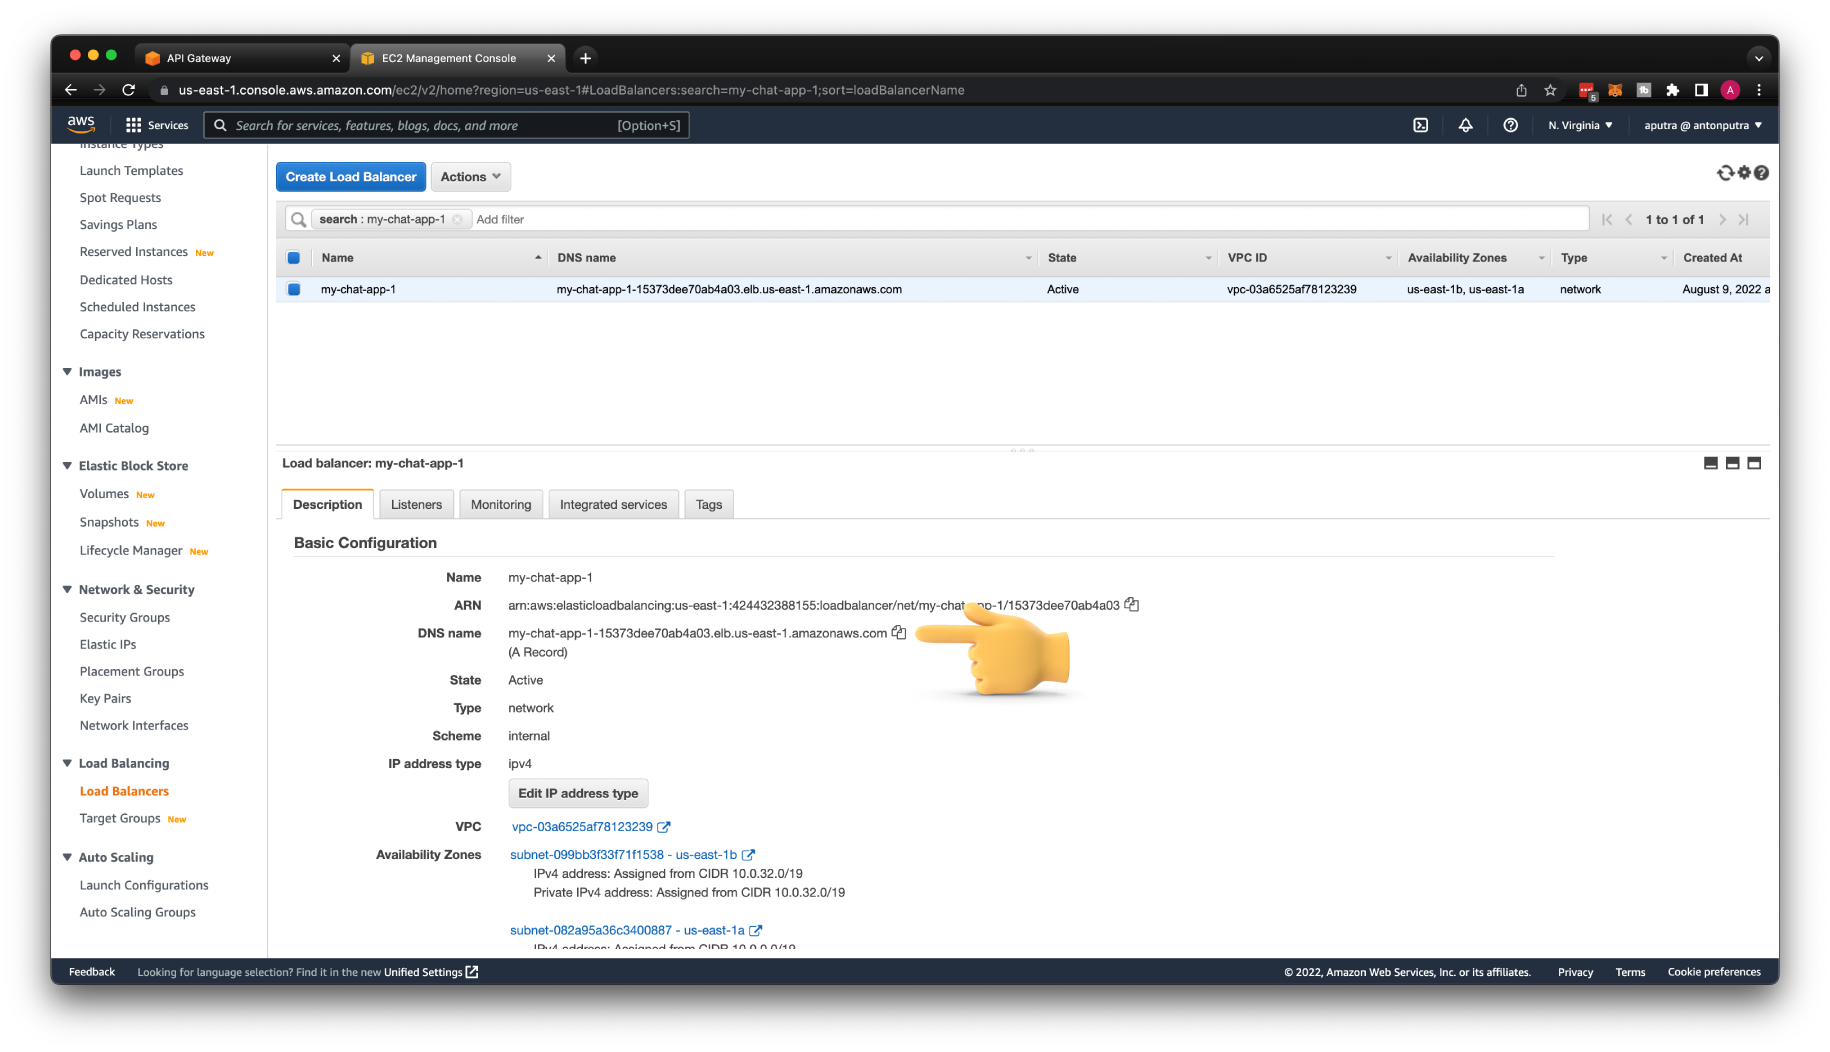
You can use private DNS name of the Load Balancer for URL Endpoint. Keep the same port 8080 and the path /connect, just replace the IP address with DNS.
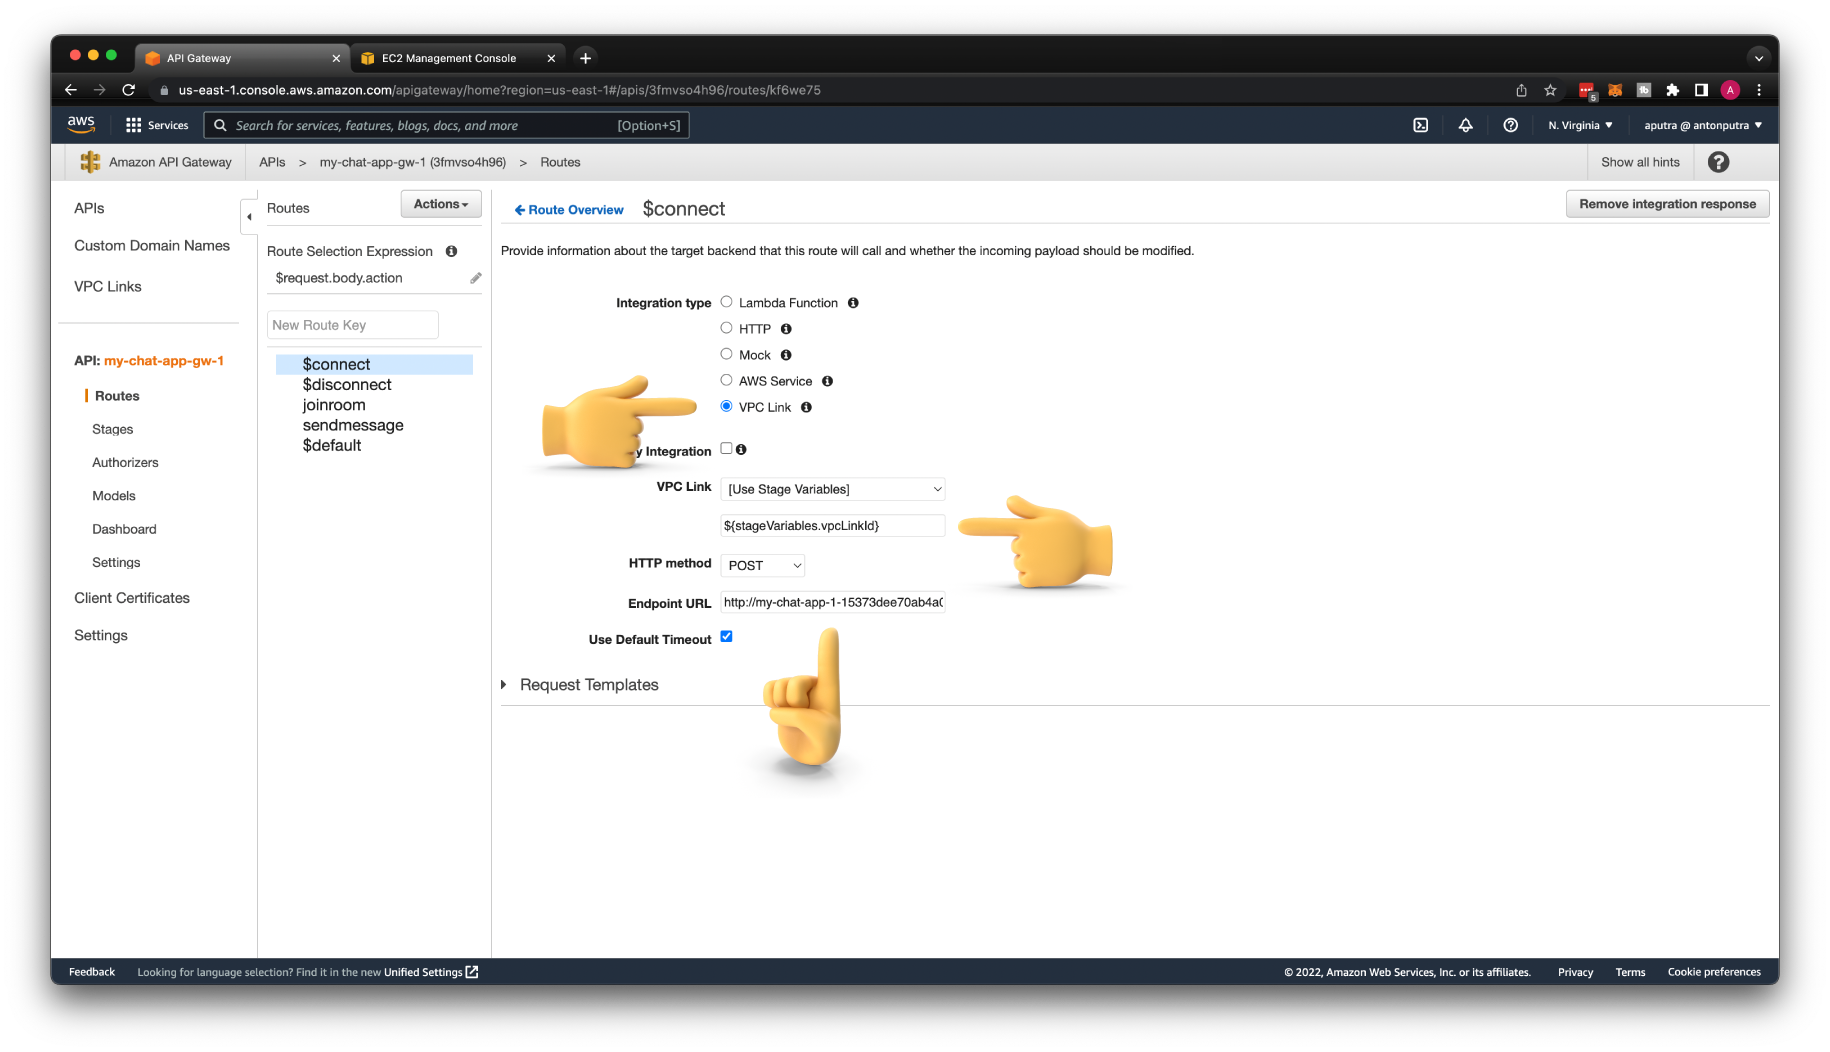
You can get the DNS name of the Load Balancer from the AWS Console.
After you're done with $connect route you need to update other routes to VPC Link Integration: $disconnect, joinroom, and sendmessage. Don't forget to Deploy API to apply the changes.
Then let's go ahead and test the new private integration.
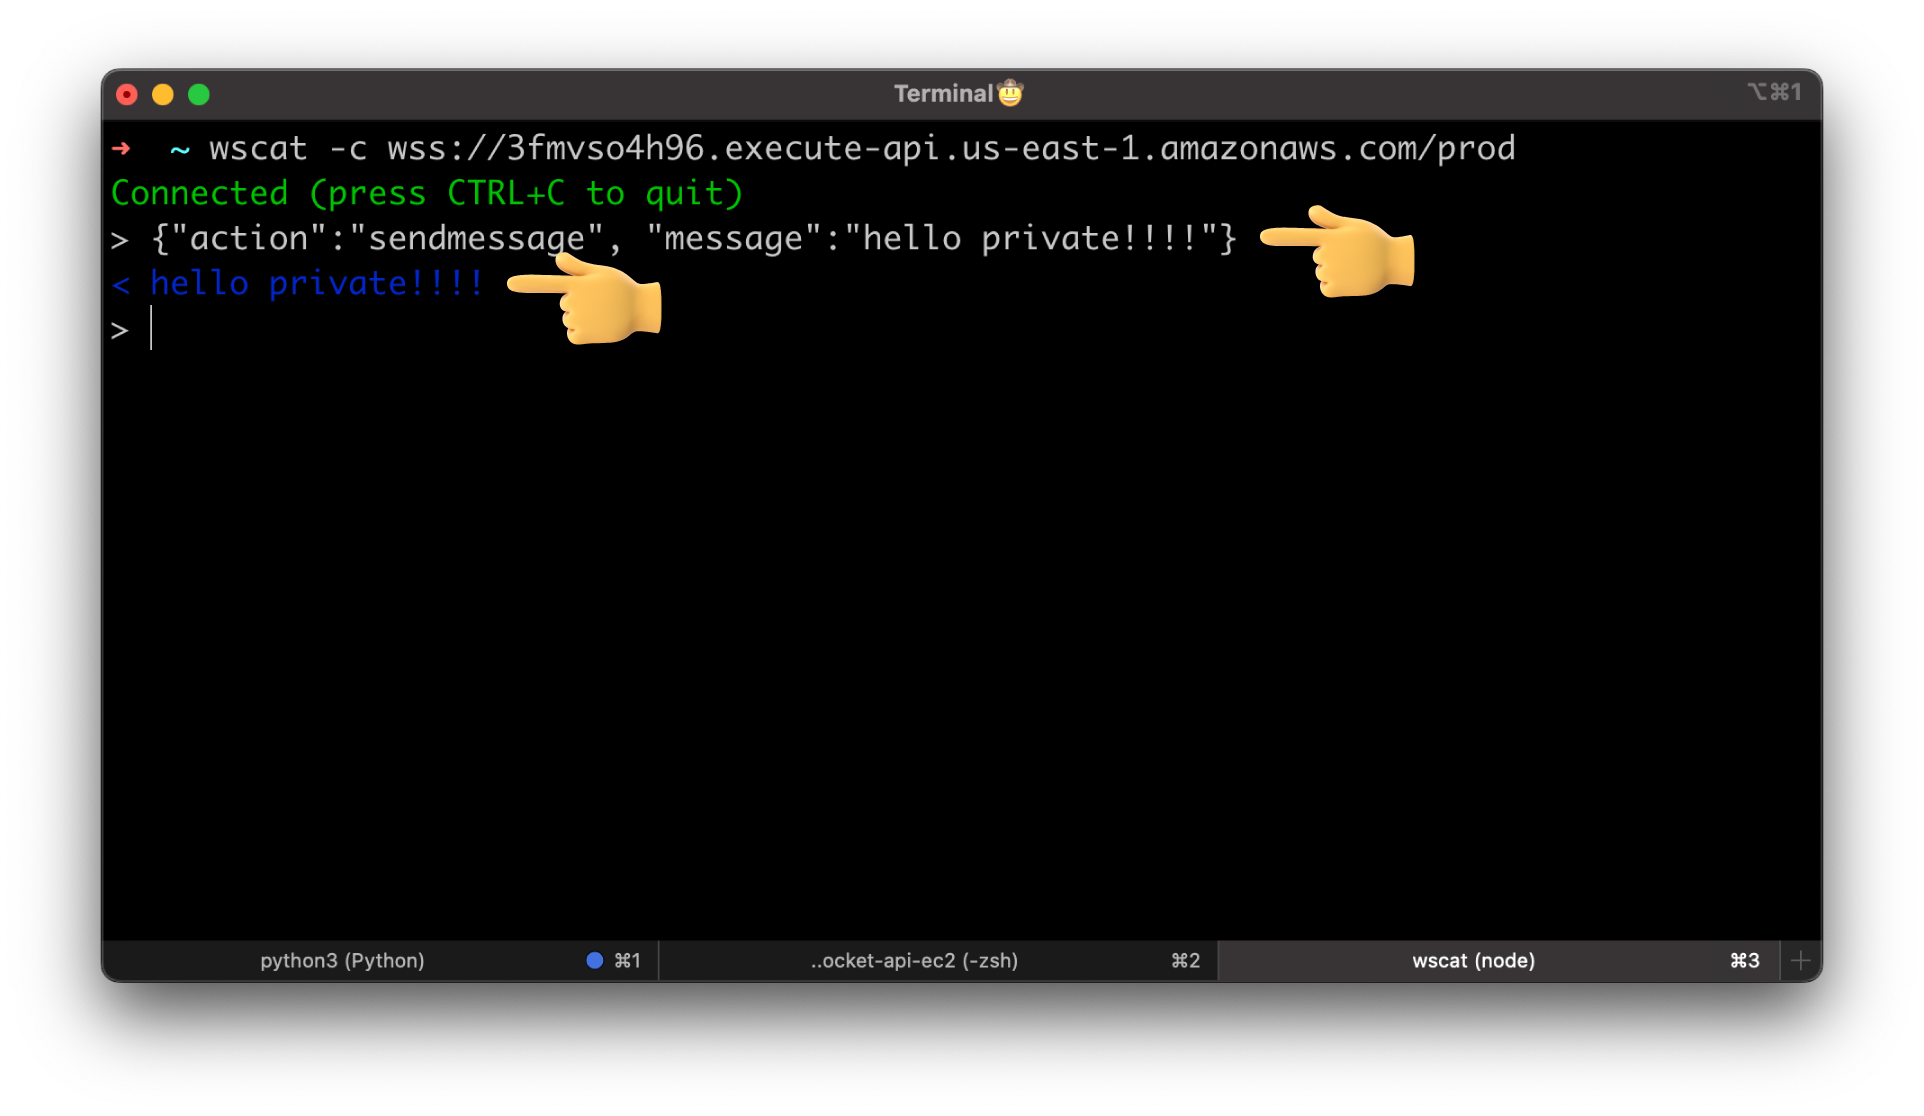
You should get back the message from your EC2 instance behind the private Network Load Balancer.
Create Custom Domain for WebSocket API
Custom domain names are simpler and more intuitive URLs that you can provide to your API users.
For example, instead of a long URL like this wss://3fmvso4h96.execute-api.us-east-1.amazonaws.com/prod,
you can give the customers shorter URL like this wss://api-ws.antonputra.com
Create Certificate for Custom Domain
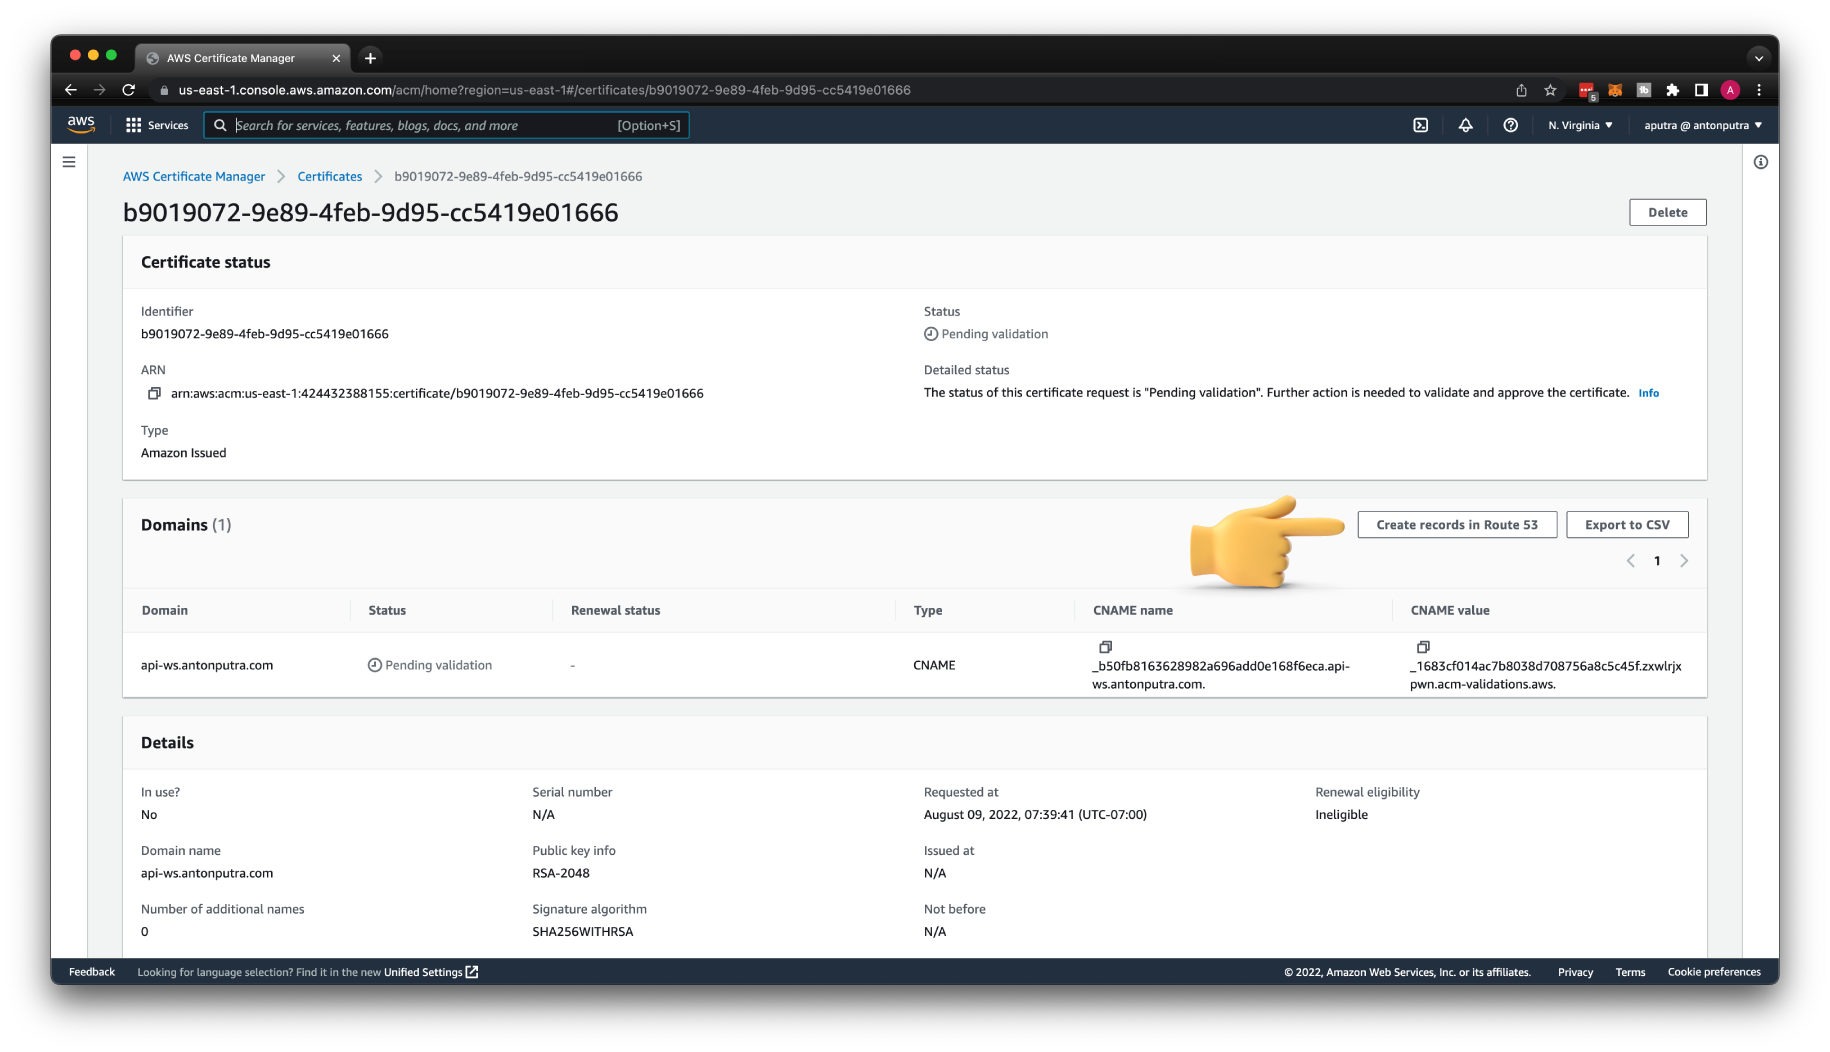
Let's issue a TLS certificate for our domain.
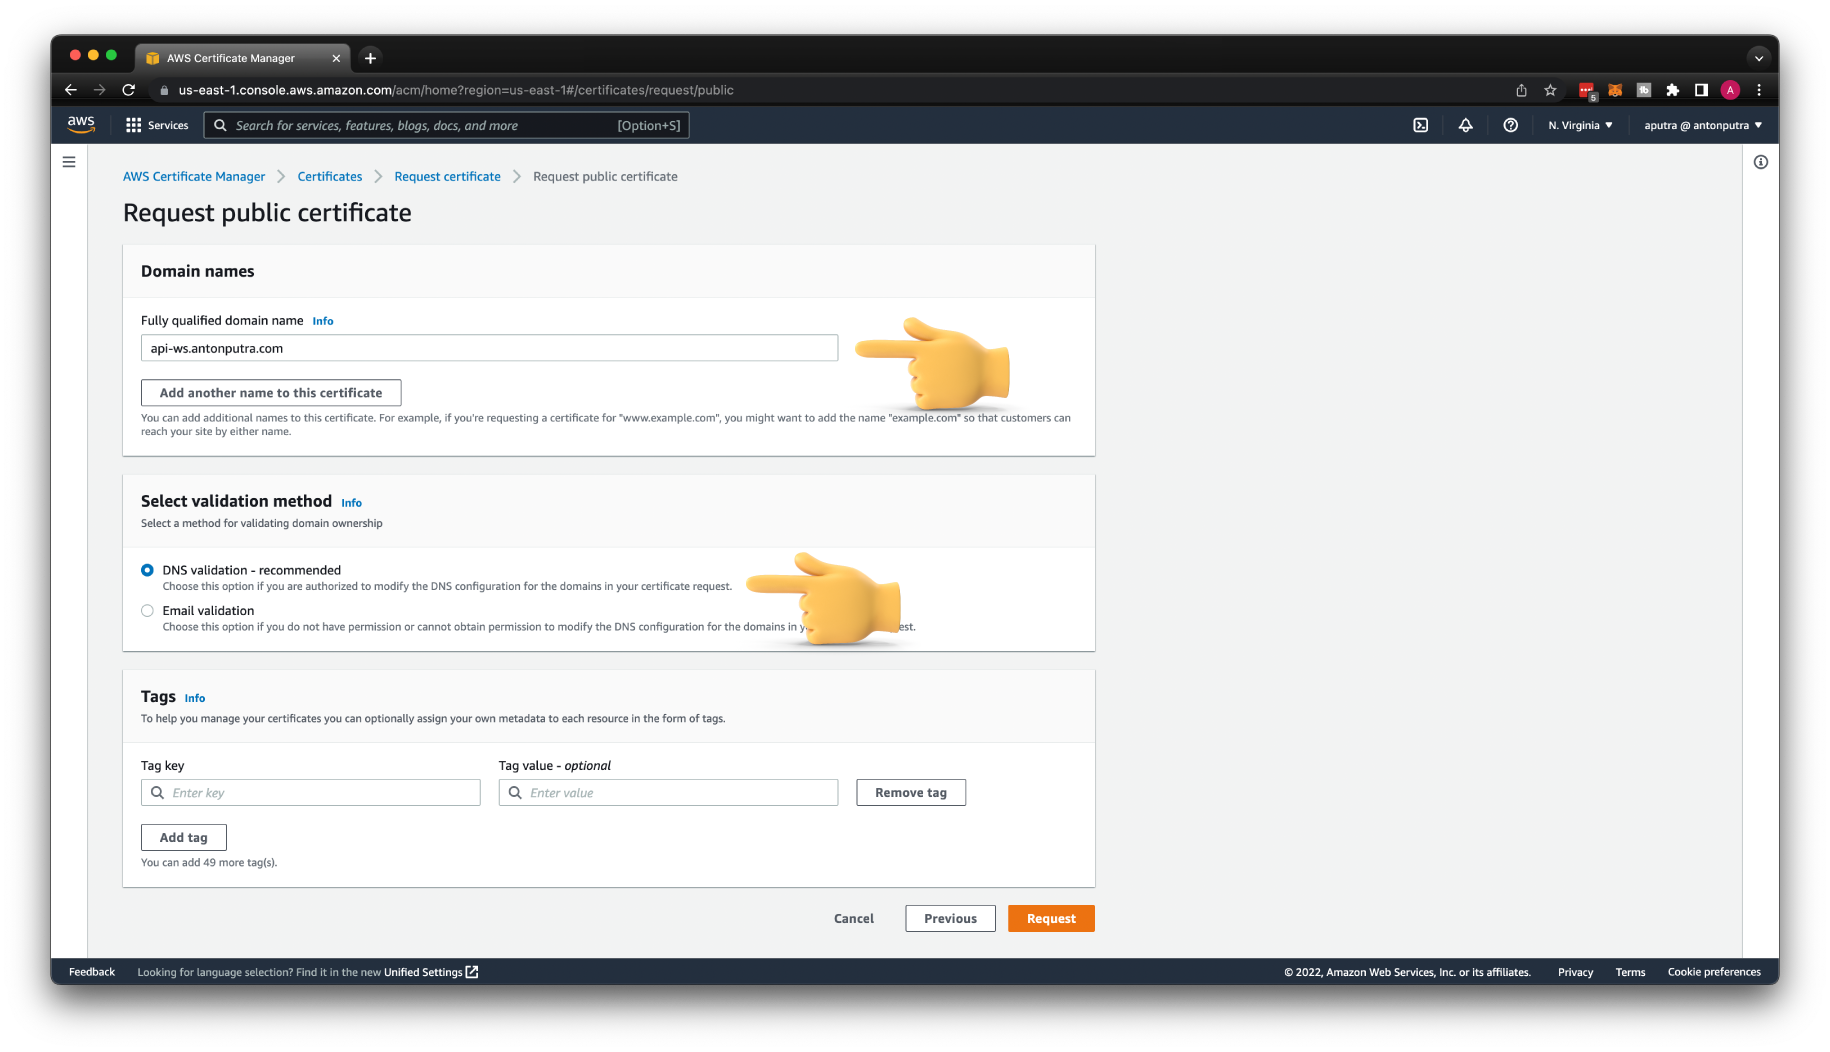
If you host your domain in Route53, you just need to click Create records in Route 53 to prove ownership. Otherwise, you need to create those records manually.
Create Custom Domain and Configure API Mapping
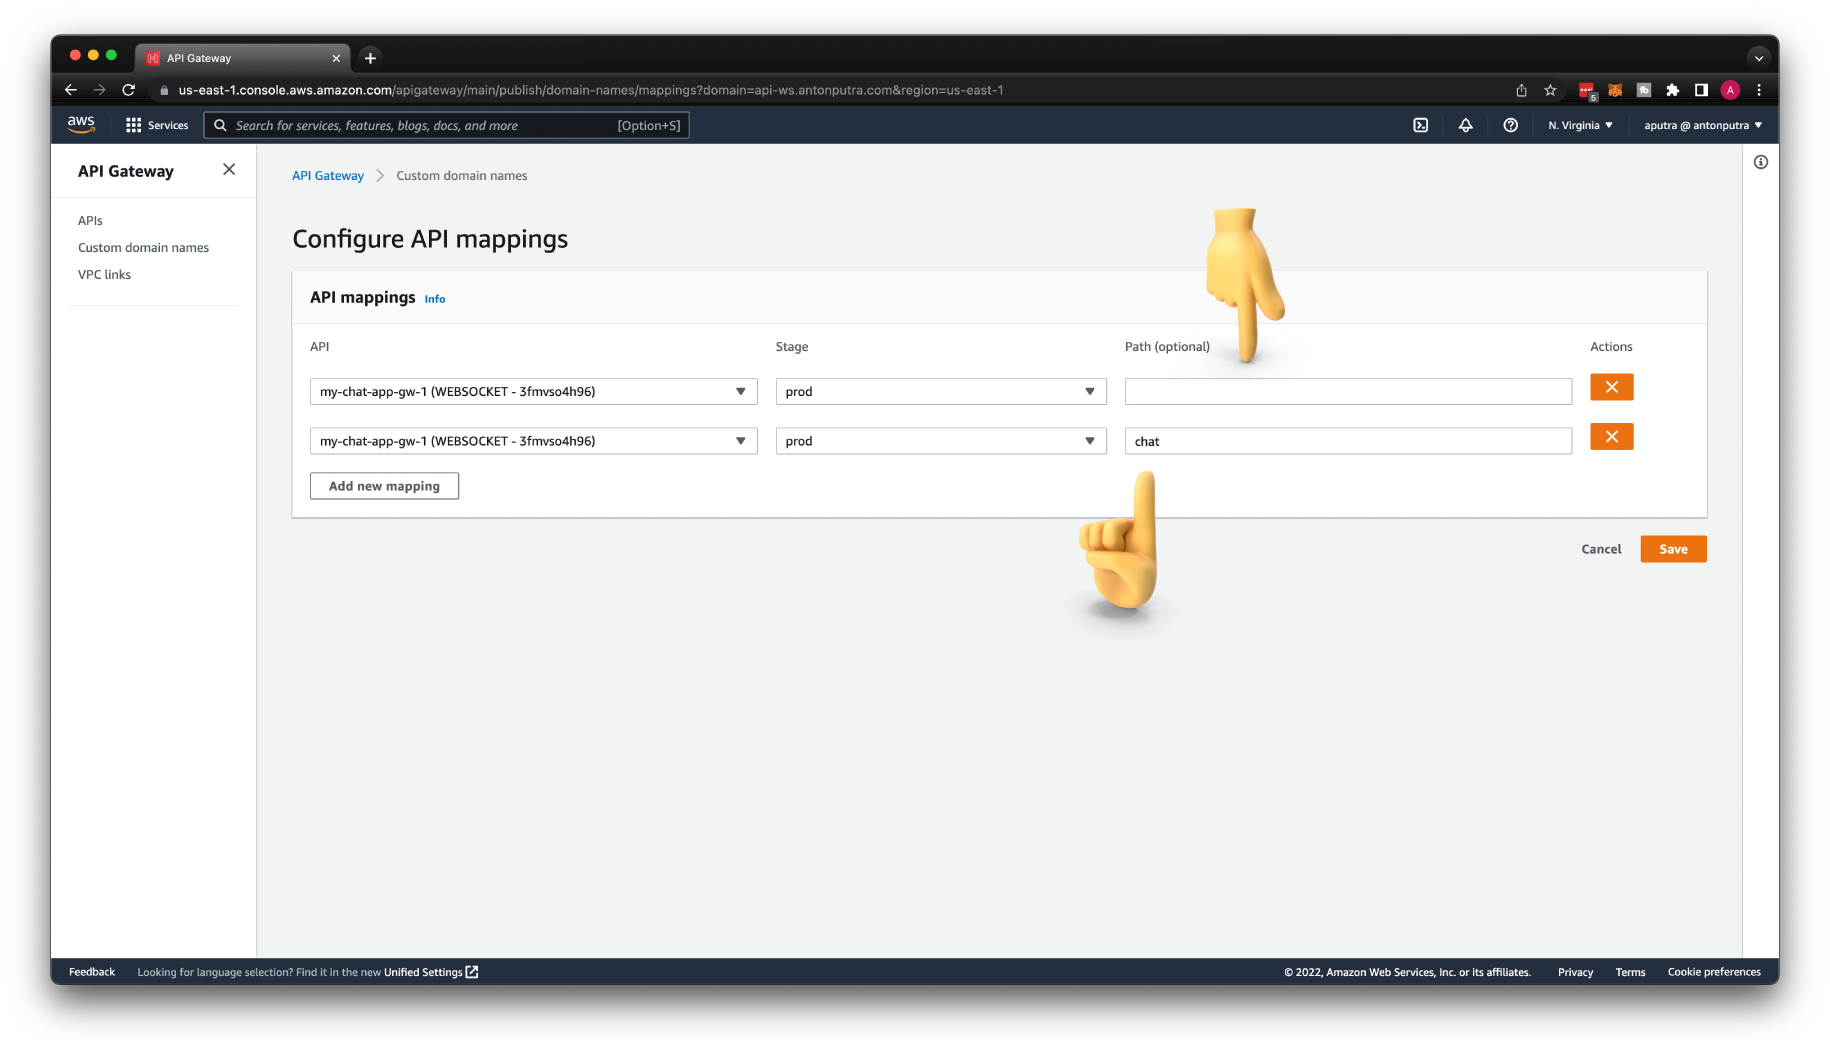
To create a custom domain, use the same fully qualified domain name that you used to issue a certificate. Then choose TLS certificate from AWS Certificate Manager.

You also need to map the API Gateway stage with your domain. Optionally, you can use a path, for example, /chat.
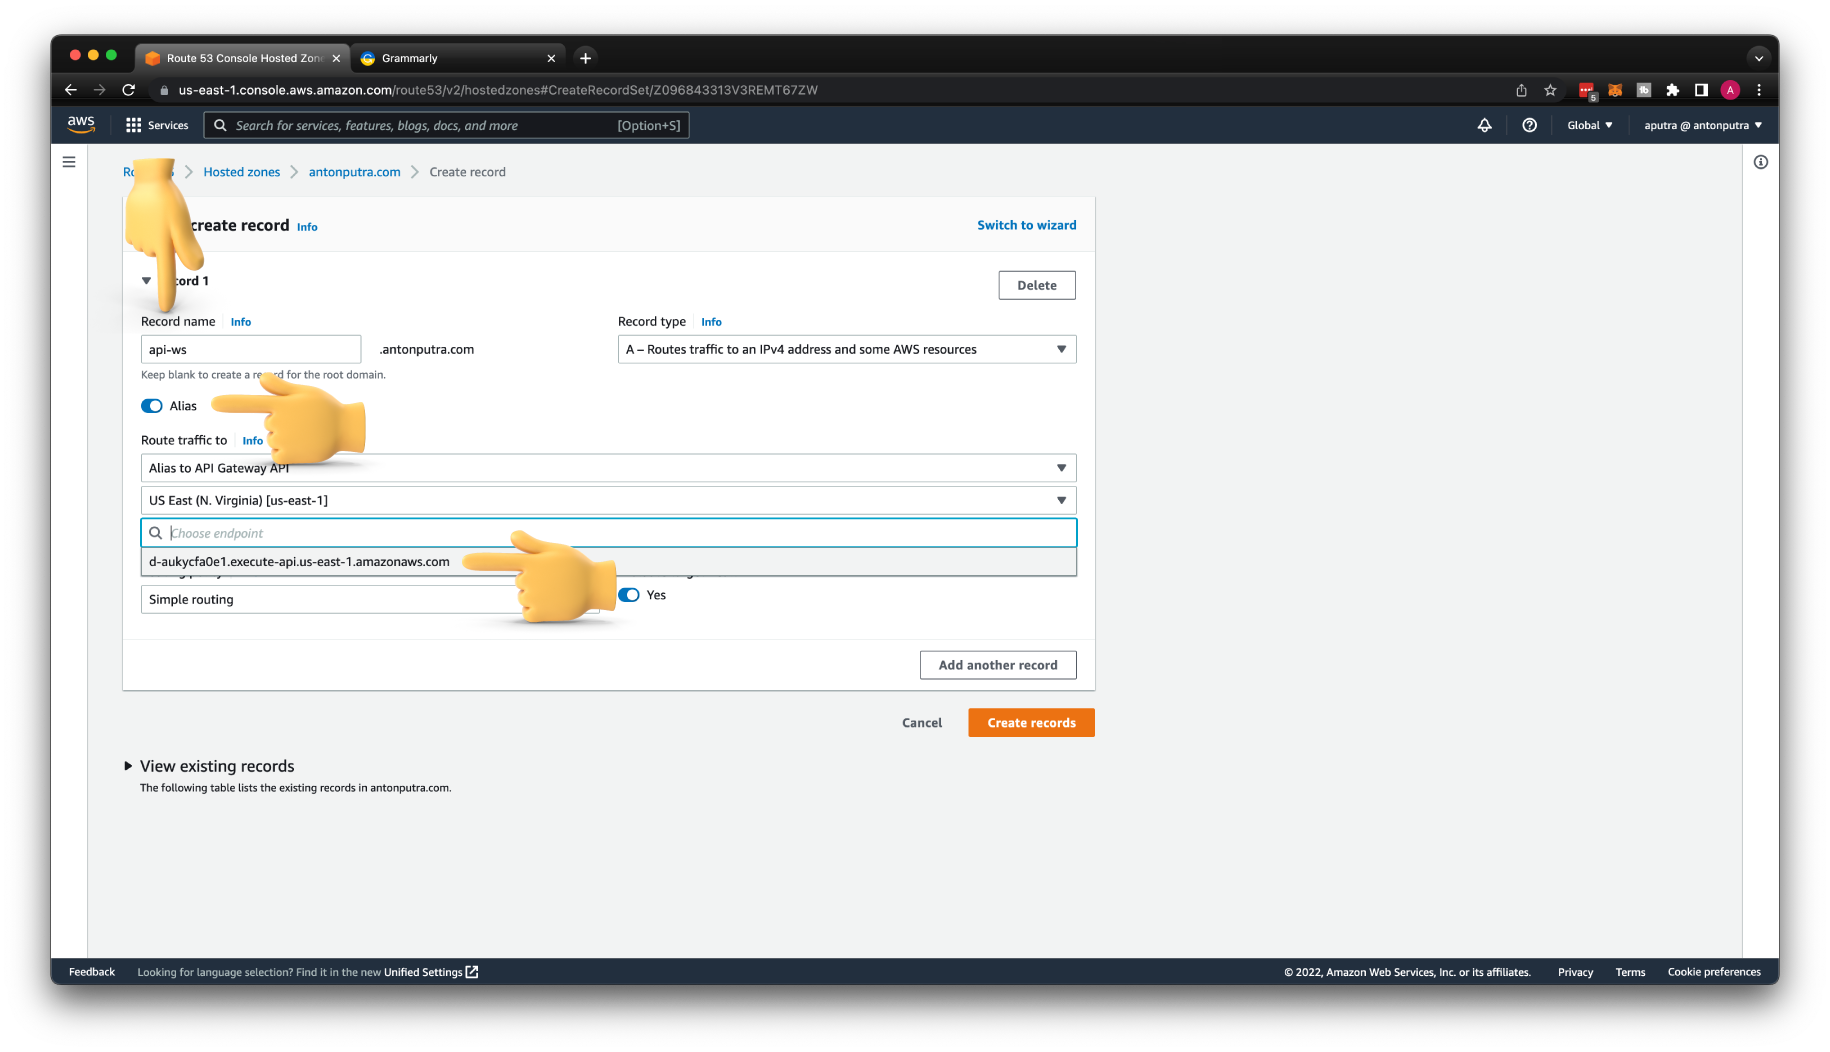
Finally, you need to create an ALIS record for api-ws to point to WebSocket API. If you use a domain hosted outside of AWS, just create a CNAME record, it will work as well.
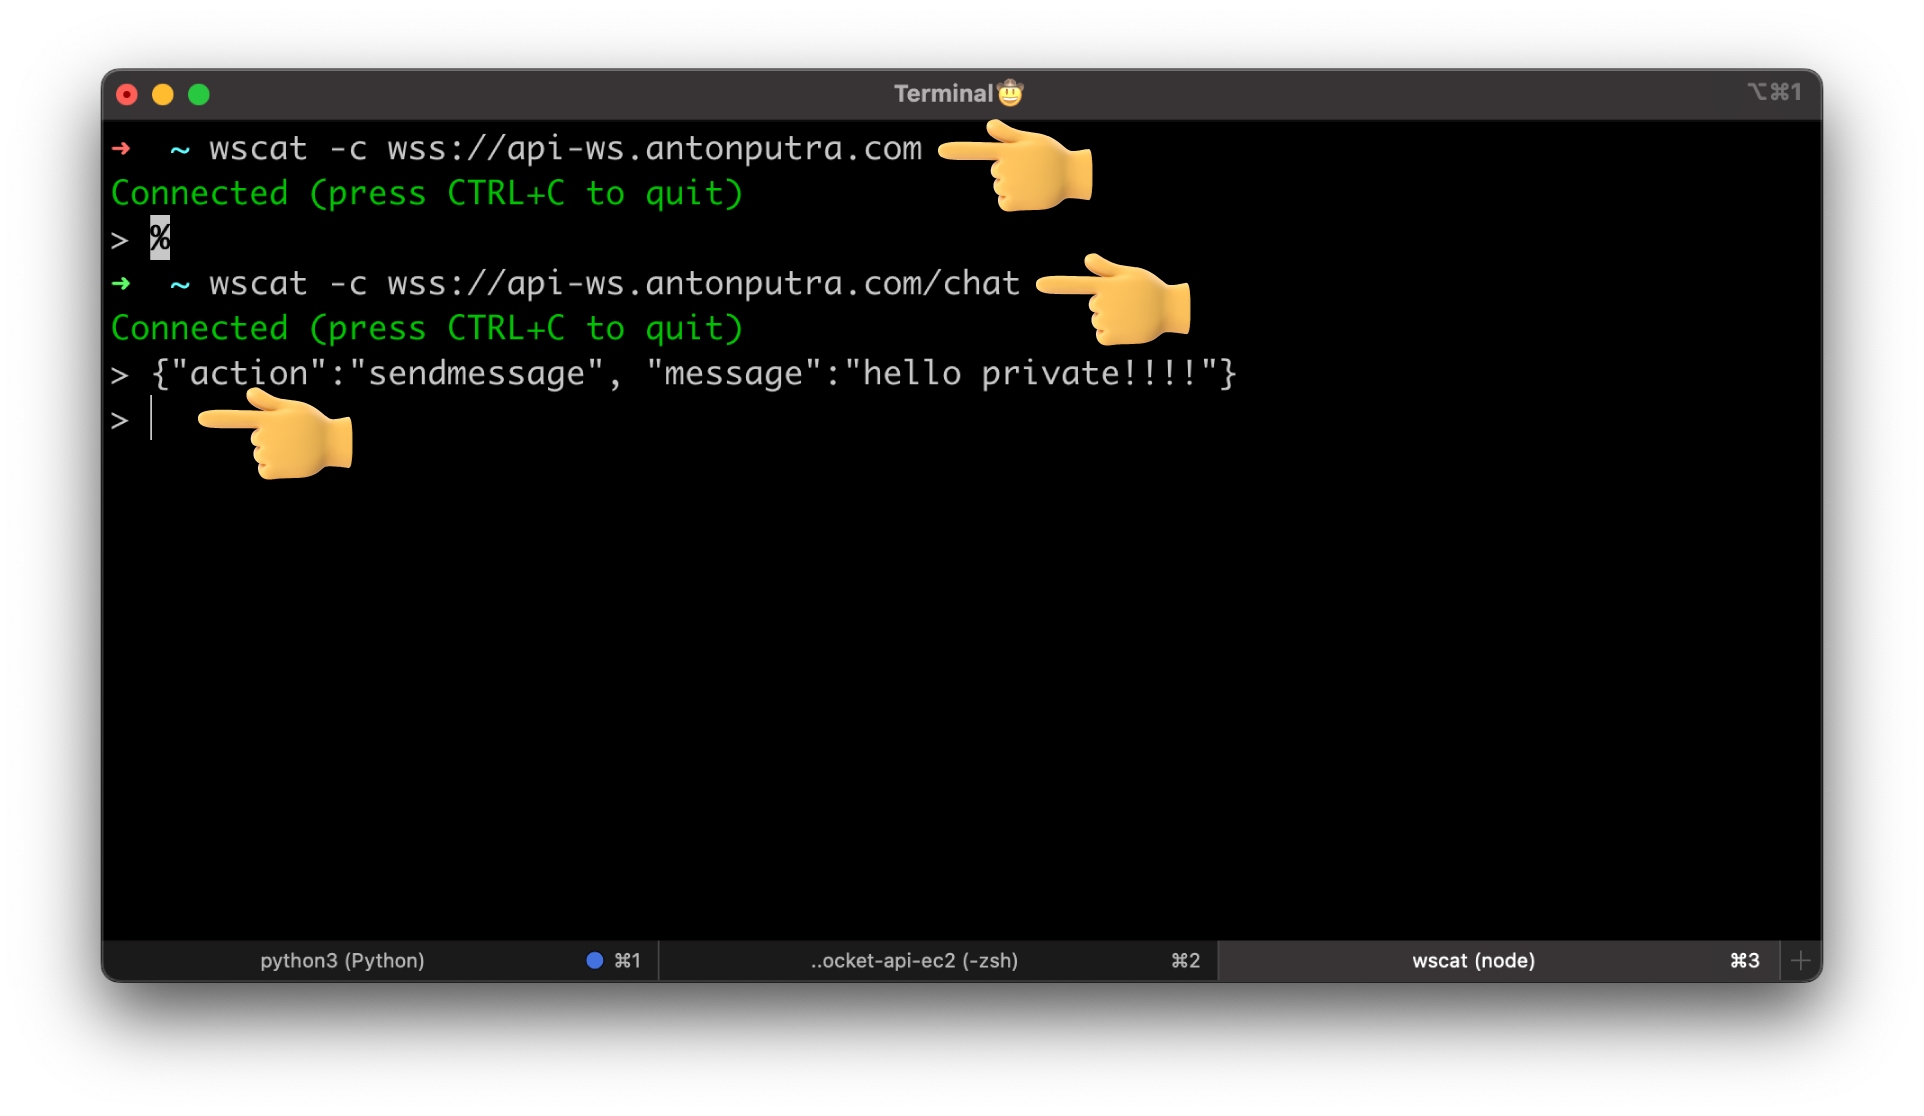
Let's test the custom domain. Both API mapping work, but we have an issue if you try to send a message.
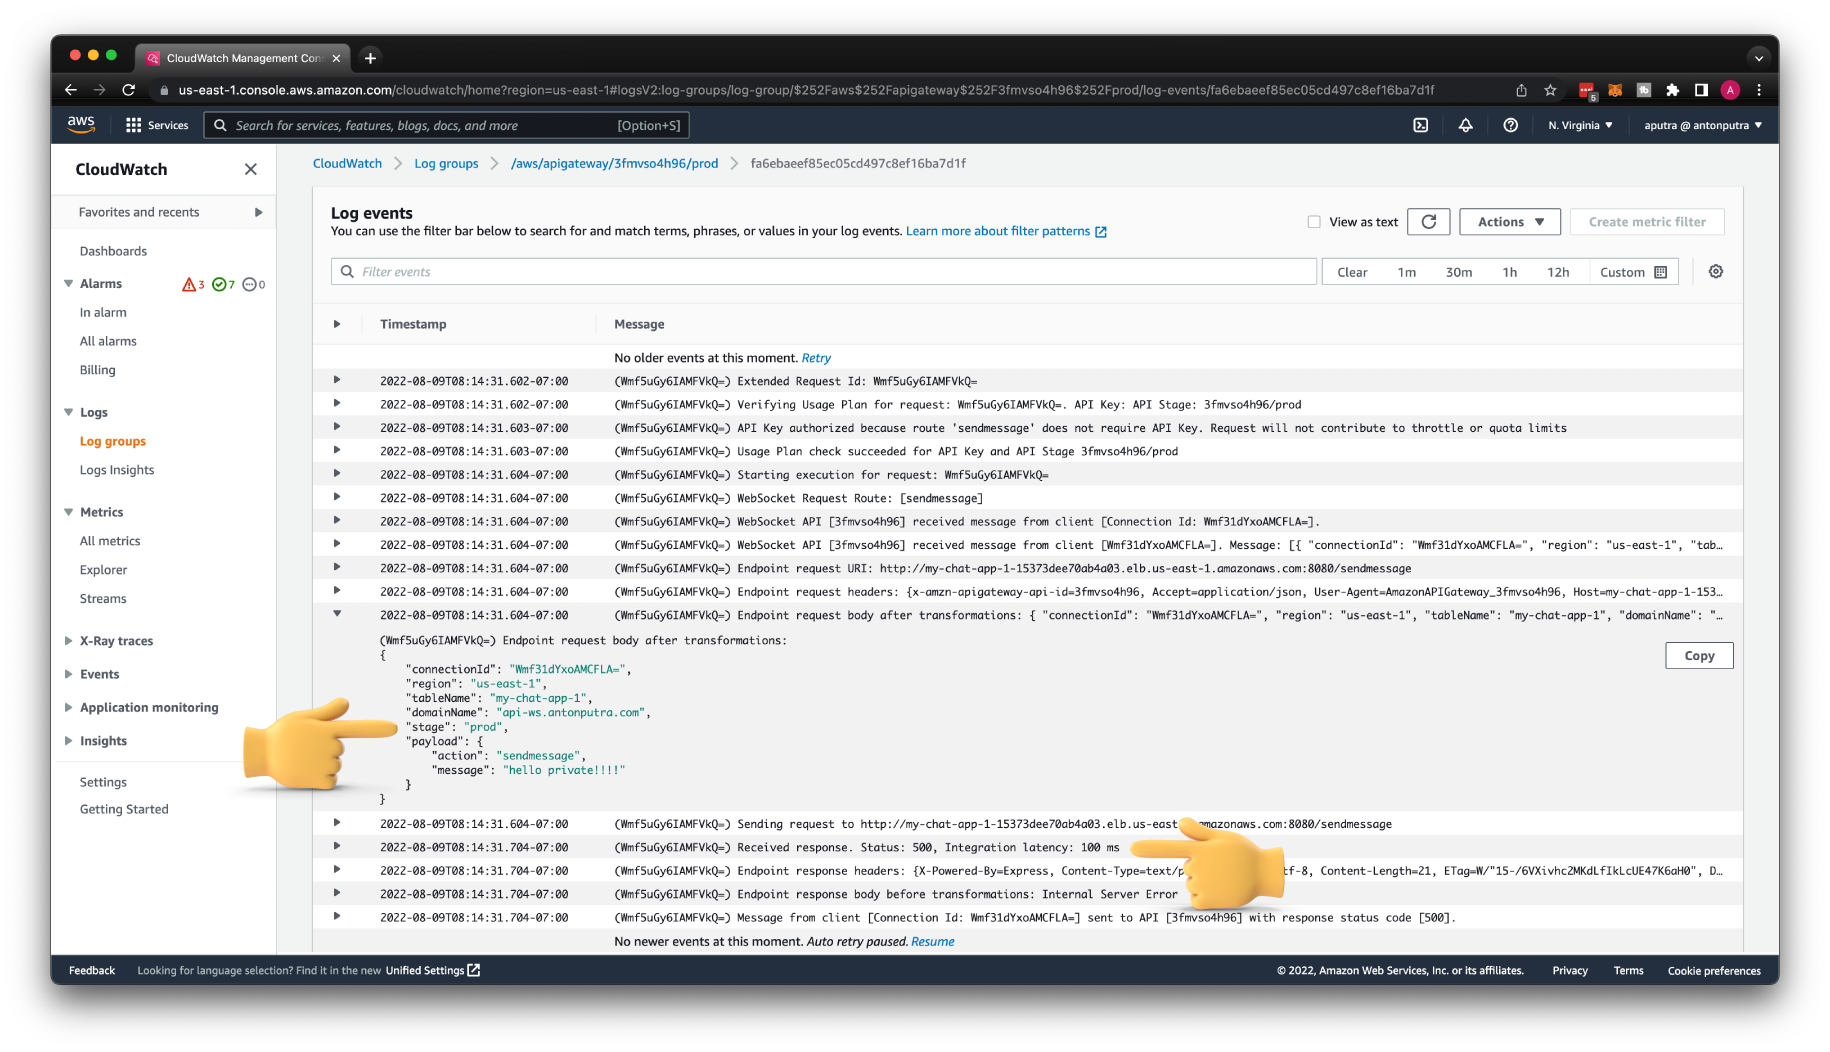
Unfortunately, it's not easy to debug since we're using private integration, but you can find an error in the CloudWatch log.
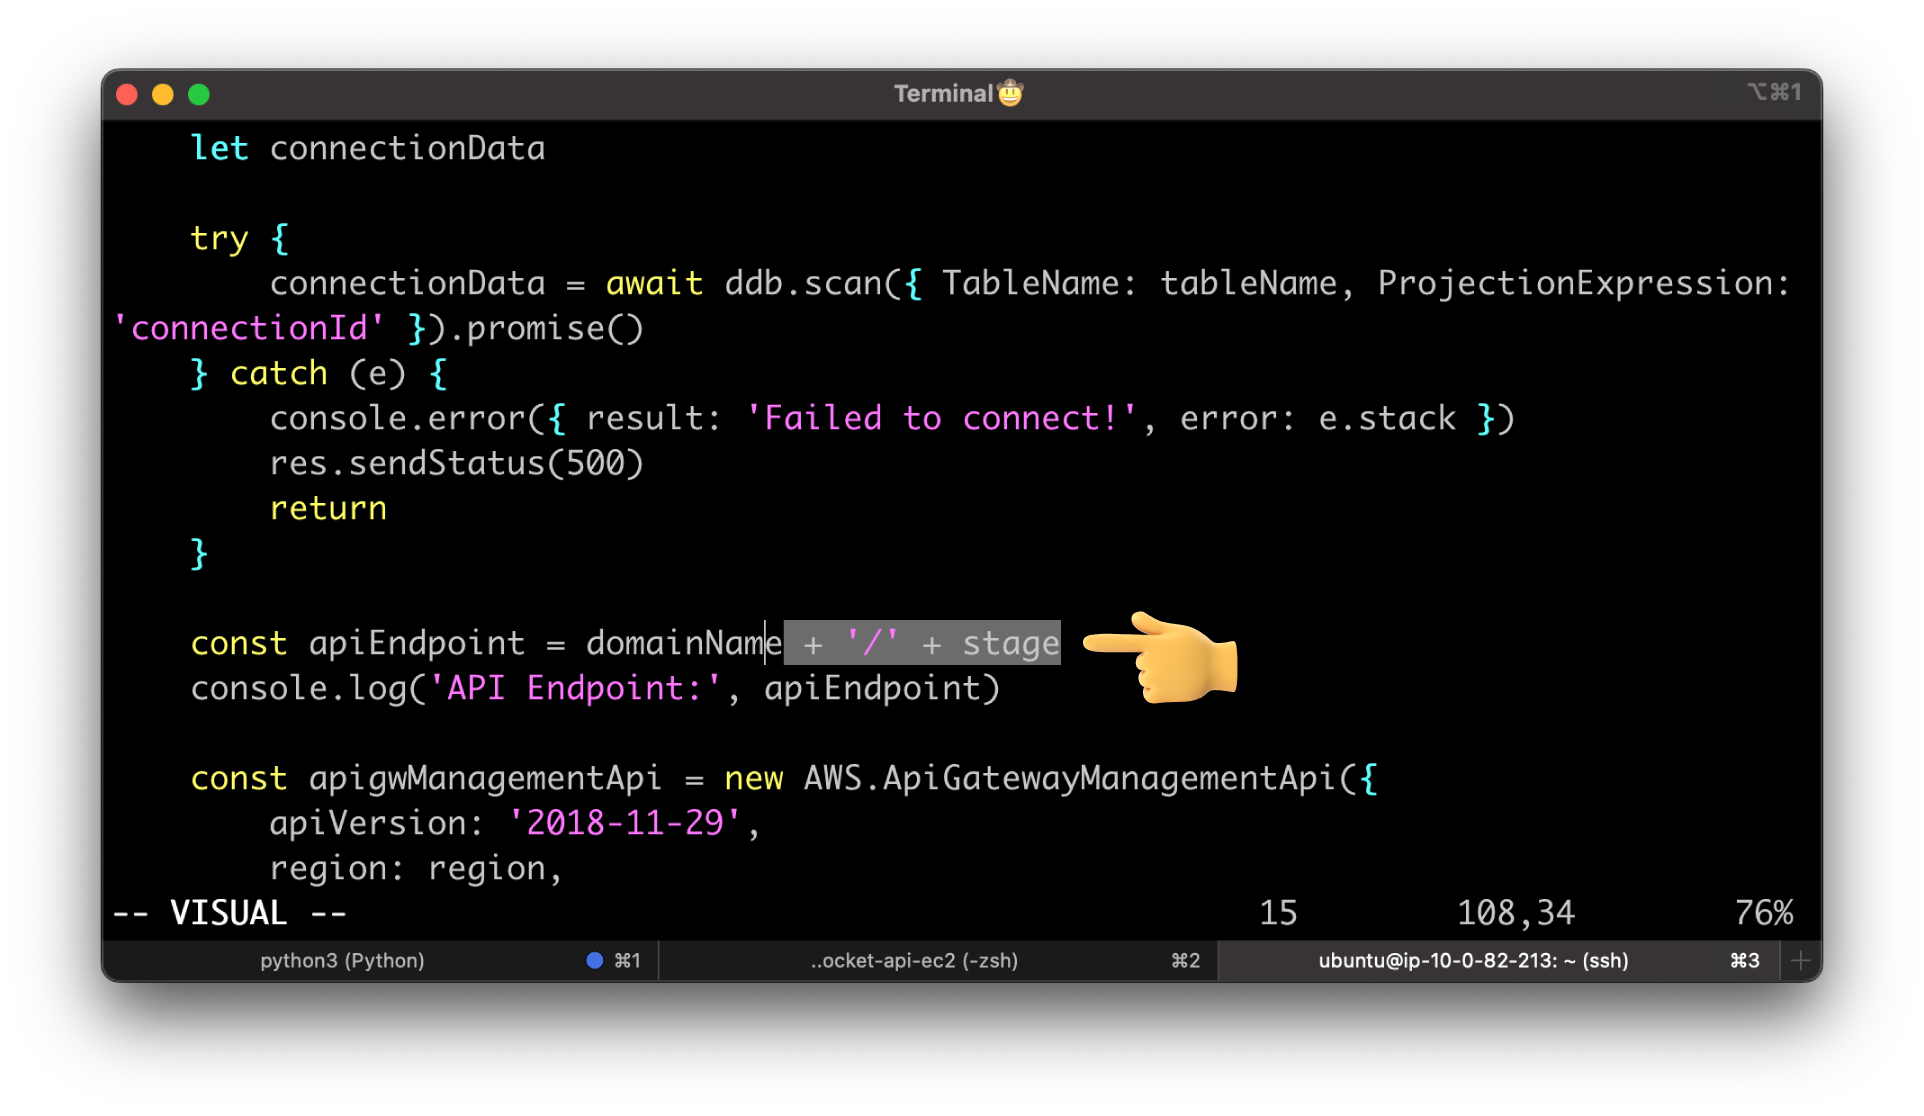
The issue is that when we try to send a message from the server to the client, our logic combines the stage name prod with domain name. Since we use a custom domain name, we don't need a stage name in the URL Endpoint.
Let's fix that by updating the NodeJS app. Remove + '/' + stage variable.
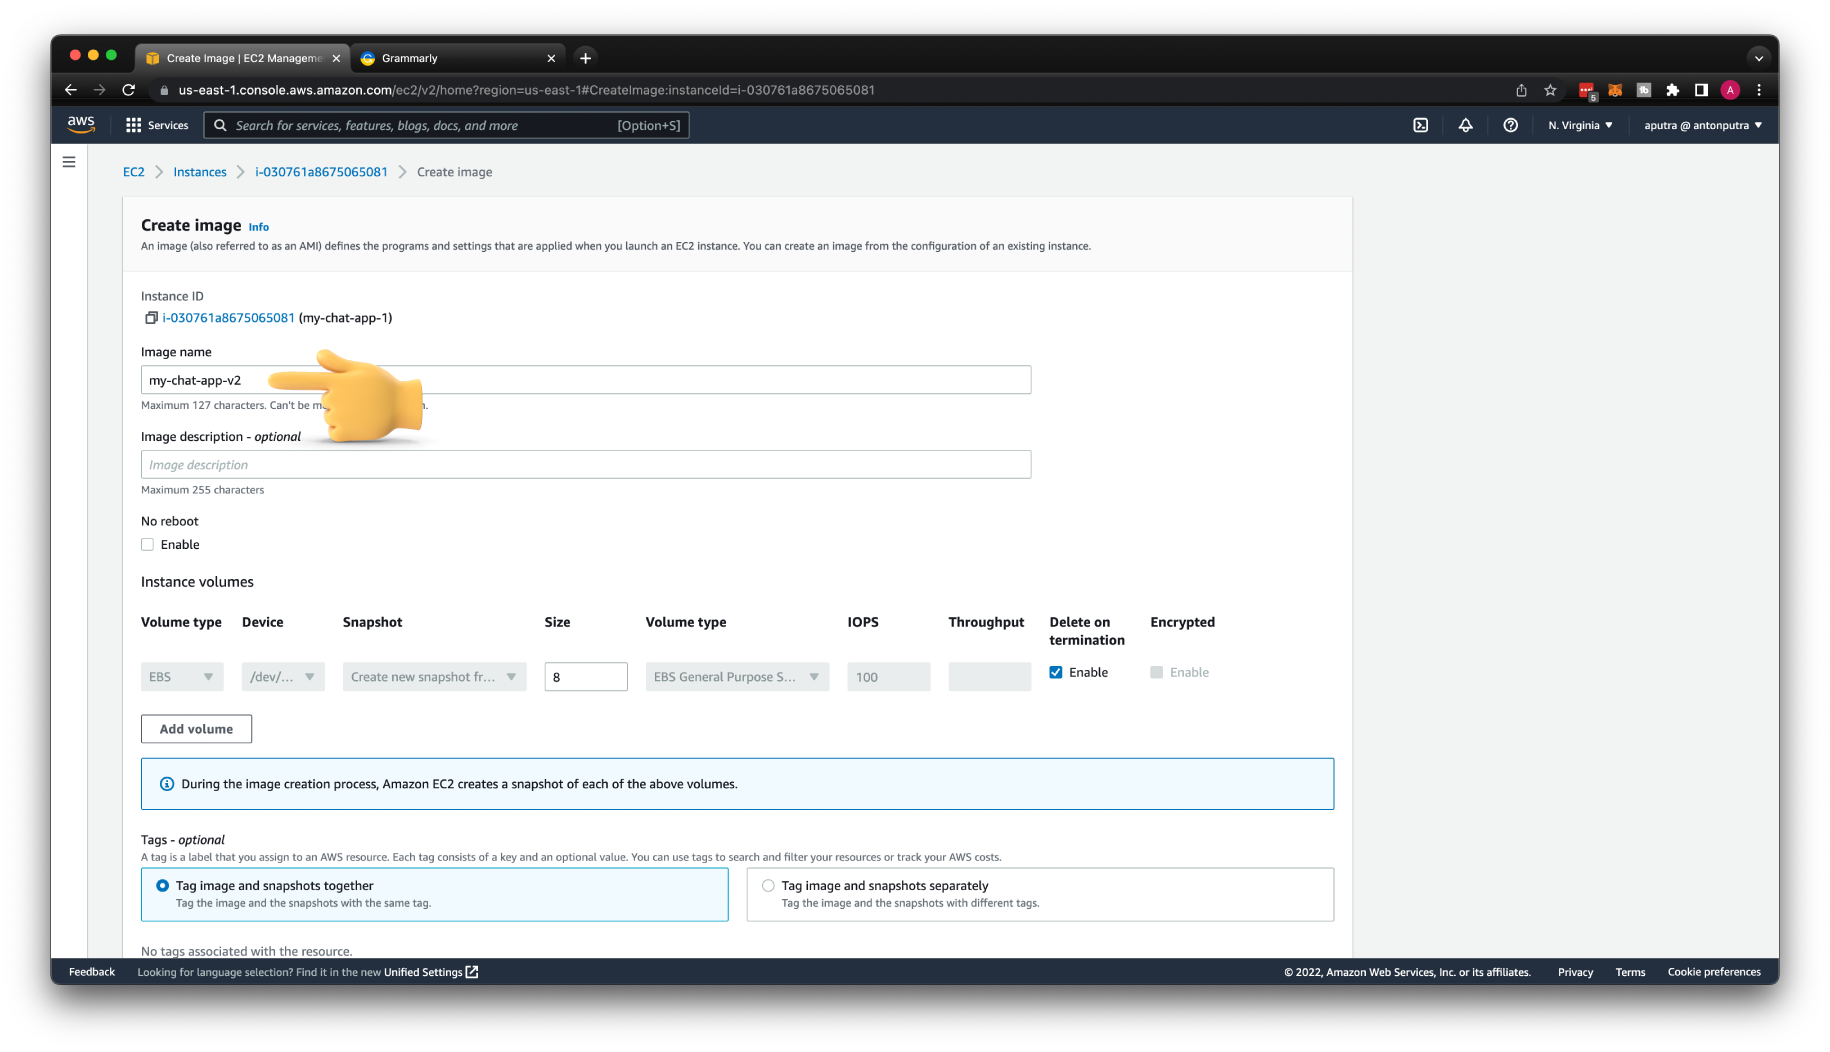
Then create a new AMI image from the EC2 instance. Name it my-chat-app-v2.
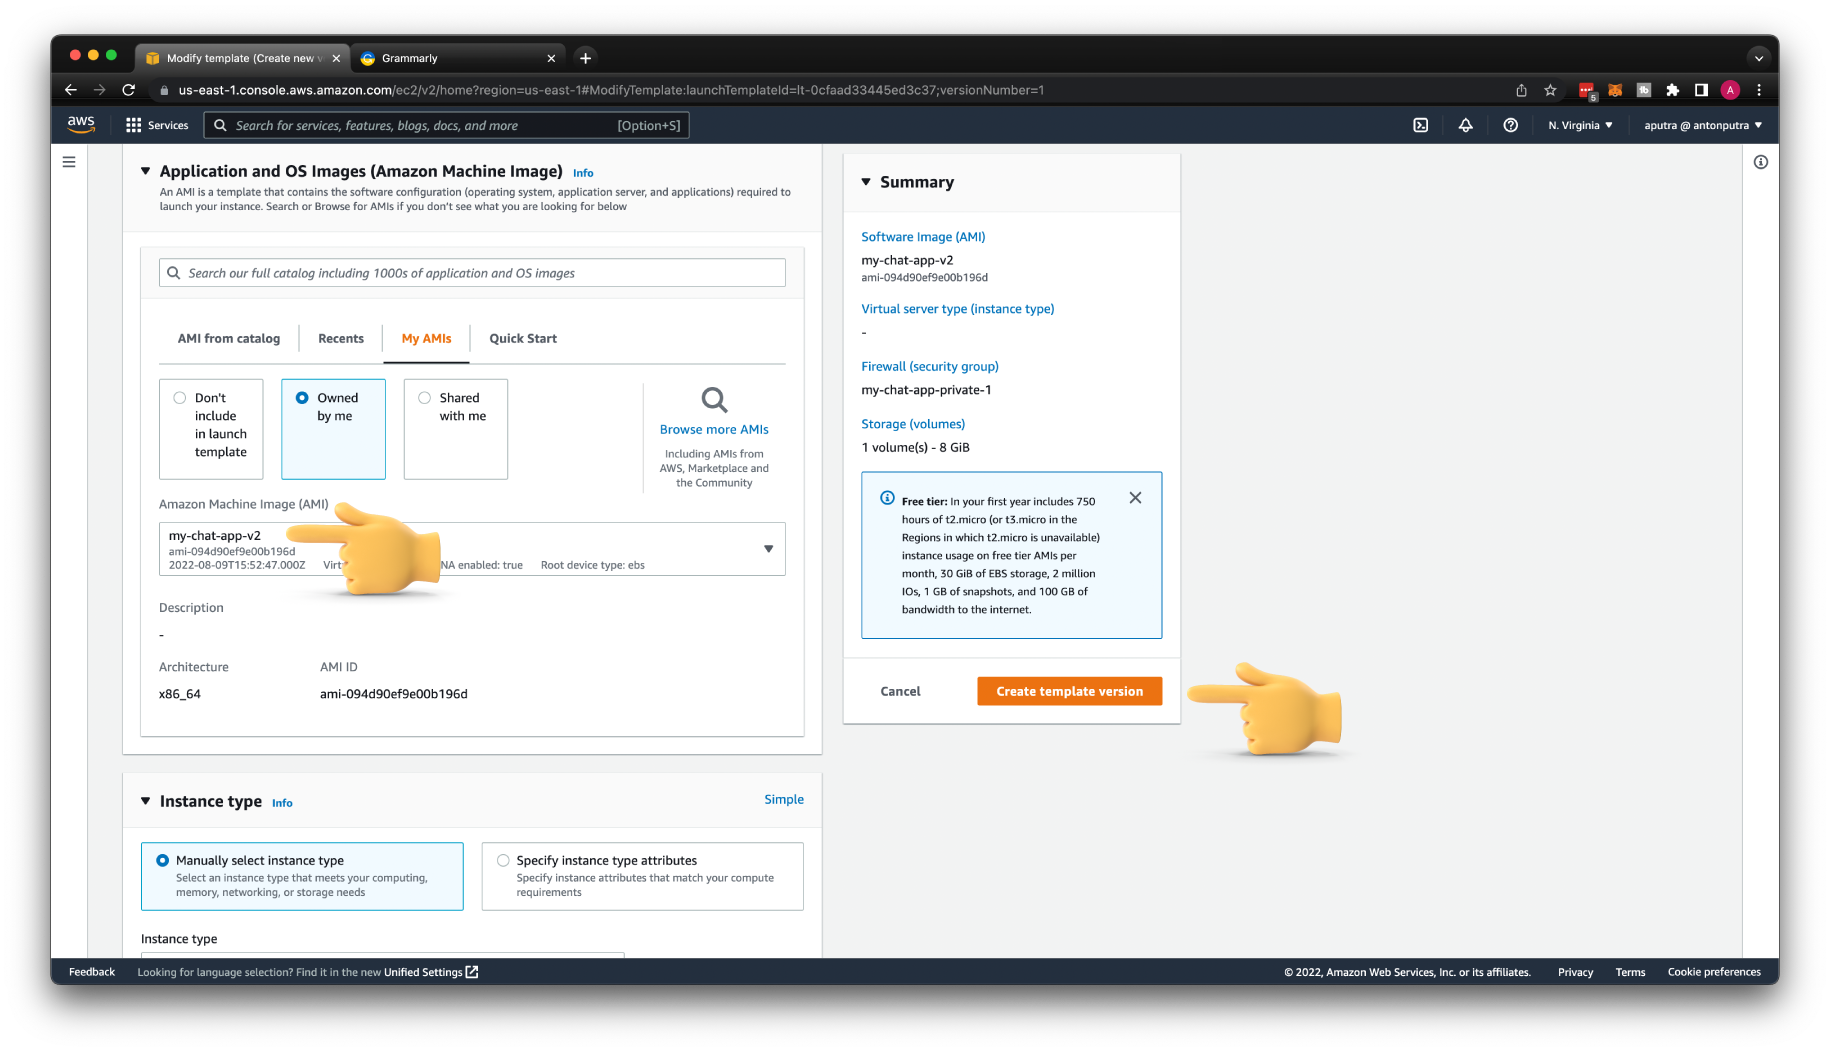
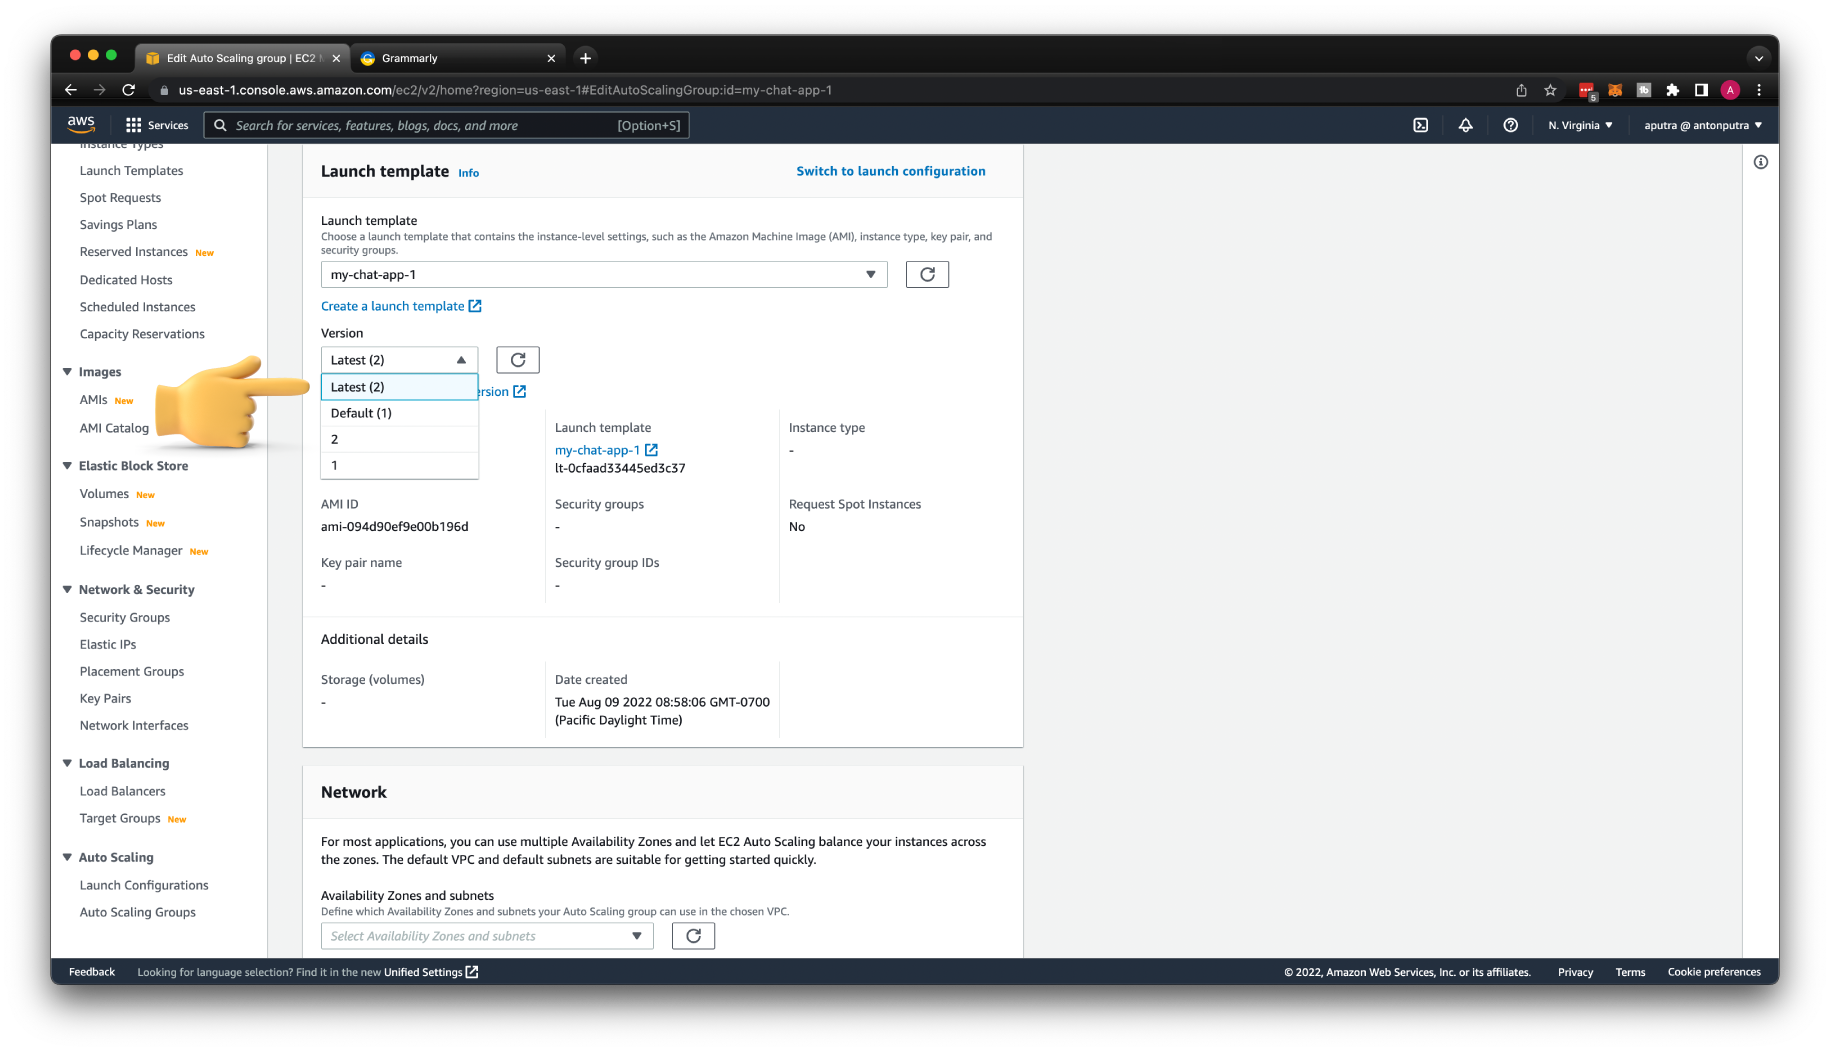
Create a new version of the template with a new AMI image.
You need to only update AMI and click Create template version.
Then go to Auto Scaling Group and choose the latest version for the launch template.
To perform a rolling update for your target group, click Start instance refresh.
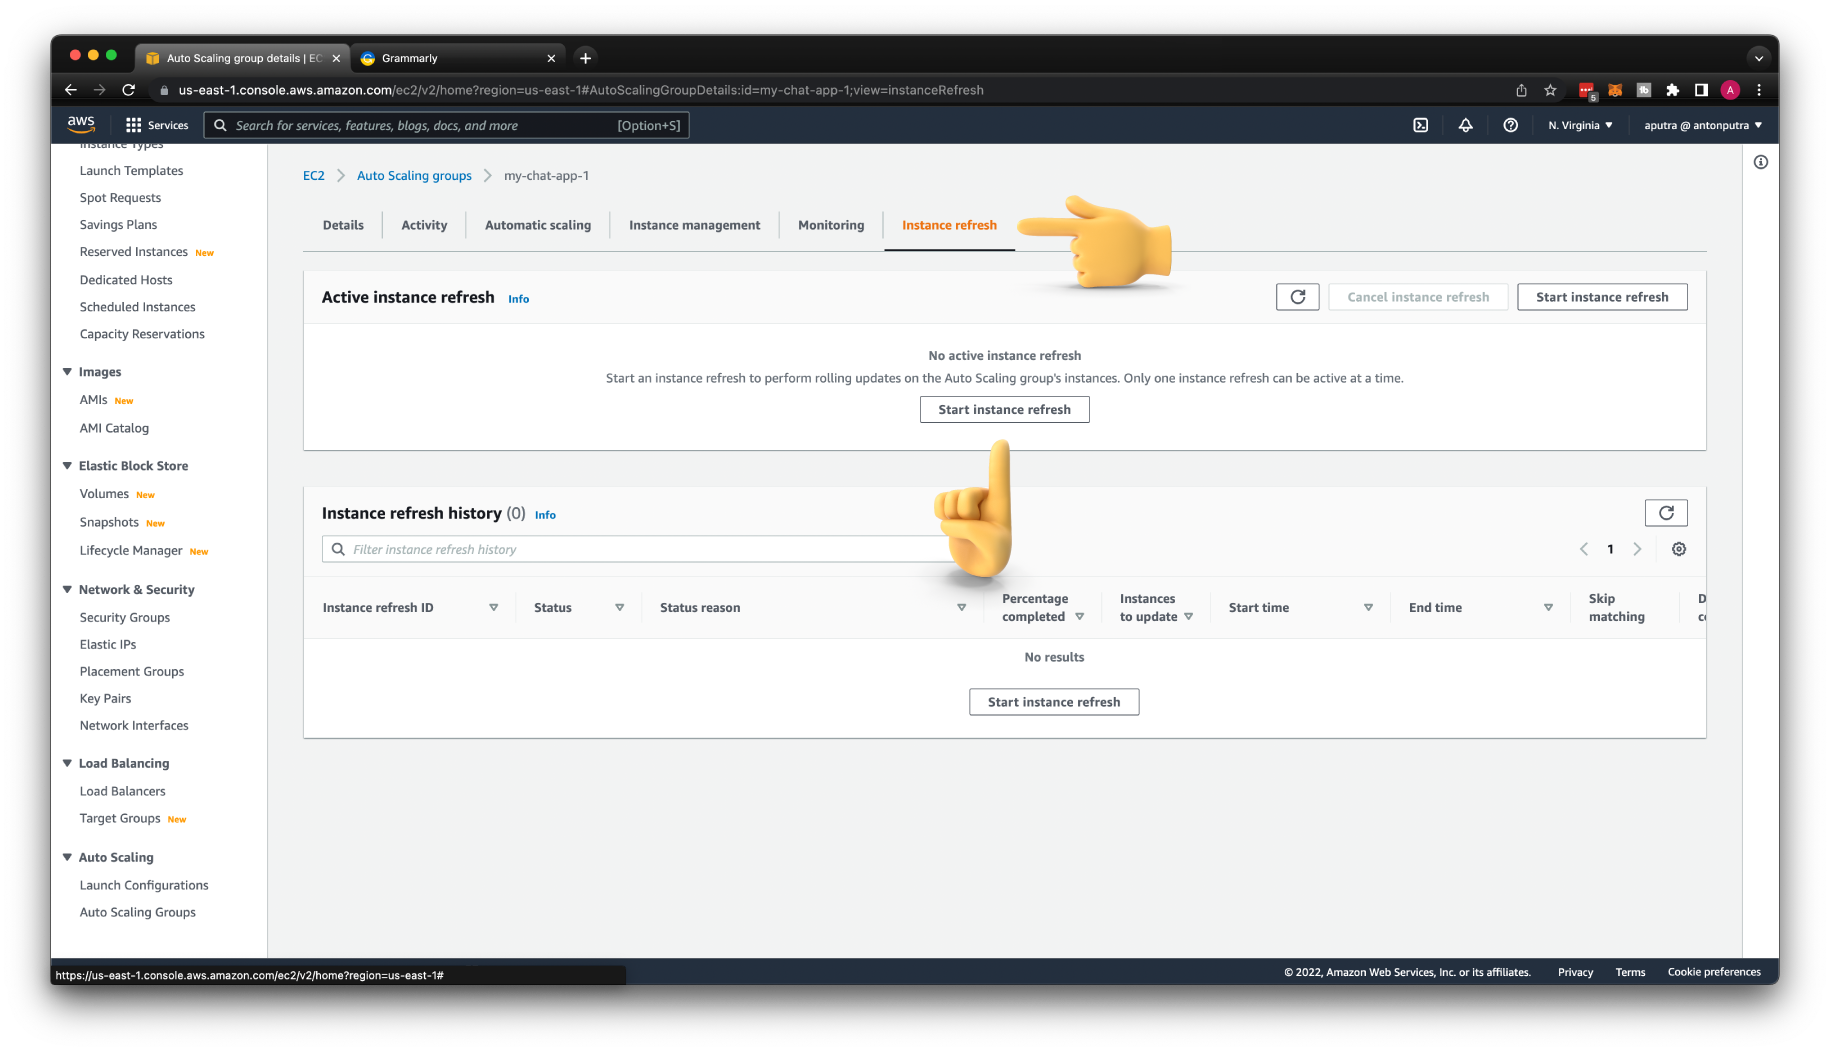
If you test it again, you should get a message back from the NodeJS backend app.
Request validation
You can configure API Gateway to perform validation on a route request before proceeding with the integration request. If the validation fails, API Gateway fails the request without calling your backend, sends a "Bad request body" gateway response to the client, and publishes the validation results in CloudWatch Logs.
Using validation this way reduces unnecessary calls to your API backend.
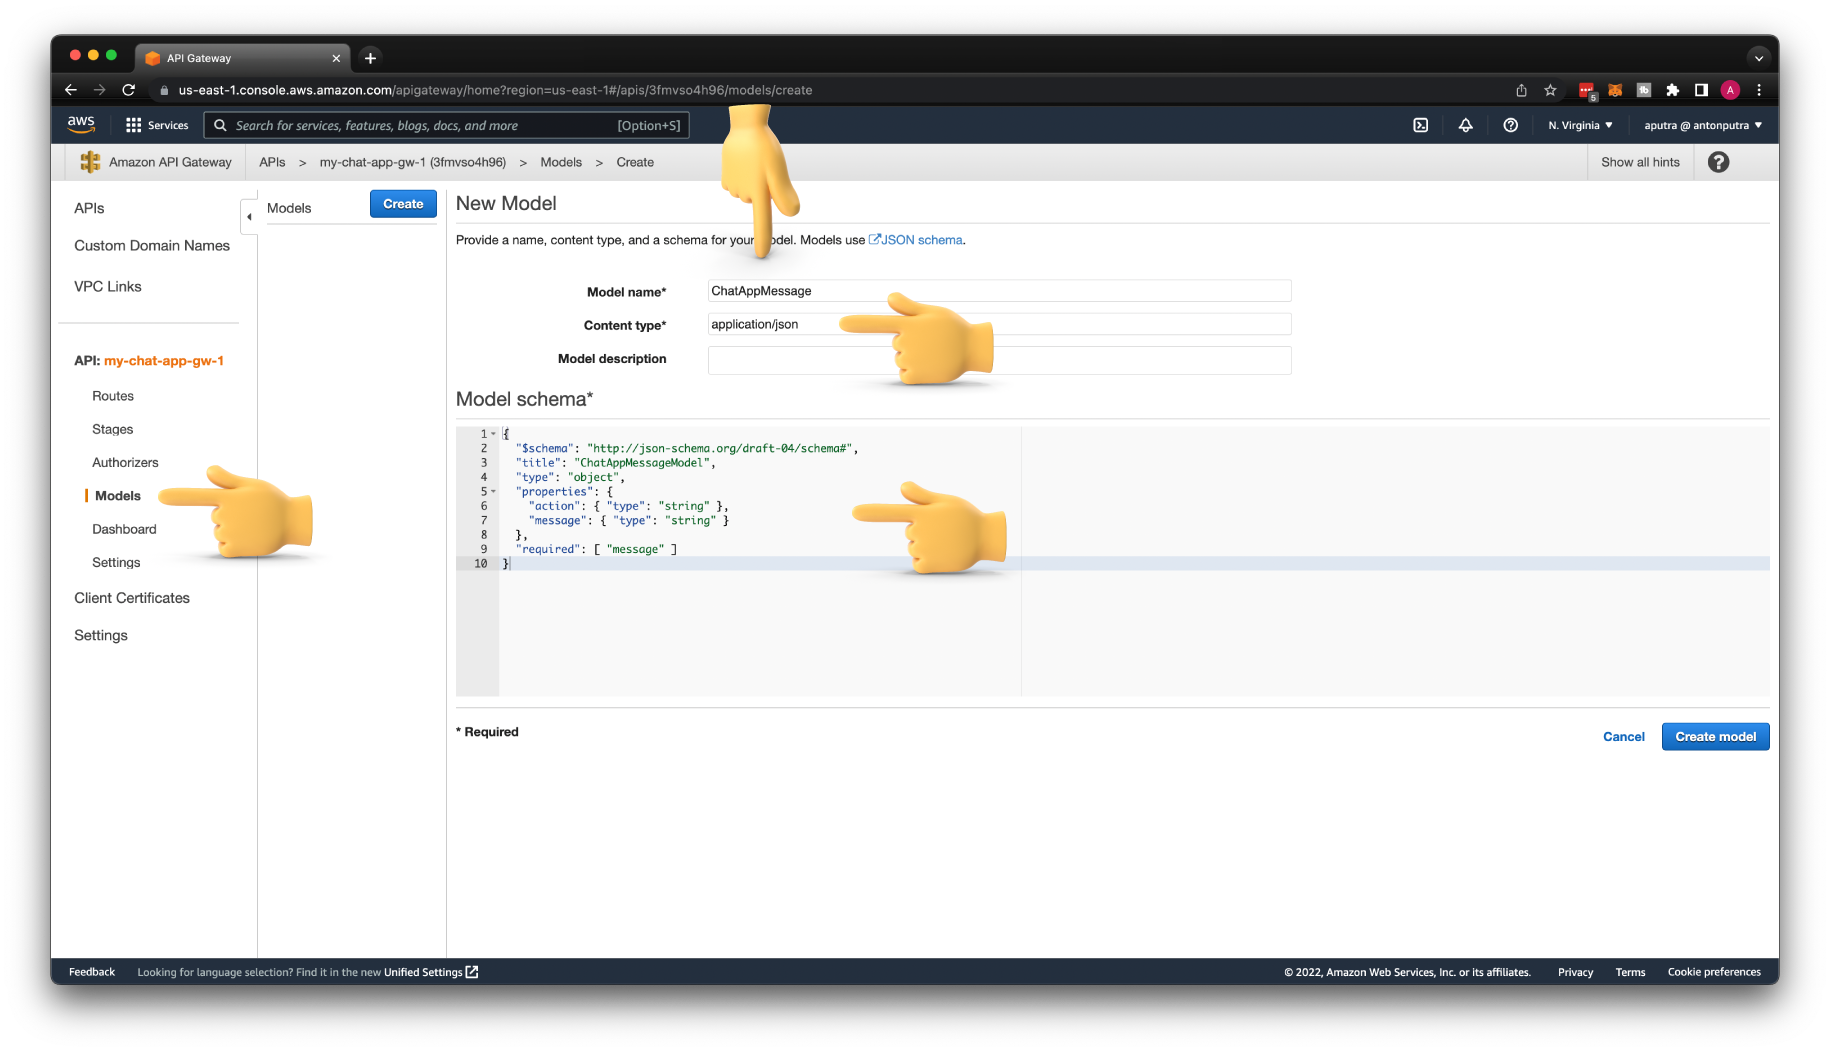
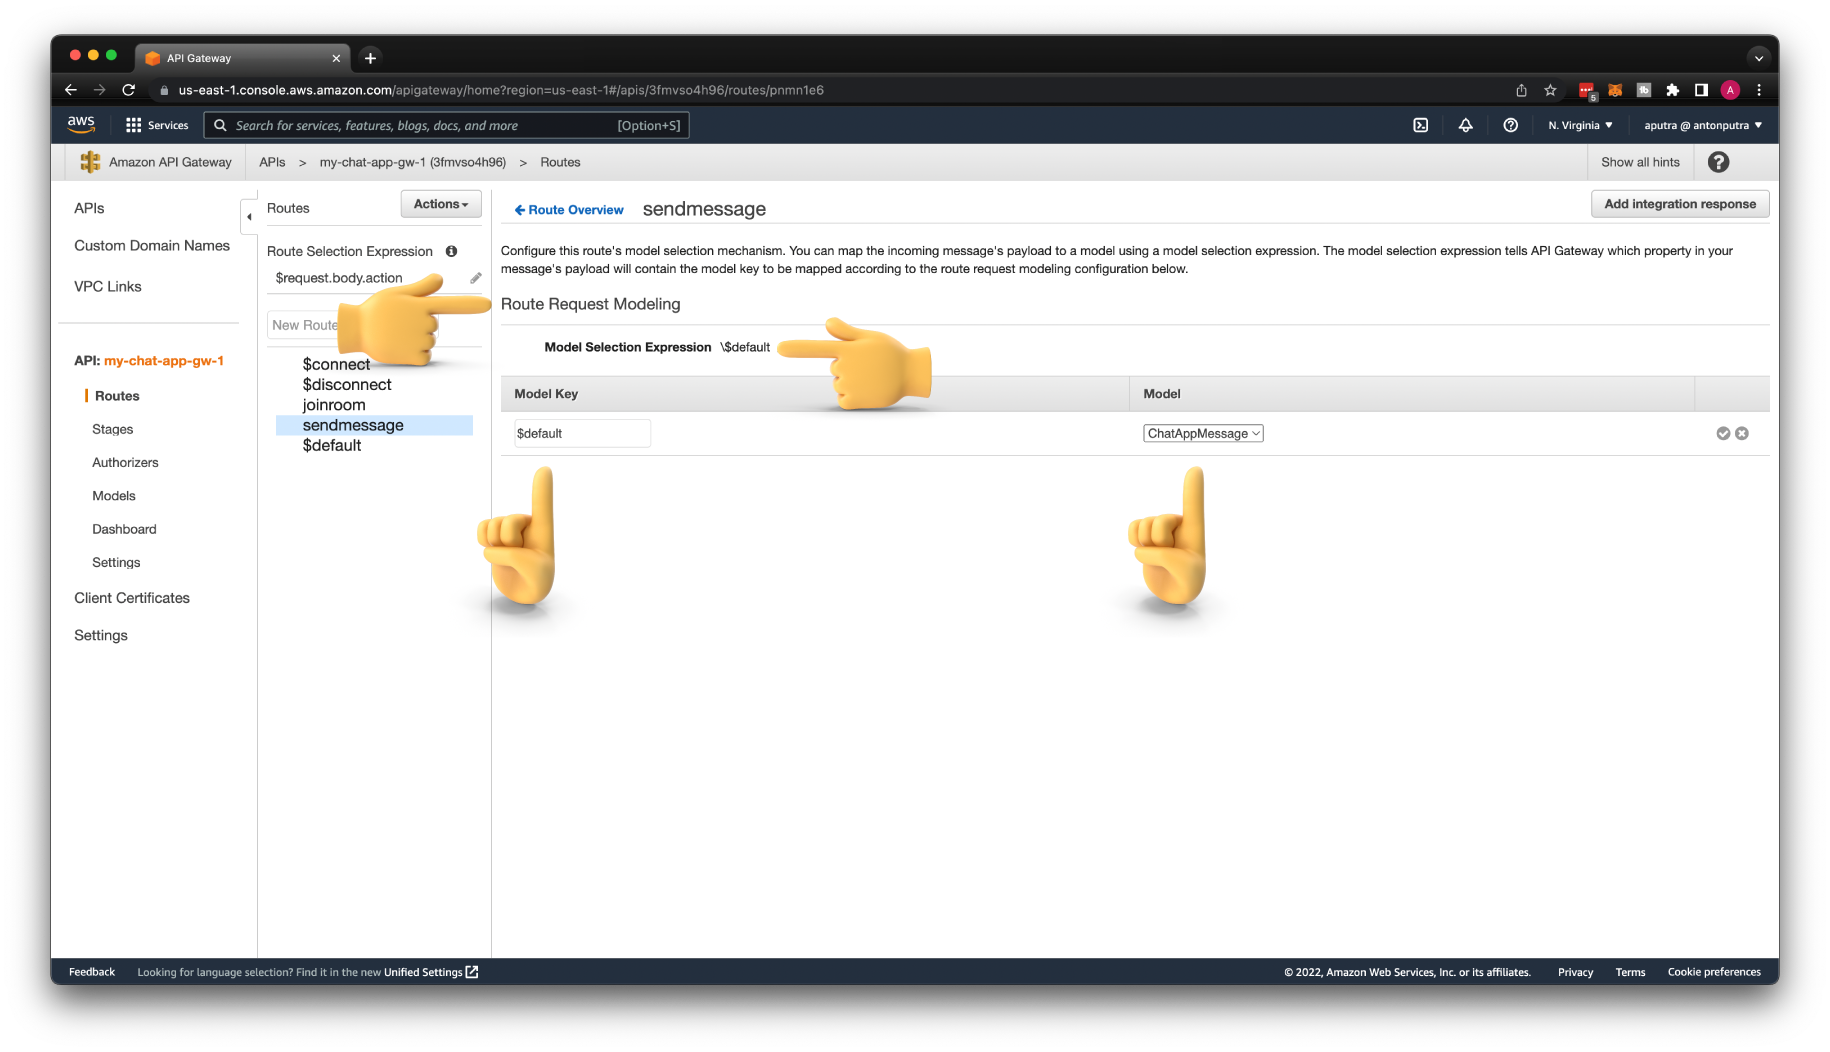
To validate a request, we need to create a Model with JSON schema describing the object that our API expects. Let's call it ChatAppMessage. For Content type, use application/json. And the JSON schema describes the message payload.
We can define what properties of the JSON object we expect and also types. For example, we require a message property in this request.
{
  "$schema": "http://json-schema.org/draft-04/schema#",
  "title": "ChatAppMessageModel",
  "type": "object",
  "properties": {
    "action": { "type": "string" },
    "message": { "type": "string" }
  },
  "required": [ "message" ]
}
Then you can apply this model to selected routes.
To apply this validation on the sendmessage route, you need to create a Model Selection Expression with a \$default key. Then for model key use the same $default and select the ChatAppMessage model.
Don't forget to Deploy API when you're done.
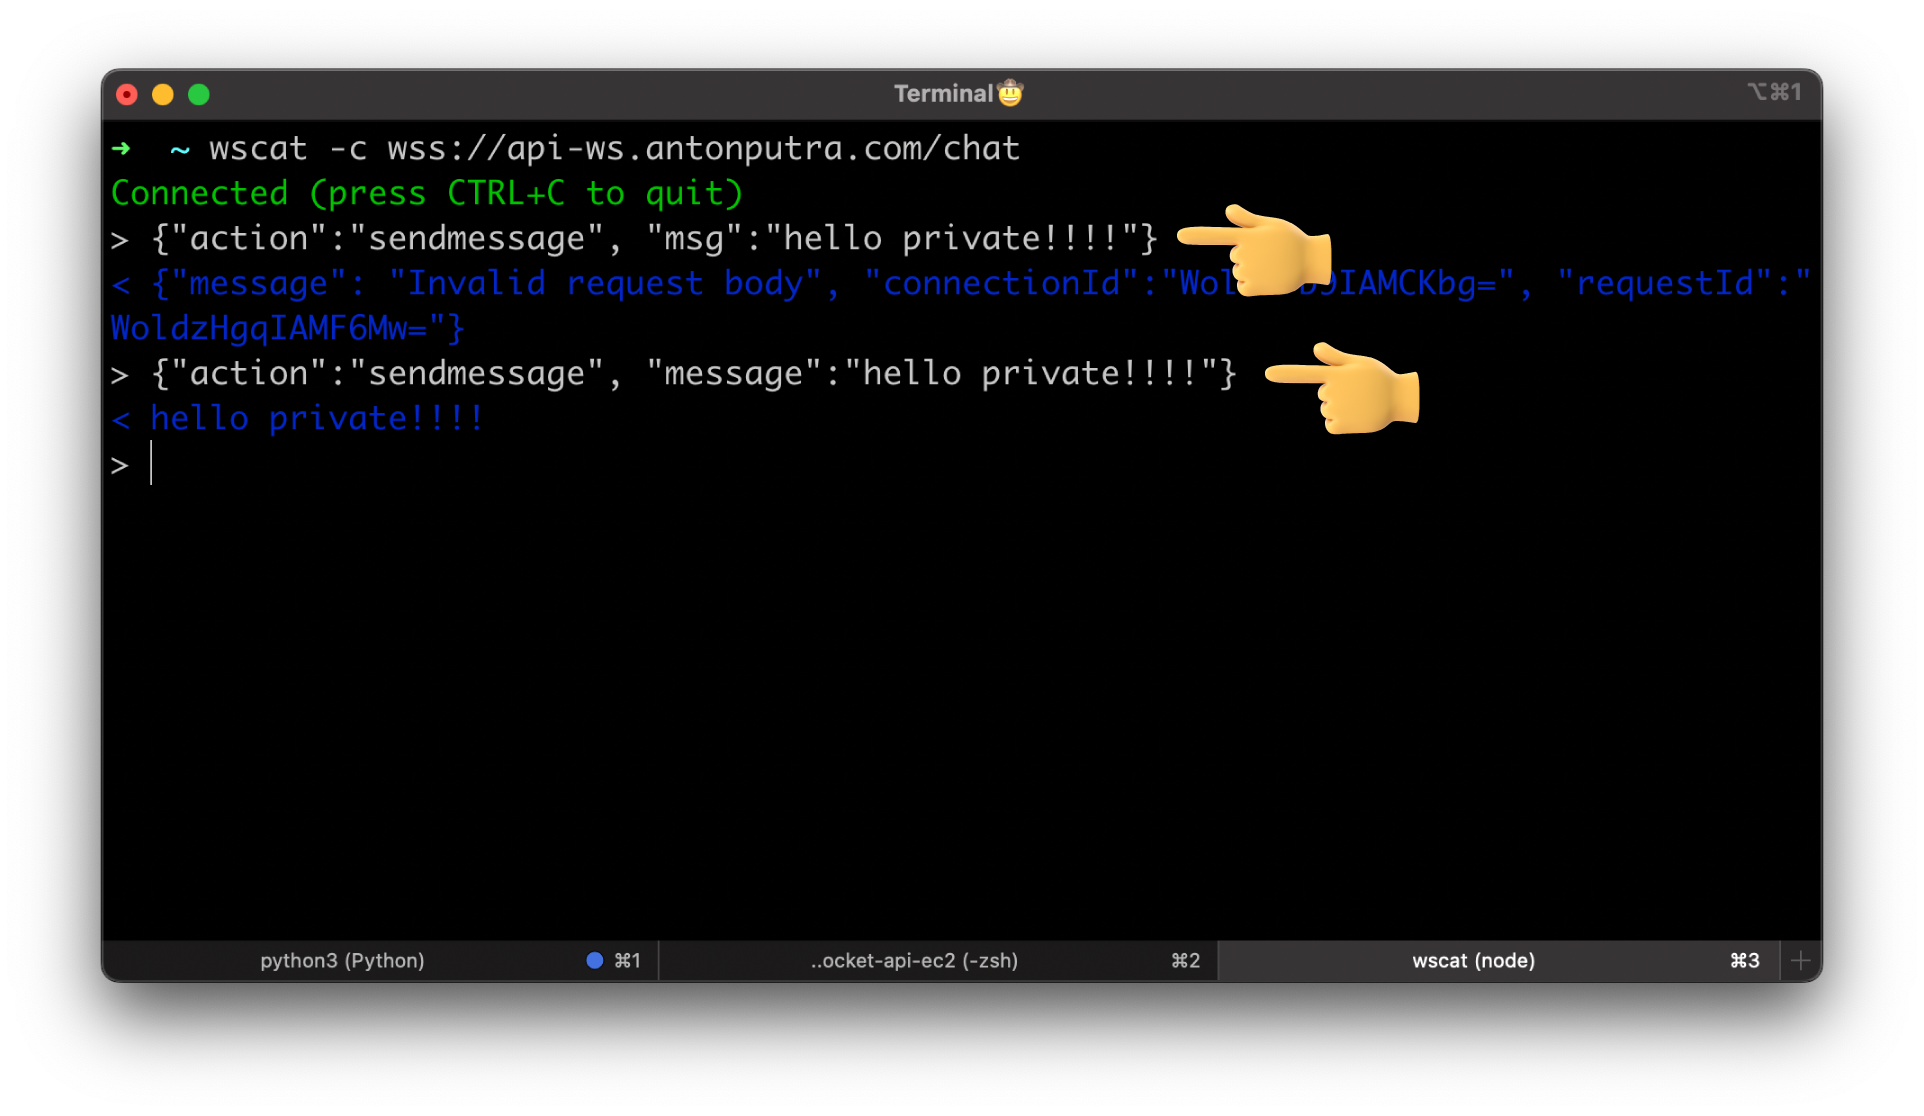
Let's test by sending a malformed message.
You can notice that we got an error in the terminal. However, if we send a valid JSON payload with a message property, we get a response with hello!!!!
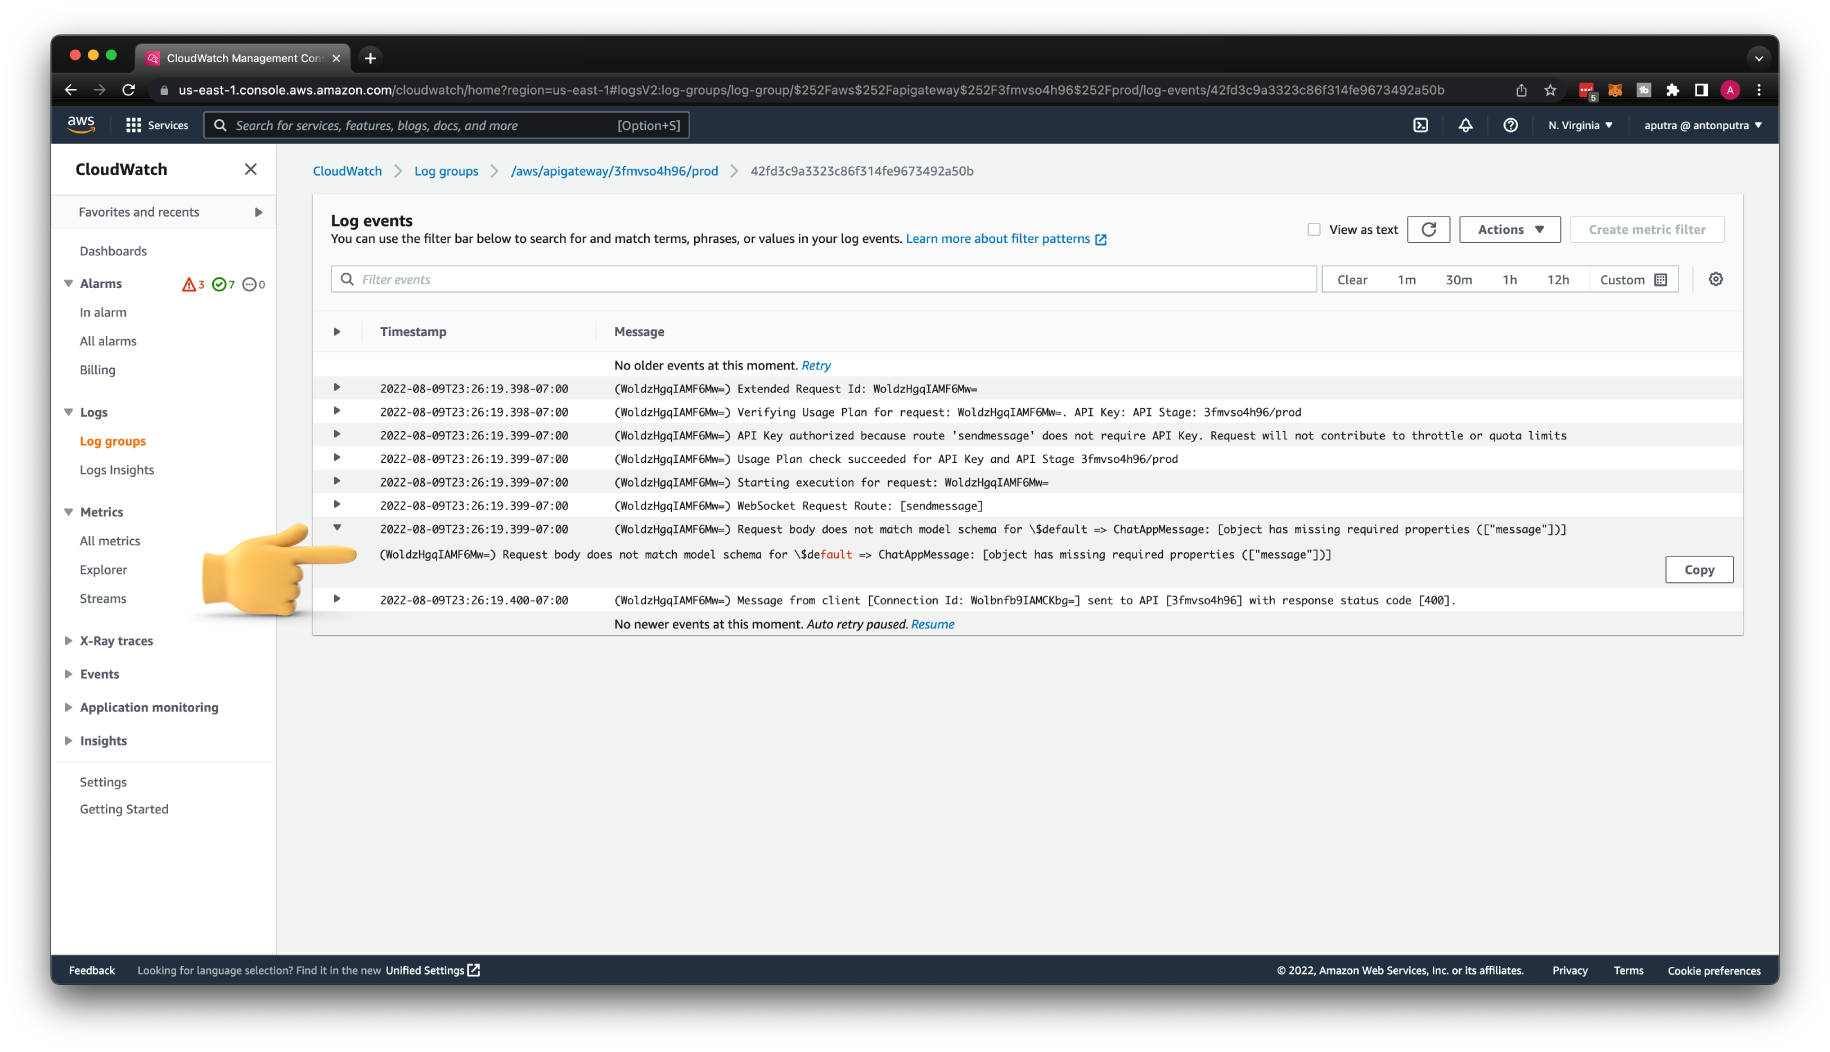
You can find an error in the CloudWatch logs. Request body does not match model schema... message is missing.
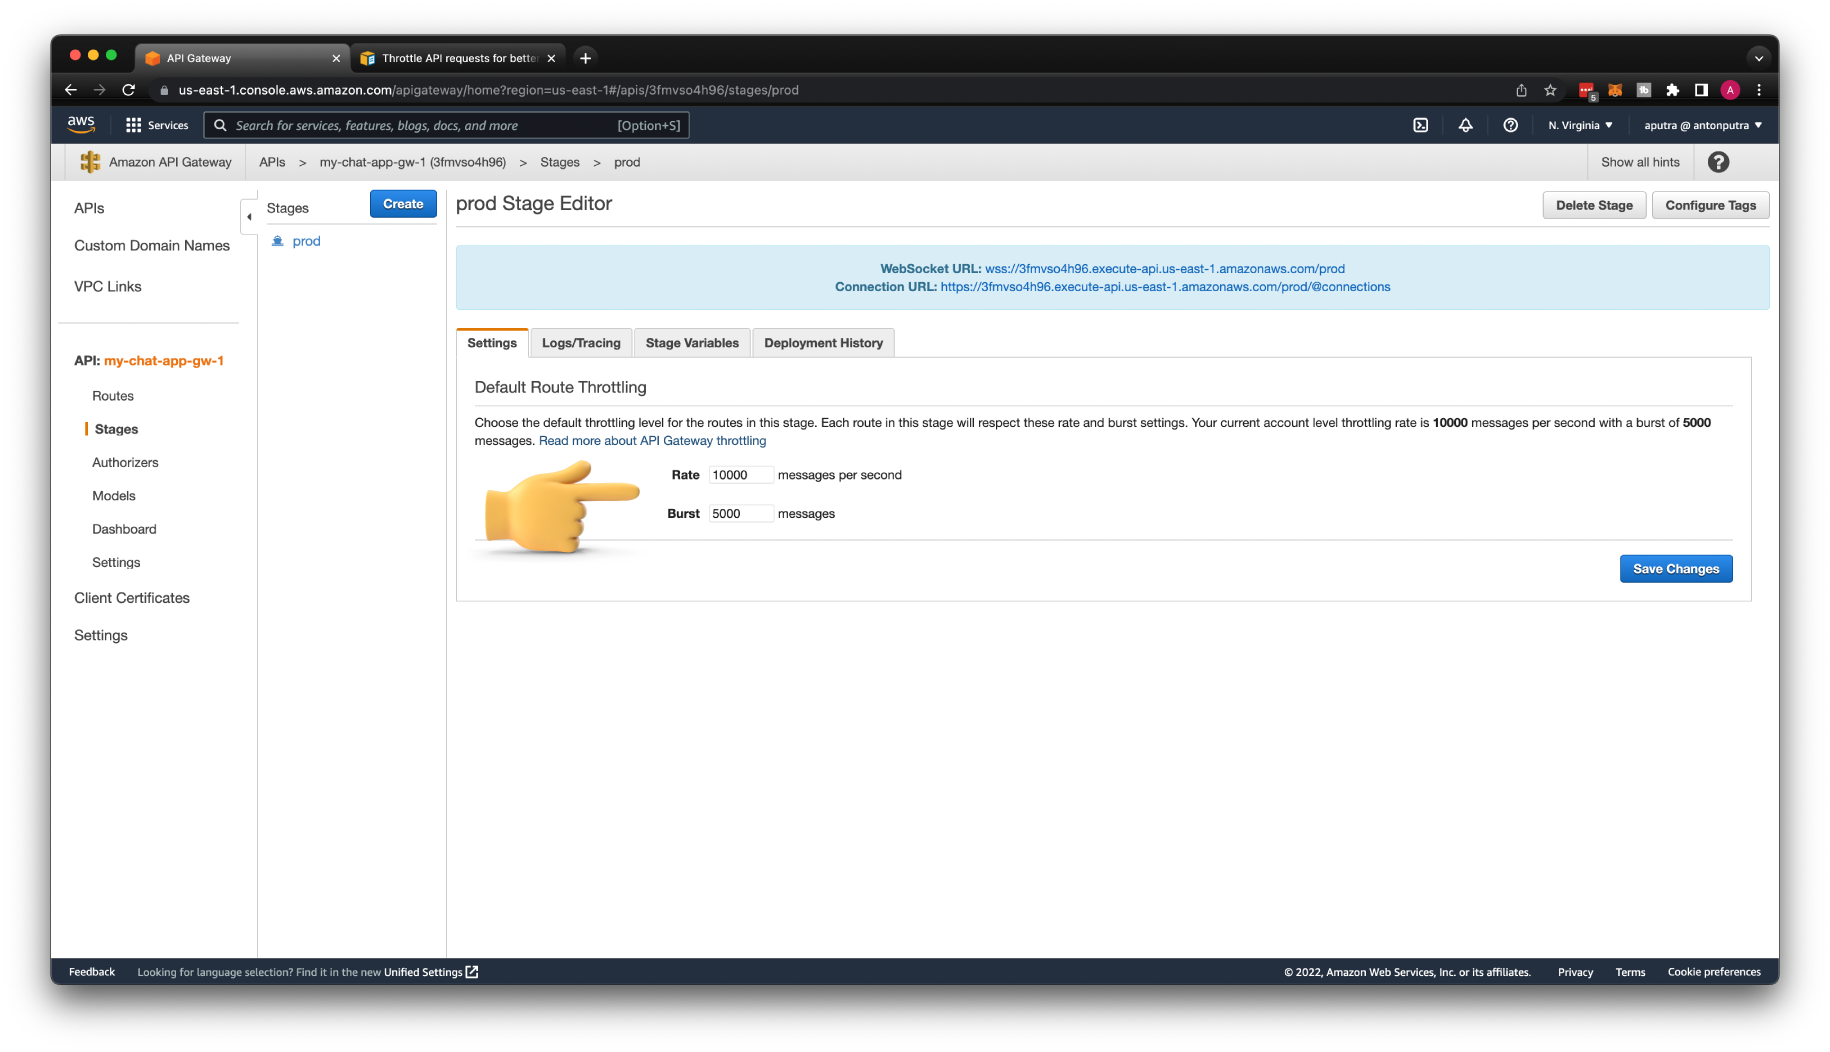
Throttle API requests
You can configure throttling and quotas for your APIs to help protect them from being overwhelmed by too many requests. Both throttles and quotas are applied on a best-effort basis and should be thought of as targets rather than guaranteed request ceilings.
Access Control to WebSocket API with Lambda Authorizer
API Gateway supports multiple mechanisms for controlling and managing access to your WebSocket API. Standard AWS IAM roles and policies, IAM tags, and Lambda authorizers. Which are Lambda functions that controls access to APIs. You can execute arbitrary code to validate the request before forwarding it to your backend.
Validation happens only on the $connect route. In this tutorial, we're going to create a simple Lambda function authorizer to validate the authorization header. If the client tries to connect without that header, we send a 401 Unauthorized error back.
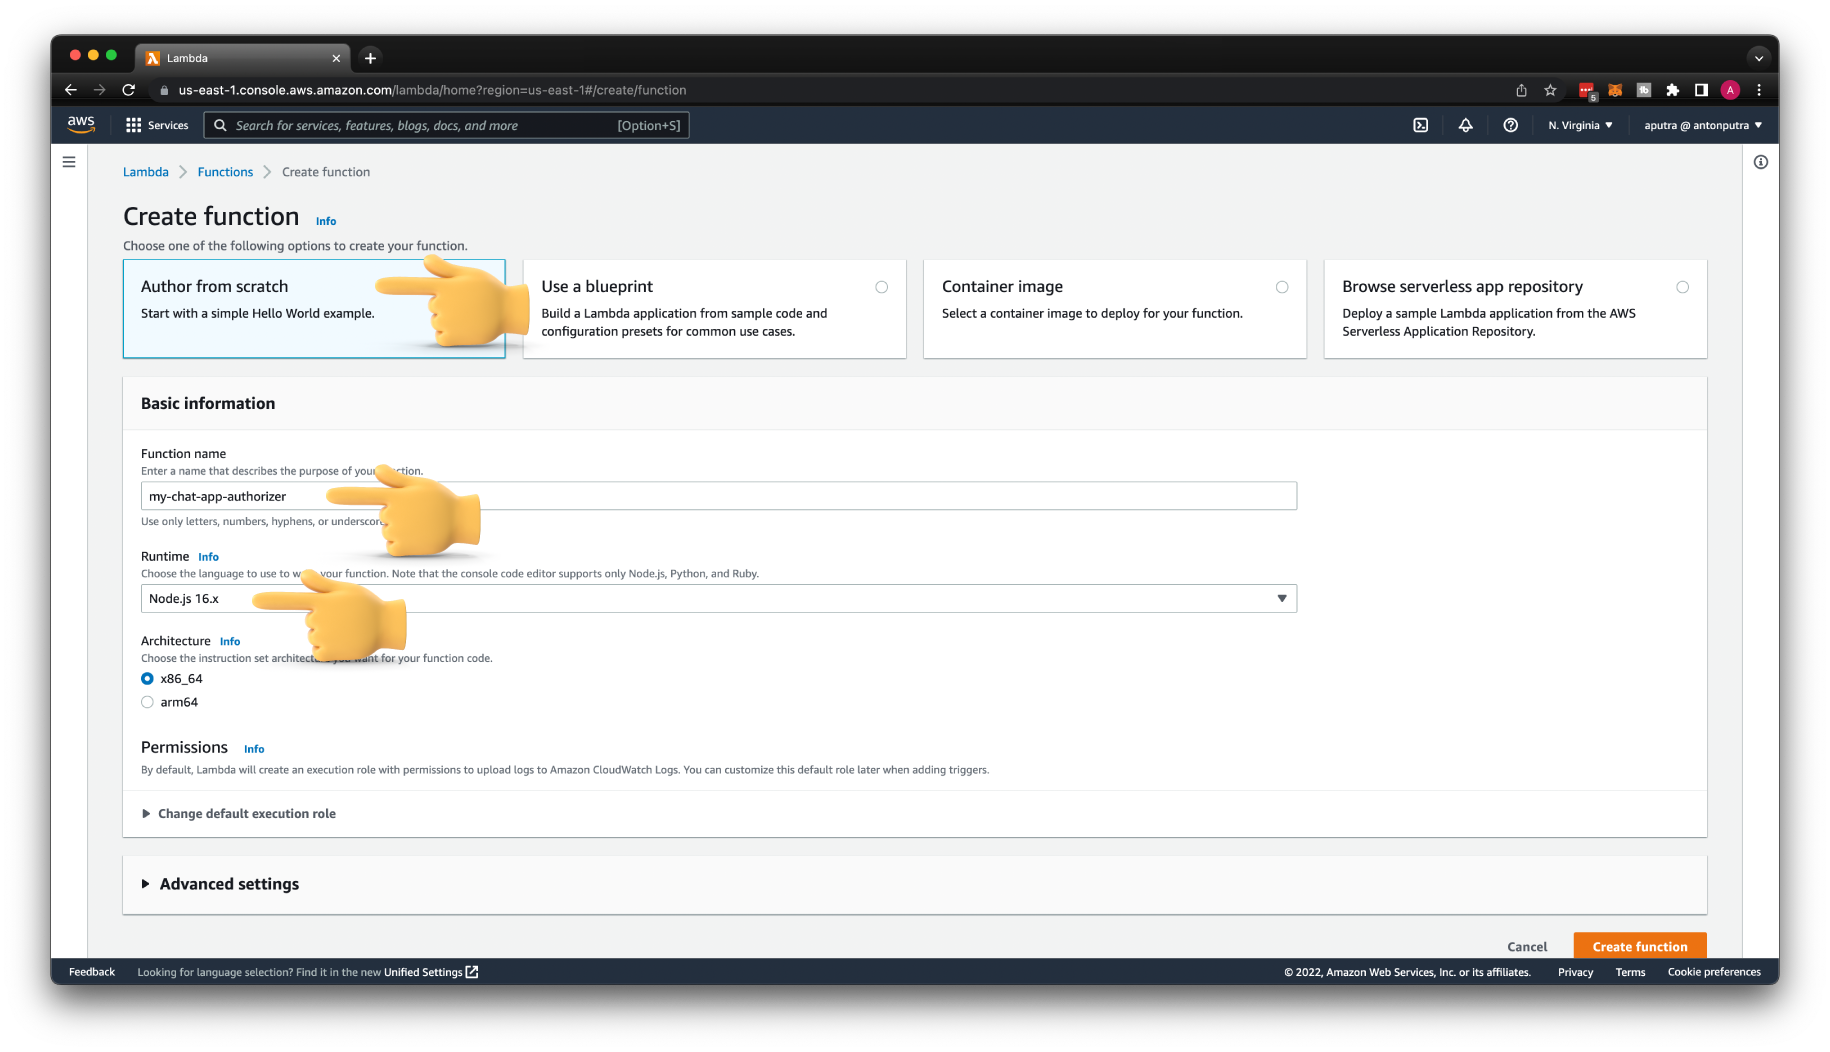
Let's create a function, and name it my-chat-app-authorizer. Keep default parameters and NodeJS runtime.
Get authorization header and check if it's equal to secret-token. If it is, then generate allow policy and authorize the request; otherwise, return Unauthorized.
Keep in mind that when you use Lambda integration, header names and query parameters are processed in a case-sensitive way.
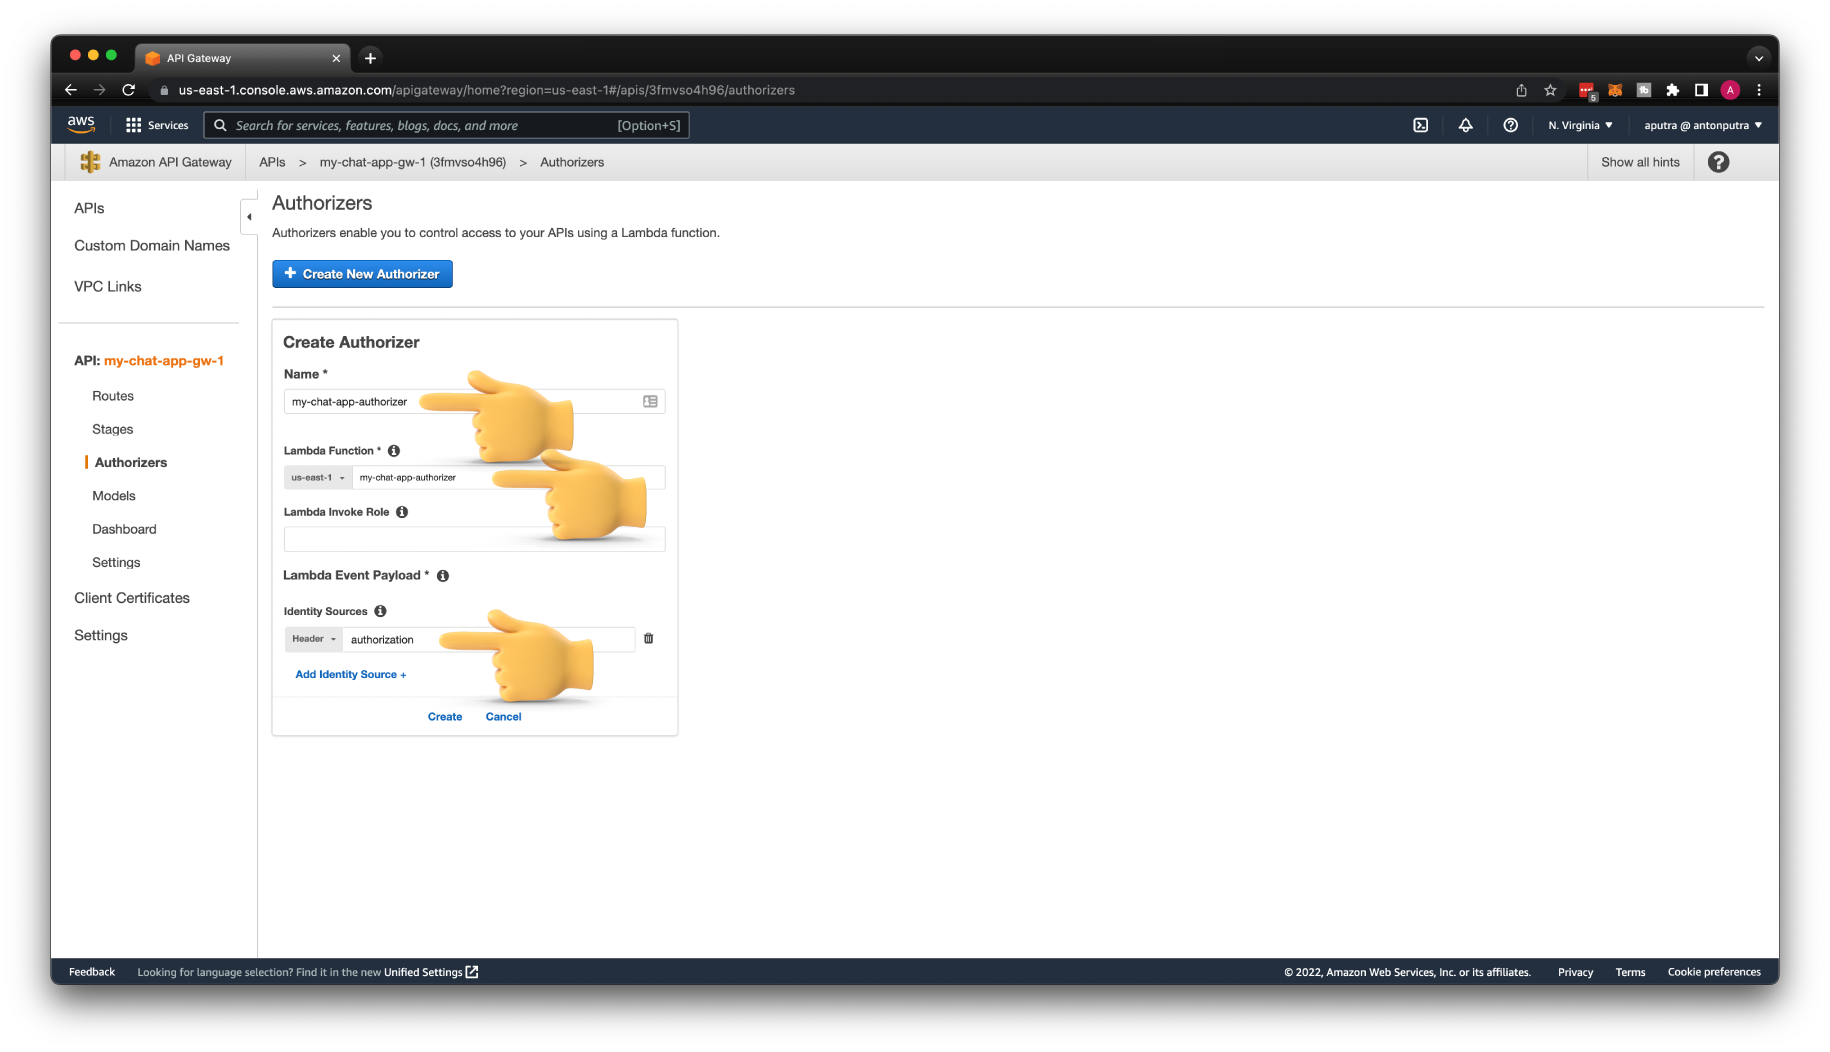
Go back to API Gateway and create a new authorizer. Give a name my-chat-app-authorizer. Then select the lambda function, and enter authorization for the Identity Source Header.
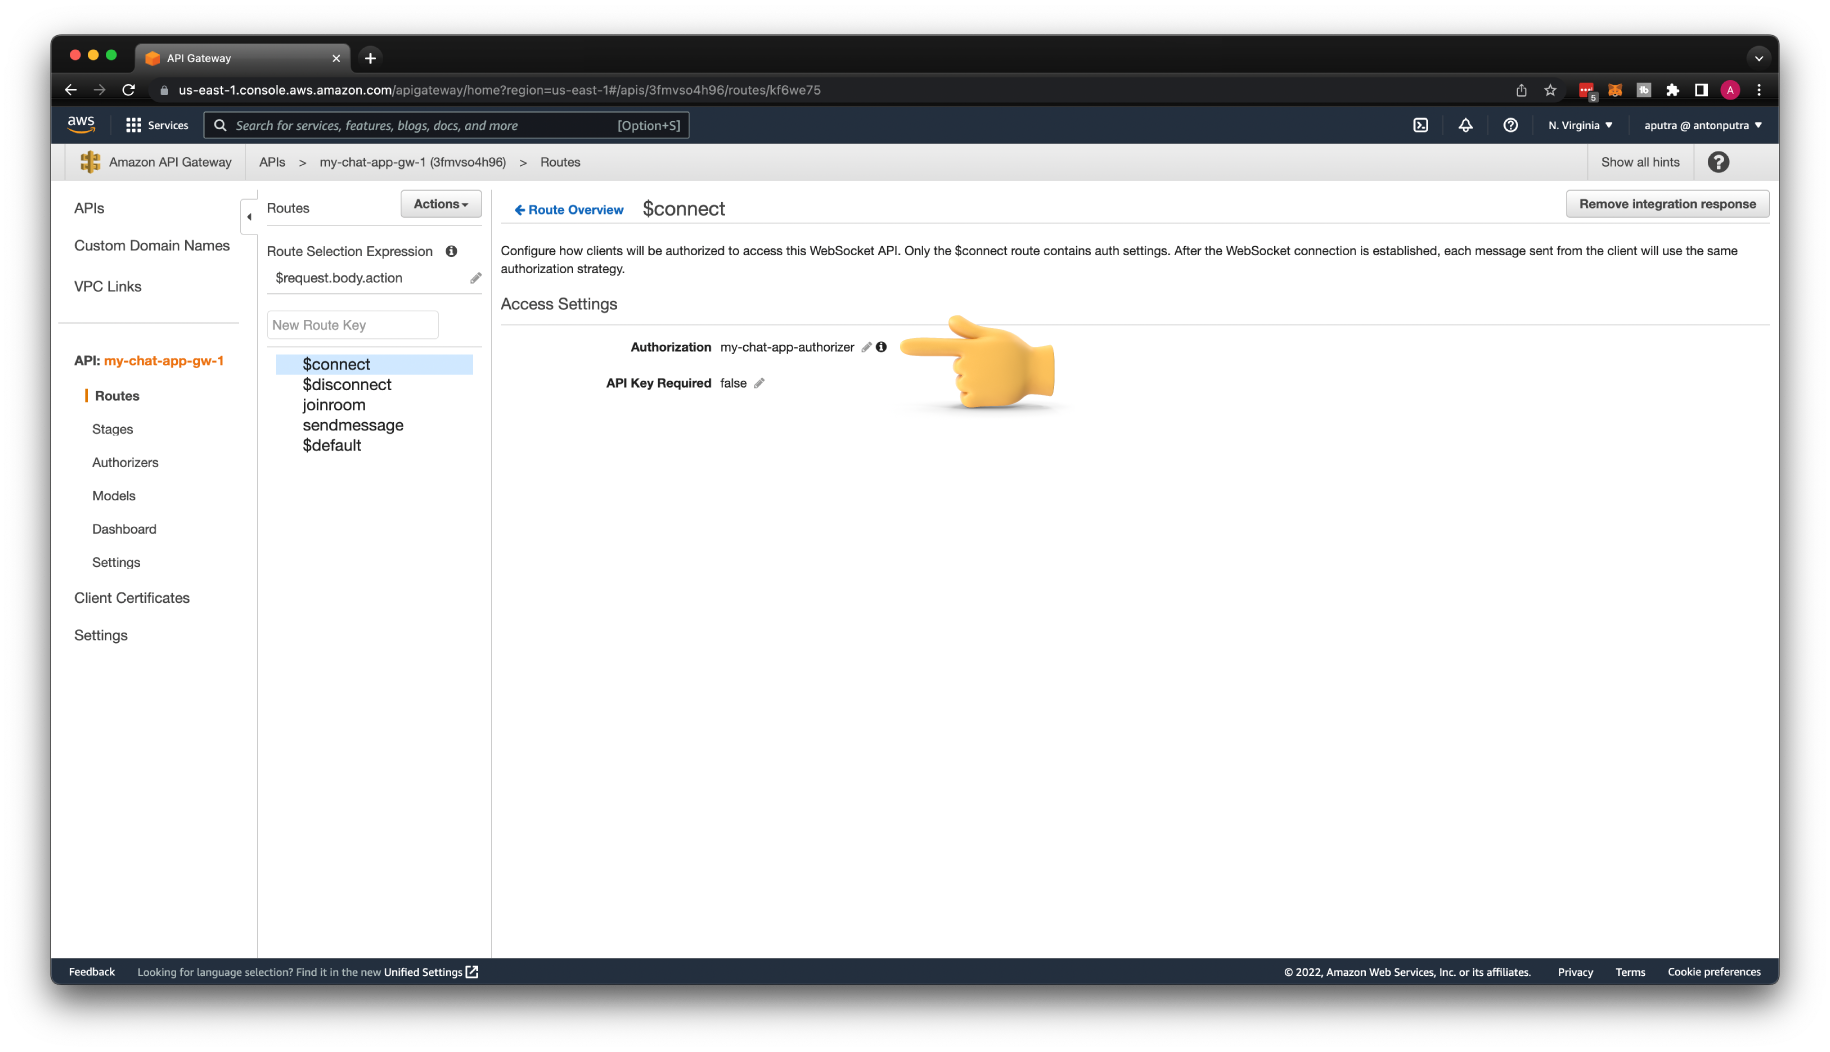
To apply authorization, go to the $connect route and select my-chat-app-authorizer authorizer. Then click Deploy API.
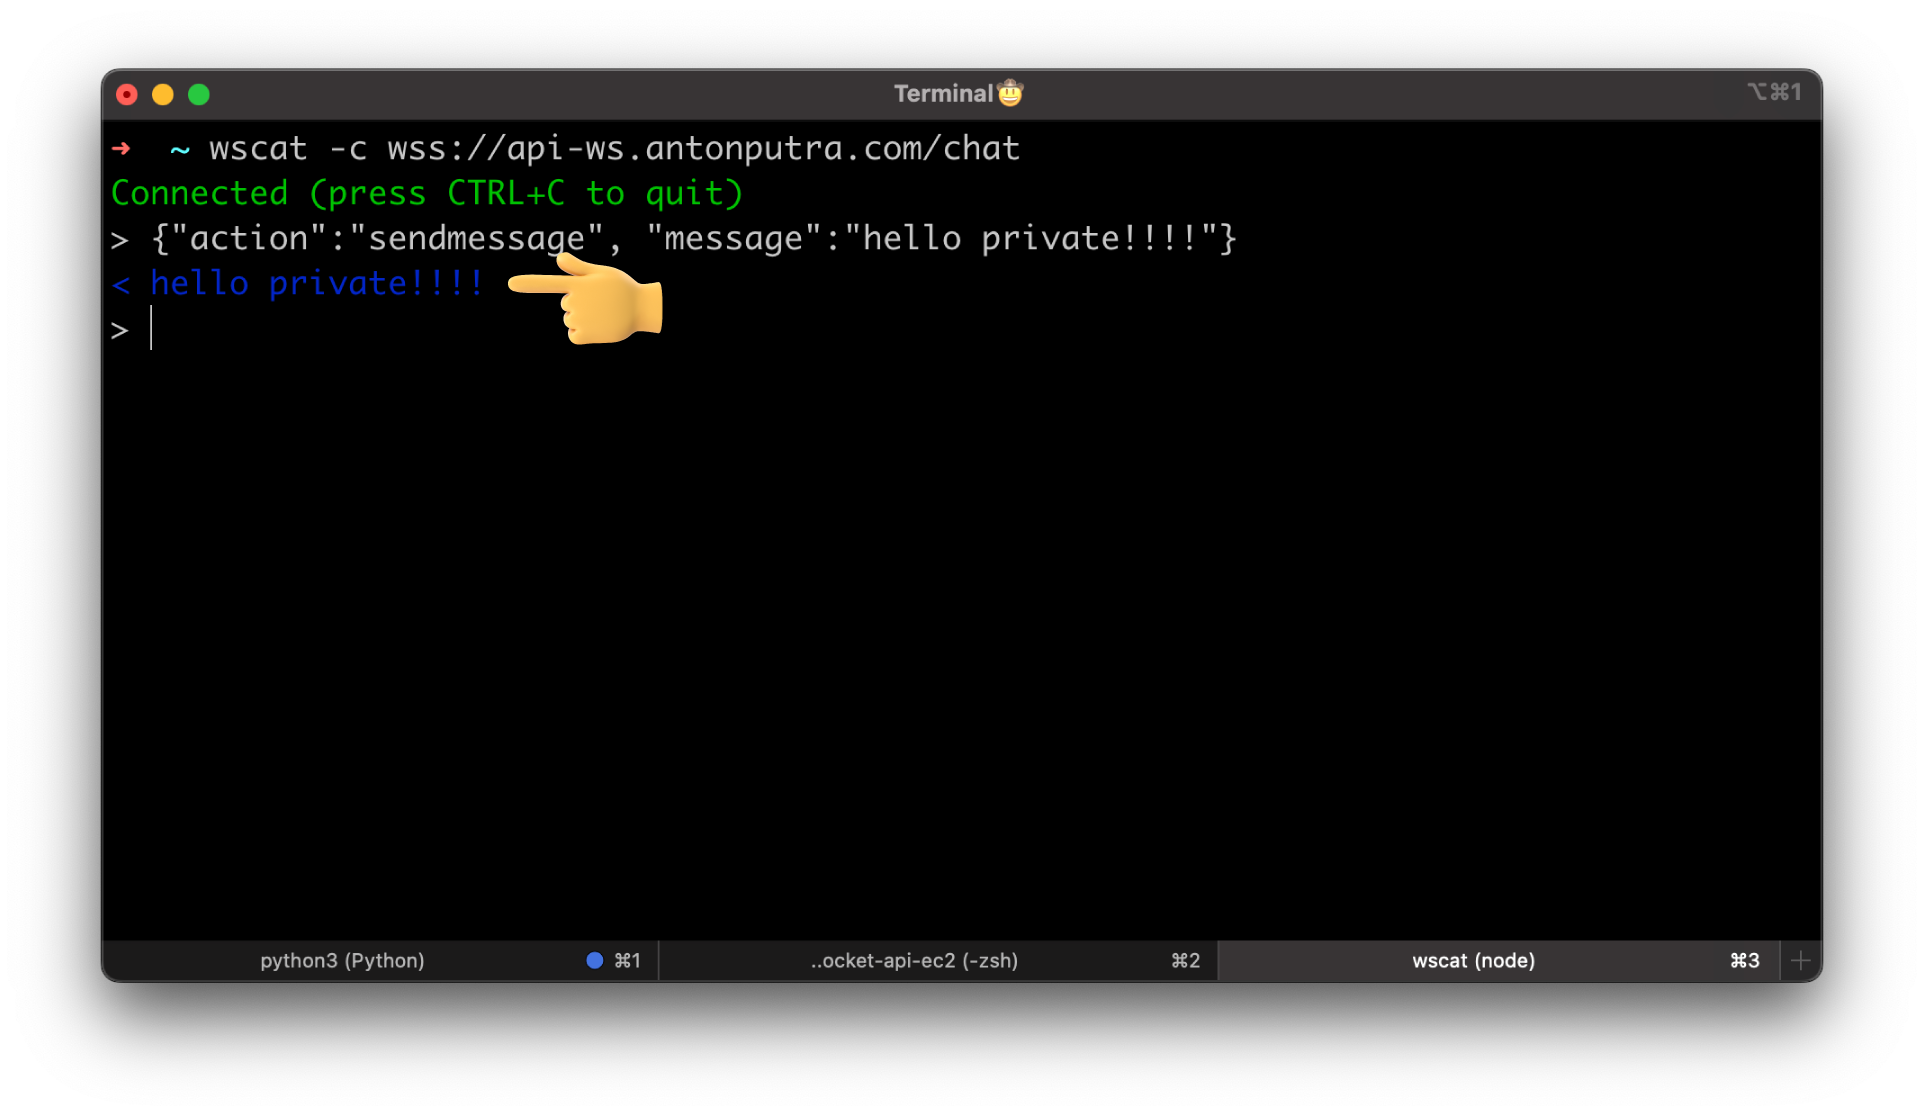
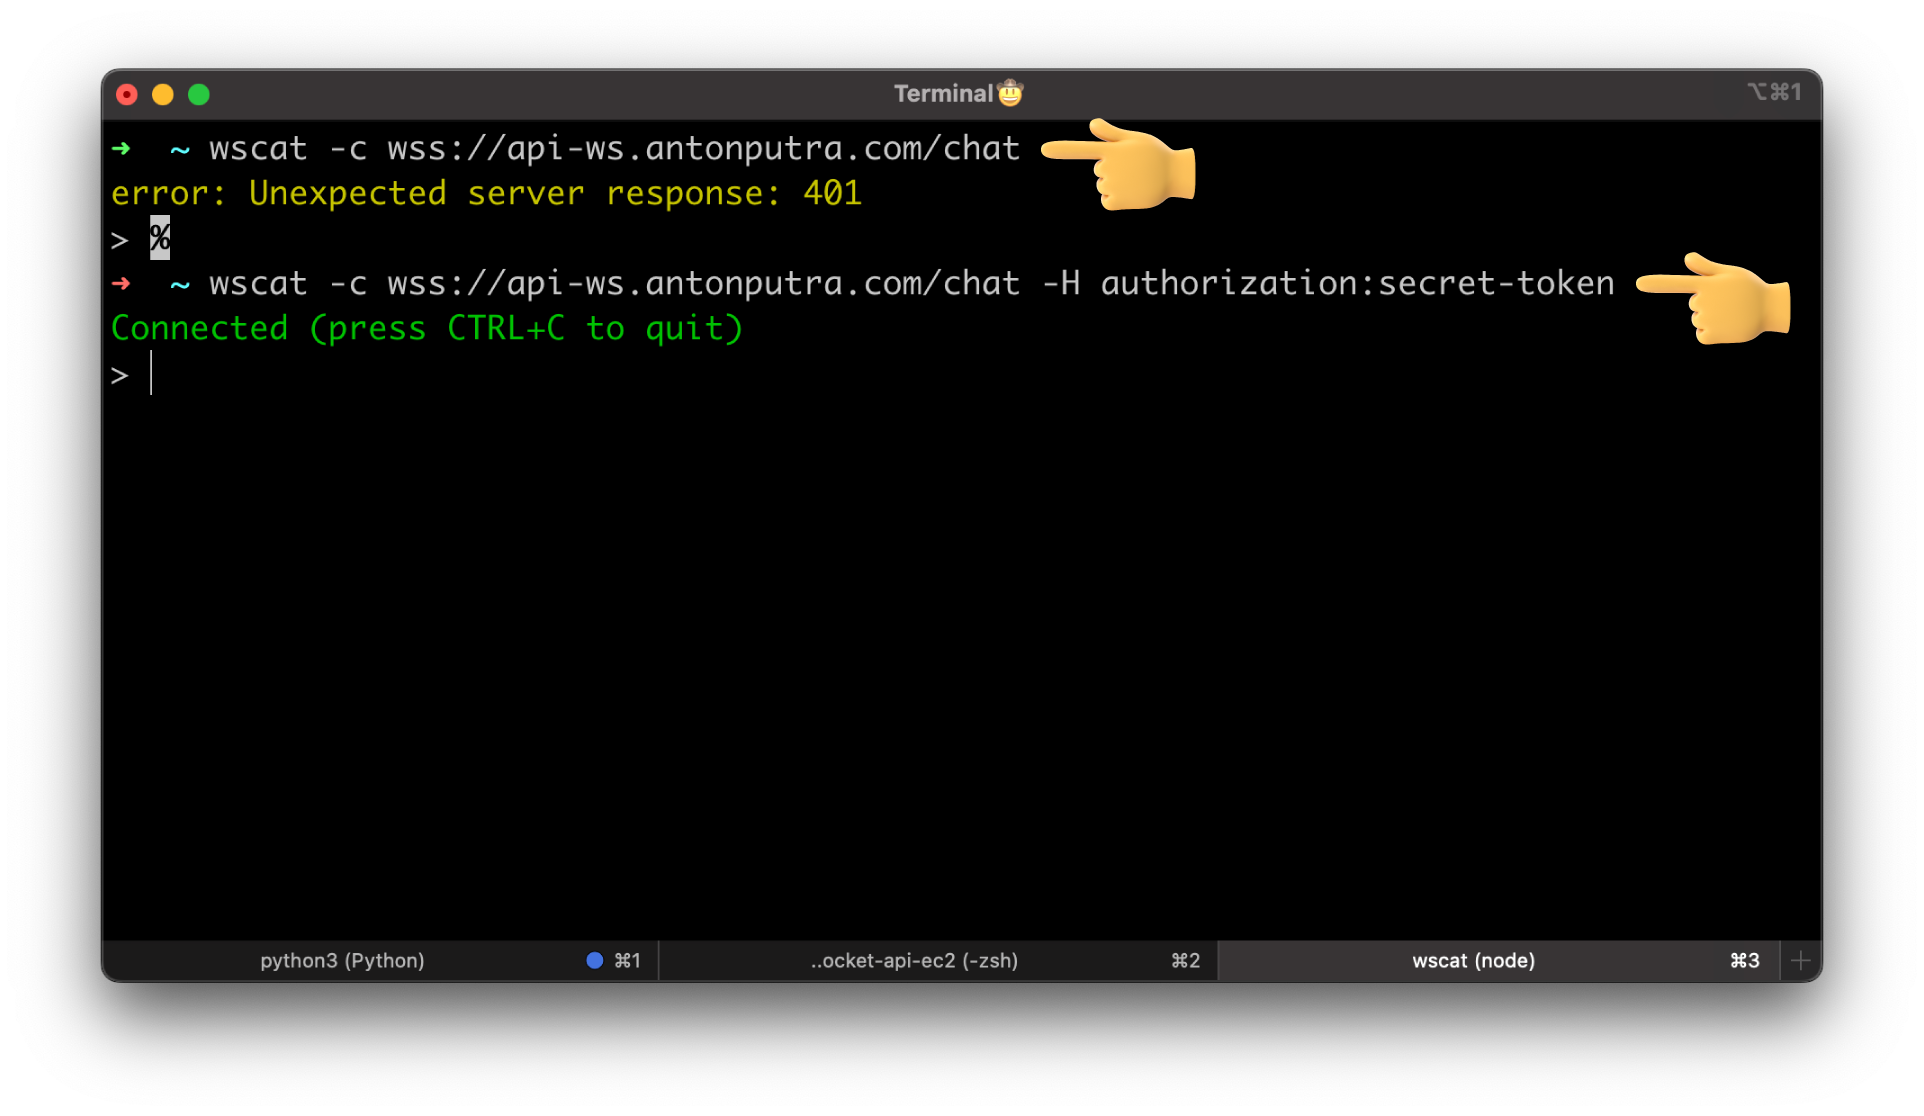
Now, if you try to connect without an authorization header, you'll get a 401 error.
wscat -c wss://api-ws.antonputra.com/chat
wscat -c wss://api-ws.antonputra.com/chat -H authorization:secret-token
Control Access and Quotas with Usage Plan & API Keys
You can use usage plans and quotas to control who can access your API. For that, you need to create a usage plan and define quotas and throttle rates.
For example, to create a usage plan with throttle and quota limits that resets at the beginning of the month, use the following command. You need to replace apiId with your API ID.
aws apigateway create-usage-plan \
--name "My Chat Usage Plan" \
--description "Usage plan for chat app" \
--throttle burstLimit=10,rateLimit=5 \
--quota limit=500,offset=0,period=MONTH \
--api-stages apiId=3fmvso4h96,stage=prod
When you create a usage plan, you need to take a note of the usage plan ID; we will use it later. In case you missed it, you can run the get-usage-plans command.
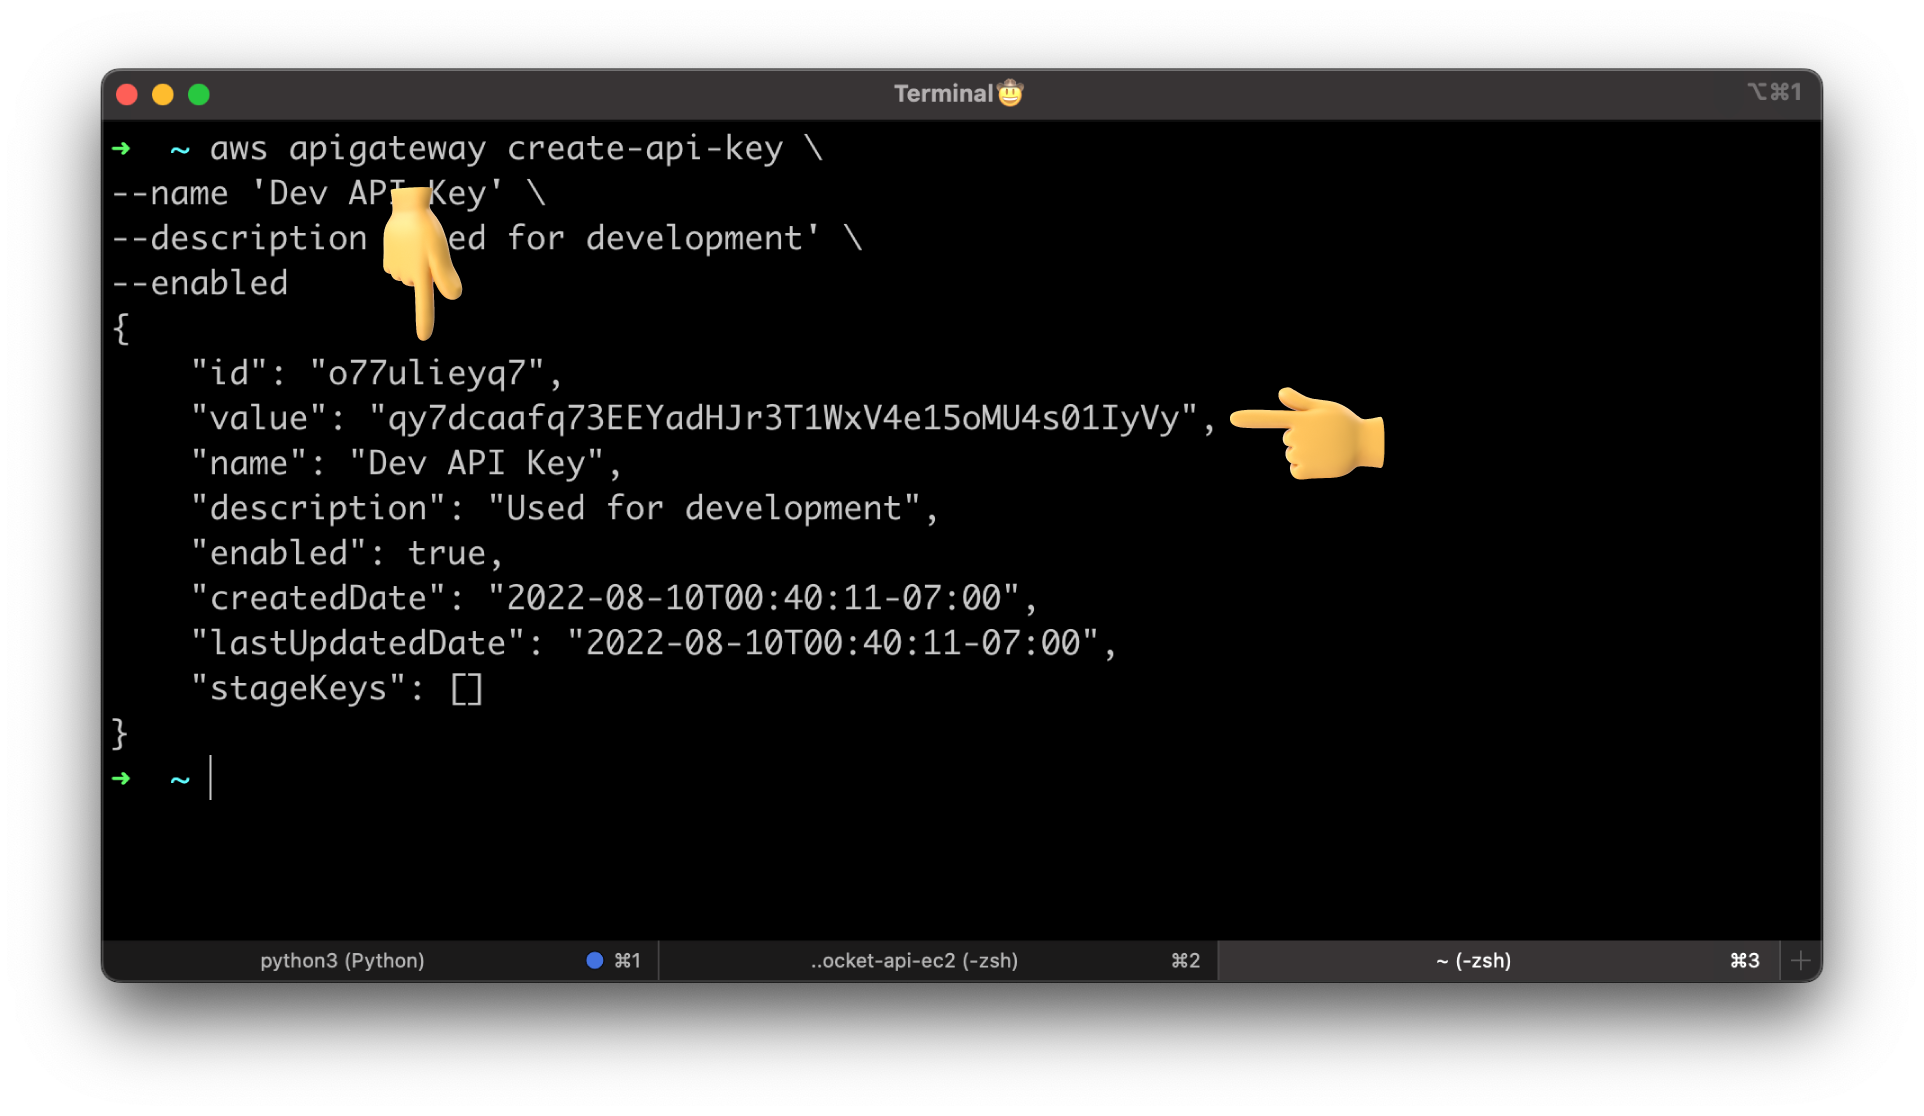
Then we need to create API Keys that we're going to distribute to the clients. There are other ways, including you can generate them dynamically. For this tutorial, let's create it manually for the dev user.
aws apigateway create-api-key \
--name 'Dev API Key' \
--description 'Used for development' \
--enabled
Take a note of the id and the value. We will use this value in the x-api-key header when we try to connect to the API Gateway.
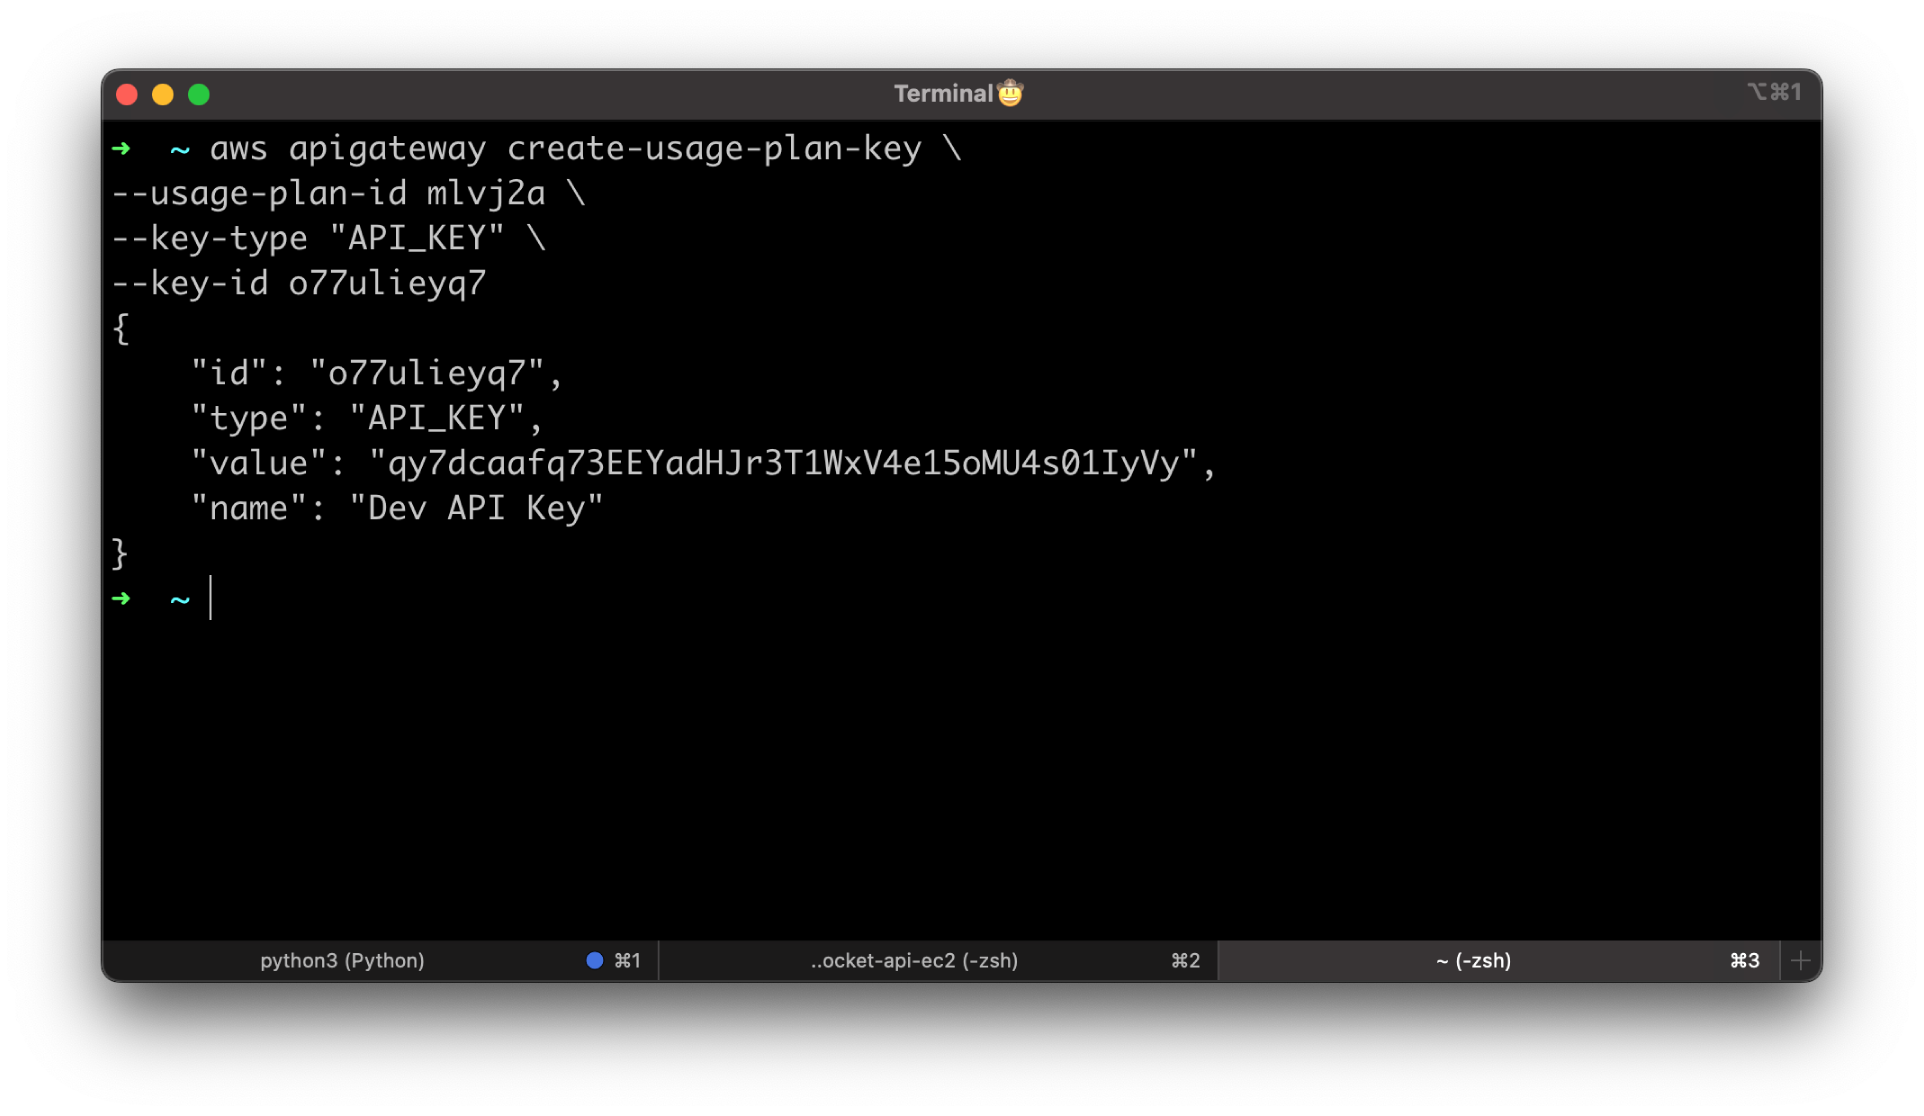
Then we need to associate an existing API key with a Usage Plan.
Update usage-plan-id and key-id to yours.
aws apigateway create-usage-plan-key \
--usage-plan-id mlvj2a \
--key-type "API_KEY" \
--key-id o77ulieyq7
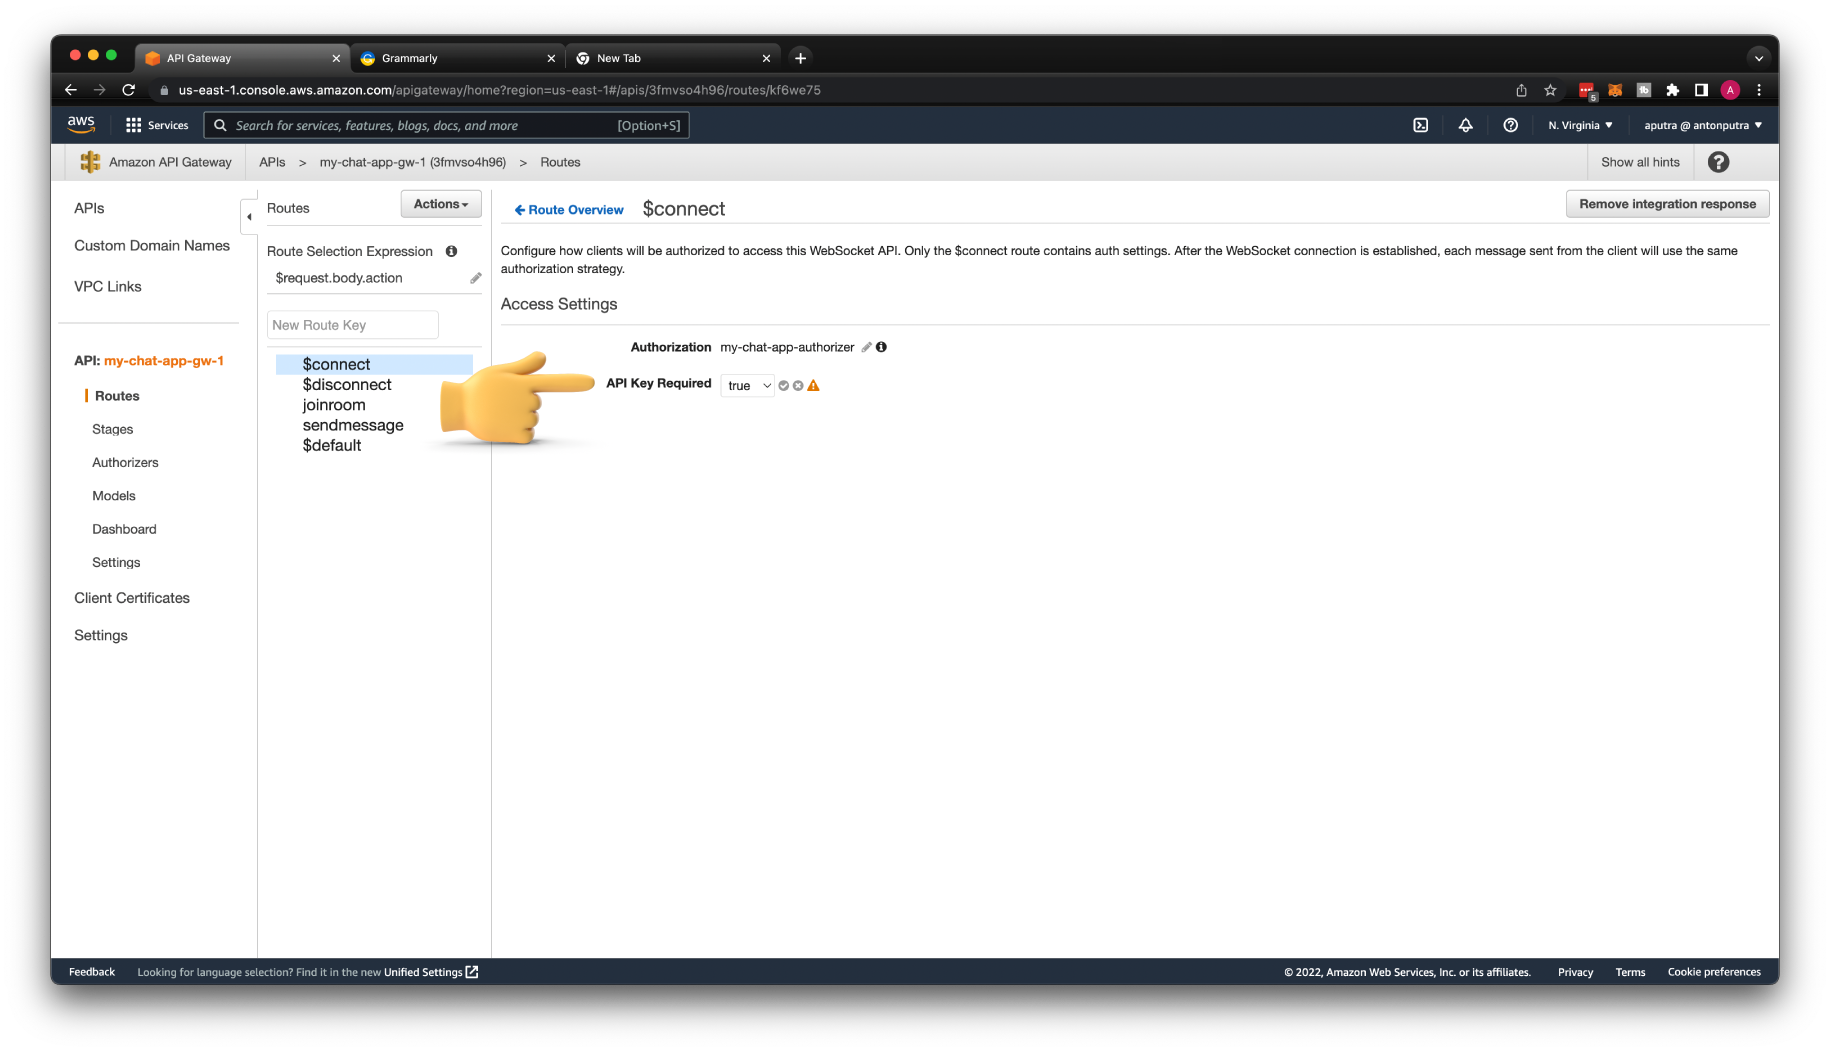
Finally, we need to update $connect route to use API Keys. Then Deploy API.
Time to test, if you try to connect with the authorization header only, you'll get a 403 error.
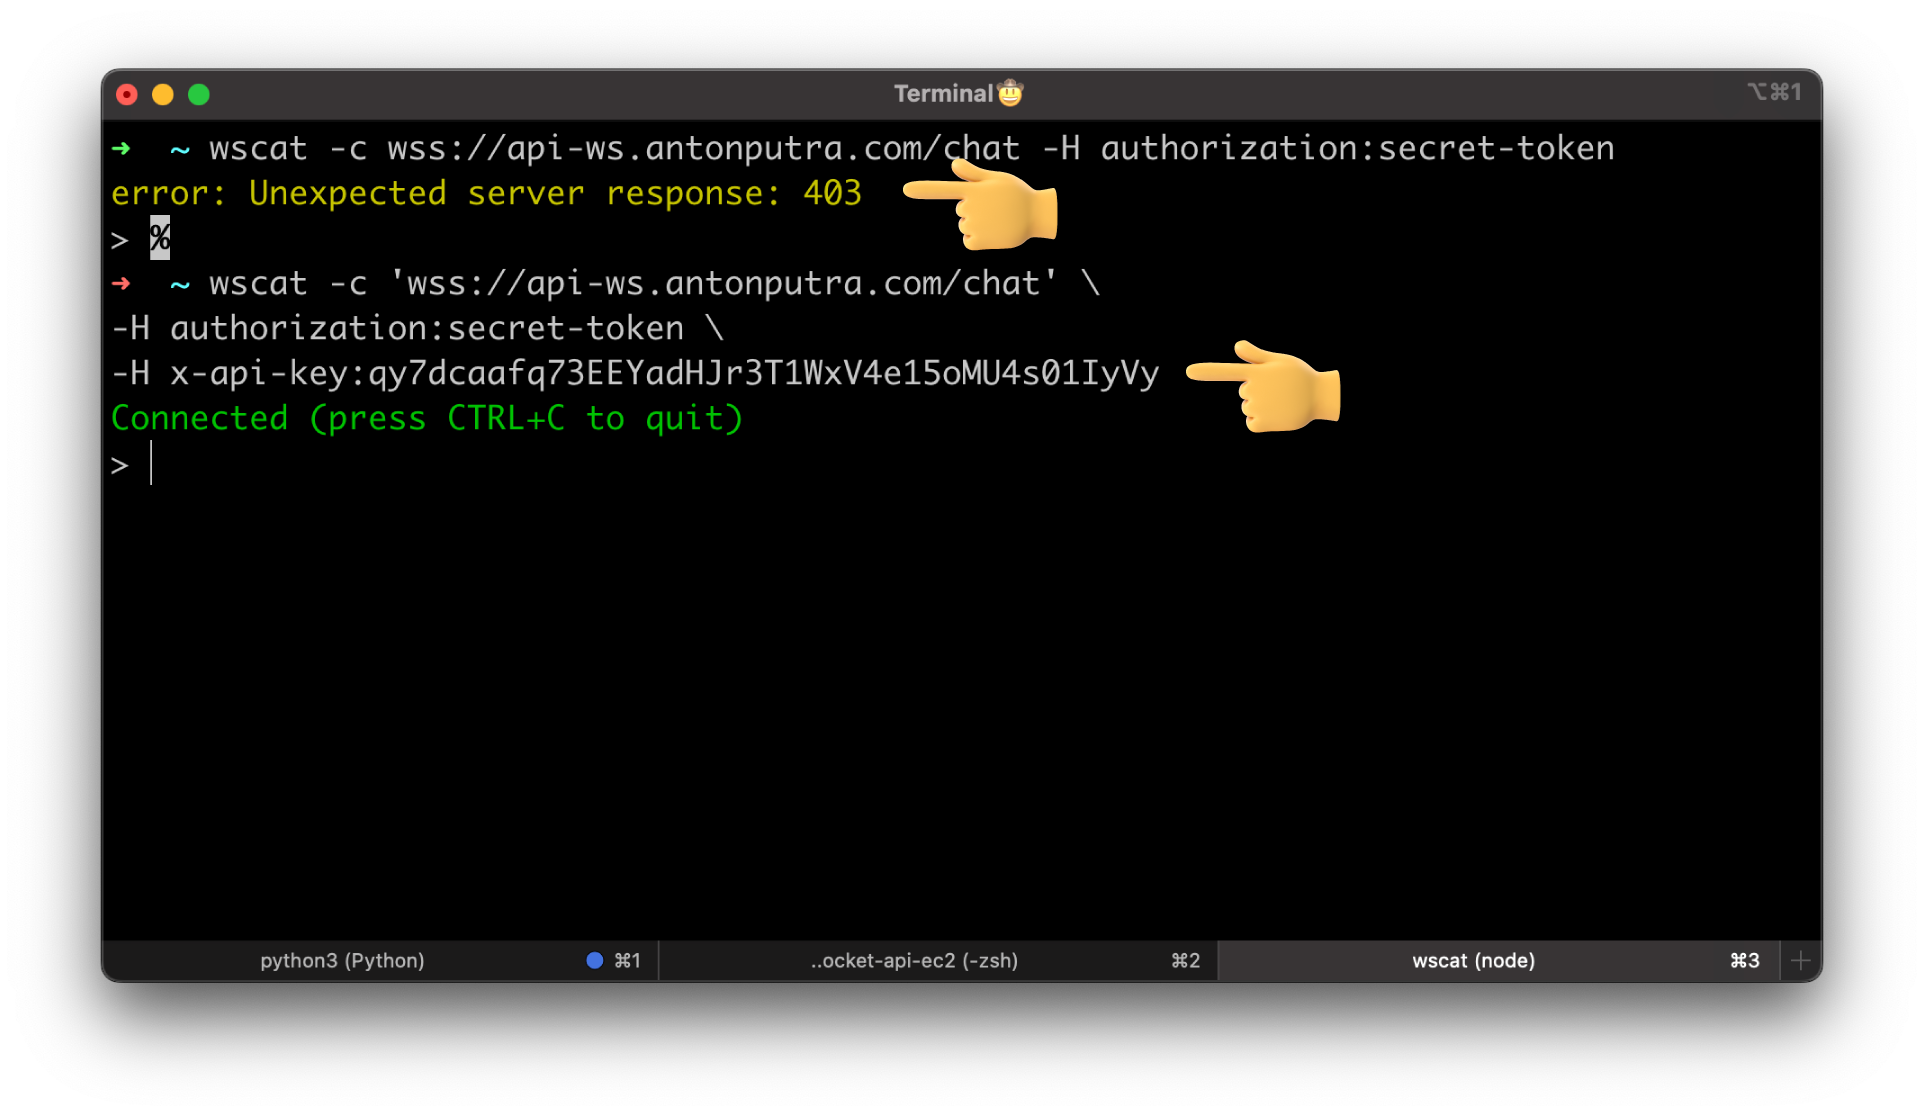
To connect, you need to use the x-api-key header with the value of the API Key.
wscat -c 'wss://api-ws.antonputra.com/chat' \
-H authorization:secret-token \
-H x-api-key:qy7dcaafq73EEYadHJr3T1WxV4e15oMU4s01IyVy
If you want to check usage and how many API calls remain on the usage plan, you can do it with the following command:
aws apigateway get-usage \
--usage-plan-id mlvj2a \
--start-date "2022-08-09" \
--end-date "2022-08-10"
It's not in real-time; you may want to wait a few hours.